by Bobbi Smith

Give Thanks Autumn Canvas by Bobbi Smith
- Materials
- Instructions
- Ranger Black Adhesive Foam Roll
- Dina Wakley Media Palette Knife
- Tim Holtz® Alcohol Ink Applicator
- Ranger Paper Creasers
- Tim Holtz Distress® Sprayer
- Ranger Heat it™ Craft Tool
- Tim Holtz® Detail Waterbrush
- Ranger Mini Blending Tool
- Ranger Non-Stick Craft Sheet™
- Archival Ink™ Jet Black
- Ranger Multi-Medium Matte
- Tim Holtz® Alcohol Ink Mushroom
- Ranger Glossy Accents™
- Ranger Texture Paste: Transparent Matte
- Tim Holtz® Distress Spray Stain Antique Linen
- Tim Holtz® Distress Ink Ground Espresso
- Tim Holtz® Distress Markers: Spiced Marmalade, Ripe Persimmon, Rusty Hinge, Peeled Paint, Forest Moss, Gathered Twigs, Ground Espresso
- Ranger Watercolor Paper
- Ranger #8 Manila Craft Tags
Instructions

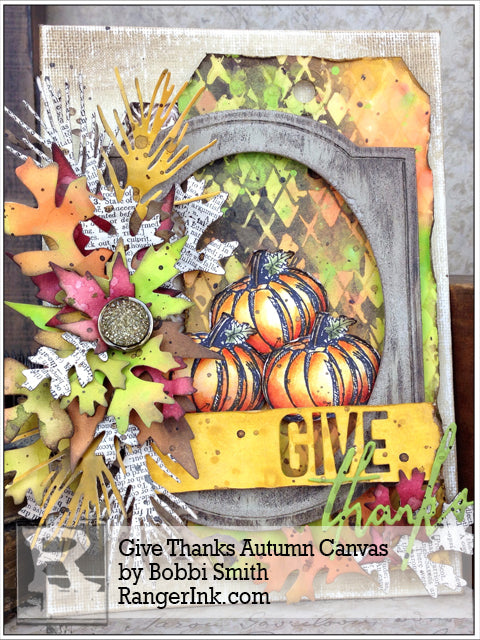
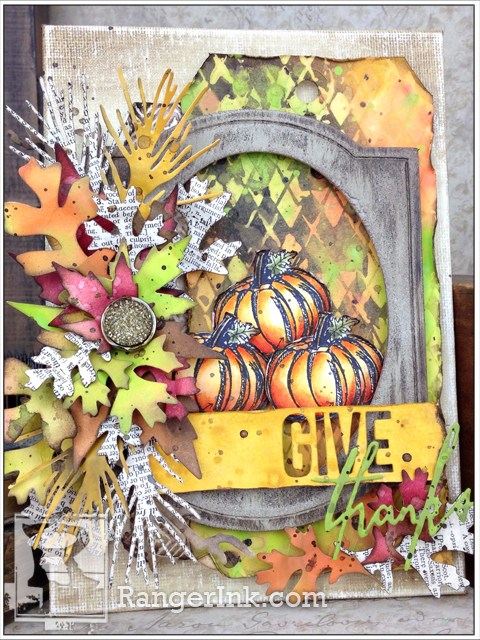
Hi everyone, Bobbi here! I’m so happy to be with you on the Ranger Blog today! I’m going to show you how to create a fun dimensional Thanksgiving/Autumn canvas home decor piece!
It could also easily be transformed into a card, even with a different sentiment.

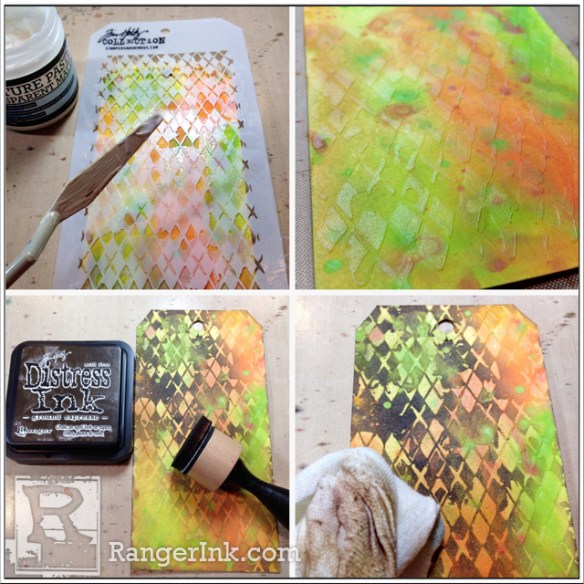
Step 1. Dab Spiced Marmalade, Rusty Hinge, Fossilized Amber, Peeled Paint and Twisted Citron Distress Paint onto a Non-Stick Craft Sheet, and lightly mist the paint with water. Press the front of the #8 Manila Tag into the paint mixture until covered. Dry with a Heat it Tool. To add more distress, pickup droplets of color off the Non-Stick Craft Sheet with manila tag, blotting to pick up the color (not swiping), then drying with heat tool.

Step 2. Place the Argyle Layering Stencil over the top of your colored manila tag. Spread a thin layer of Transparent Matte Texture Paste through stencil and set aside to air dry. Make sure to immediately clean your layering stencil and spreading tool right after use. The paste is initially opaque, then dries clear. You can see all the great color and splatters through the dried paste! For our purposes, the paste is going to act more as a resist technique today. After the paste has thoroughly air dried, apply Ground Espresso Distress Ink with a Blending Tool and Foam over various portions of the tag. Buff off any remaining ink on the argyle pasted pattern with a dry cloth.

Step 3. To further distress, spritz a little water with a Distress Sprayer on tag and dry with a heat tool. Then splatter watered-down Ground Espresso Distress Paint with paintbrush to tag and dry with heat tool.

Step 4. For this step, we will apply the same principles as in step one of coloring the tag. We are making swatches for the Autumn leaves to be cut from. Here are some color combinations that I used: Spiced Marmalade/Rusty Hinge, Twisted Citron/Peeled Paint/Spiced Marmalade, Aged Mahogany/Twisted Citron, Fossilized Amber/Spiced Marmalade/Rusty Hinge… have fun with it.
The color combinations are endless. Dab various colors of Distress Paint to Non-Stick Craft Sheet and lightly mist the paint with water. Press the front of the Manila Cardstock into the paint mixture until covered. Dry with a Heat it Tool. To add more distress, pick up droplets of color off the Non-Stick Craft Sheet with manila cardstock, blotting to pick up the color (not swiping), then drying with heat tool. Splatter watered-down Ground Espresso Distress Paint with paintbrush to manila cardstock and dry with heat tool. If the splatters are not drying fast enough, you can always blot them with a dry towel in addition to applying heat.

Step 5. Attach vintage book paper to top of Manila Cardstock with an even coat of Multi Medium Matte. Let dry thoroughly. You can speed this process up with the heat tool. Diecut several of the large and medium leaves, branches and stalks of wheat using Tim Holtz Sizzix Fall Foliage Thinlit dies using the vintage book paper and colored manila cardstock. Splatter watered-down Ground Espresso Distress Paint with paintbrush to diecut leaves, branches and wheat stalks then dry with heat tool. Shade outer edges of cutouts with Ground Espresso Distress Ink and an Ink Blending Tool with Foam. Shape and bend leaves, branches and wheat stalks so they look more lifelike.

Step 6. Die cut a piece of Grungeboard using Sizzix Tim Holtz Cameo Frame with the largest Sized Oval inserted in Mover and Shaper. Apply an even coat of Antique Linen Distressed Paint to diecut Cameo Frame. To speed up drying time, apply a little heat to Cameo Frame with the heat tool, but not too much. You don’t want it to warp. After dry, apply a coat of Frayed Burlap Distressed Paint to Cameo Frame. Then let dry or apply a little heat with heat tool. Very lightly apply a little Ground Espresso Distress Paint barely skimming across the surface, hitting and missing areas on the cameo frame. Then let dry or apply a little heat with heat tool.

Step 7. Here is why I applied three different colors of Distress Paint to the Cameo Frame. Sand the Cameo Frame using a Sanding Grip, this is going to expose that underlying Grungeboard and various colors of Distress Paint. The color variation is quite lovely. Shade the exposed Grungeboard with Ground Espresso Distress Ink and a Blending Tool with Foam. Apply Gold Mixative and Mushroom Alcohol Ink to Gumdrop and large Custom Fastener using Alcohol Ink Applicator Tool with Felt. The Alcohol Ink dries very quickly. Attach Gumdrop to large Custom Fastener using a little Glossy Accents as adhesive. The Gumdrop fits perfectly in the large Custom Fastener!

Step 8. Run a 2×5 1/2 inch strip of Ranger Watercolor Cardstock through die cut machine using Sizzix Tim Holtz Diamond Texture Fade folder. Spritz a little Antique Linen Distress Spray Stain on embossed watercolor cardstock and dry with heat tool. Then shade with Ground Espresso Distress Ink and a Blending Tool with Foam. For additional distress, spritz a little water using the Distress Sprayer on embossed watercolor cardstock and dry with the heat tool.

Step 9. Stamp three mini pumpkins onto Ranger Watercolor Cardstock using Jet black Archival Ink. Color stamped pumpkin images with Distress Markers and a Detail Water Brush, then dry with heat tool. Cut out pumpkins and shade edges with Ground Espresso Distress Ink and a blending tool. Distress edges of pumpkins with paper creaser.

Step 10. Apply the layer of antique linen distress paint to 5×7 flat back canvas, then spritz a little water with Distress Sprayer and dry with heat tool. Apply a little Frayed Burlap Distress Paint to canvas and pushed around color with baby wipe, then dry with heat tool. Apply very small amount of Ground Espresso Distress Paint to canvas concentrating on corners, push color around using baby wipe and dry with heat tool. Sand canvas with Sanding Grip to futher distress.

Step 11. Cut a 1×5 inch strip and a 2 1/2 x 2 1/2 inch of Ranger Manila Cardstock. Then diecut the word “Give” with Sizzix Tim Holtz Alphanumeric thin dies and “Thanks” from Sizzix Tim Holtz Celebrate thin dies sets. Apply Fossilized Amber Distress Paint and a spritz of water to “Give” diecut. Then dry with heat tool. Apply Peeled Paint Distress Paint and a spritz of water to “Thanks” diecut. Then dry with heat tool. Then splatter watered-down Ground Espresso Distress Paint with paintbrush to “Give” & “Thanks” and dry with heat tool.

Step 12. Distress tag, embossed watercolor cardstock and word strip with Ranger Paper Creaser. Attach embossed watercolor cardstock strip with Glossy Accents to back side of tag, so it peeks out about 3/4 of an inch from tag. Then attach tag and strip to canvas with Ranger Black Adhesive Foam Tape offsetting to the left of the canvas. We want to start giving this piece dimension. Then attach Cameo Frame centered to canvas with Ranger Black Adhesive Foam Tape. Attach “Give” wording strip to bottom portion of Cameo Frame using Ranger Black Adhesive Foam Tape and tear off excess paper past Cameo Frame.

Step 13. Start layering the wheat stalks, branches and leafs to left of Cameo Frame securing with Glossy Accents. Attach a few leaves to bottom right of canvas and secure with Glossy Accents. Attach the word “Thanks” to bottom left of the “Give” word strip and over the leaves securing with Glossy Accents. Then attach the three pumpkins stacked like a pyramid centered just inside the Cameo Frame with Ranger Black Adhesive Foam Tape. Then attach the Gumdrop Custom Brad to center of Autumn spray with Glossy Accents (I snipped the prongs off with wire cutters).
Now you are all ready for Autumn/Thanksgiving with this fun decor piece! I hope you’ll give it a try!
Drawer Title
- Choosing a selection results in a full page refresh.


