


Ranger Signature Artist Wendy Vecchi shares a tutorial for a mixed media canvas that is full of technique, texture, and color.
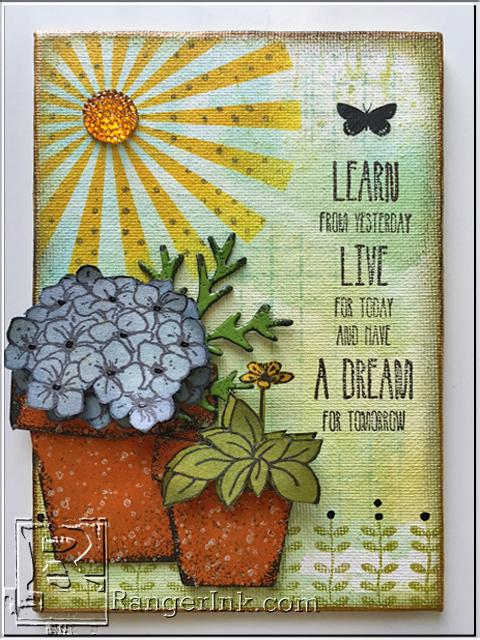
Live for Today Mixed Media Canvas by Wendy Vecchi
- Materials
- Instructions
- Buttercup, Dandelion, Orange Blossom, Sky Blue, Tree Branch, Watering Can, Potting Soil, Hydrangea, Leaf Green, Fern Green
- Orange Blossom, Fern Green
- Honeycomb
- Glacier White
- Jet Black
- Ranger Multi-Medium
- Black
- Ranger Mini Blending Tool
- Dina Wakley Media Palette Knife
- Ranger Non-Stick Craft Sheet™
- Ranger Heat it™ Craft Tool
- Studio 490 Wendy Vecchi Clearly for Art (WVAPCLEARLY), Newsprint Paper Paper (WVNEWS)
- 4 x 6 inch flat canvas panel
- Stampers Anonymous Wendy Vecchi studio 490: Lots of Leaves Background (WVBG016), All Occassion Art (SCS130), Trademark Art (SCS132), Spatter Stamp (WVFGST) All About Art (LCS011)
- Studio 490 Wendy Vecchi: Sunburst (WVSFA 029) Old Ledger (WVSFA 038)
- Studio 490 Wendy Vecchi Stamp-It Stencil-It: Hydrangea (WVSTST 015)
- Studio 490 Wendy Vecchi Mat Minis: large and small flower pot (WVMMFP)
- Studio 490 Wendy Vecchi Magic Mat Board: (WVMMB) Black
- Tim Holtz Sizzix Alterations: Tattered Pinecone (657492)
- Tim Holtz Idea-ology Gumdrop, Botanical Remnant Rubs (TH93119)
- Rubbing Alcohol (isopropyl)
- painter
- Sakura Glaze Pen, black
- embossing gun
- Tim Holtz Remnant Rub Tool
Instructions
 Ranger Signature Artist Wendy Vecchi shares a tutorial for a mixed media canvas that is full of technique, texture, and color.
 Swipe the Tree Branch and Sky Blue pads onto the craft sheet.

 Add rubbing alcohol and use the palette knife to mix the ink into the alcohol.
 Lay the canvas in the inks, pick up, allowing the inks to drip. Dry.
 Mask off the leaves background and ink just the bottom 5 rows with Fern Green.
 Stamp at the bottom of the canvas. Dry.
 Position the sunburst stencil in the top left corner and stencil with Buttercup, using the blending tool.
 Add Orange Blossom to darken the center area. Dry.
 Reposition the sunburst stencil and use Watering Can with the polka dot background to stamp thru the stencil. ***An unmounted stamp is easiest to use thru the stencil***. Dry.
 Use Jet Black to stamp the sentiment toward the right side of the canvas as shown. Dry.
 Use Tree Branch on the blending tool to add shading to the canvas edges. Dry.
 Shake the Black Soot Distress Paint and dispense a small amount onto the craft sheet. Tap the ball end of the remnant rub tool into the paint and add dots to the border leaves. Dot the furthest to the left and the last 3 on the right. Dry.
 Add one drop of Honeycomb to the gumdrop, allow to dry, then glue to the center of the sunburst.
 Shake the Tarnished Brass Distress Paint and with a fairly dry dabber top, edge the canvas. Dry.

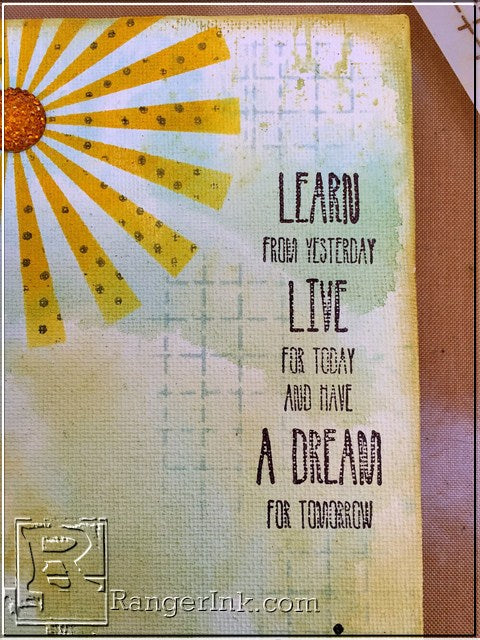 Use Sky Blue with the old ledger stencil to add 3 stenciled areas toward the right side. Dry.
 To create the “faux graniteware technique”, use the blending tool to add Orange Blossom ink to the flower pot pieces. While the ink is wet, sprinkle with Orange Blossom embossing powder and heat to emboss. *** I like to wipe some of the powder from the edges BEFORE embossing to create a worn vintage effect.
 Add shading to the flower pot pieces with Potting Soil. DO NOT DRY.
 Ink the spatter stamp with Glacier White and stamp over all 4 pieces. Dry.
 The white ink will absorb some of the Potting Soil to make it less stark.
 Use Glue N Seal to add the trim pieces to the top of the flower pots.
 Paint a thin layer of Glue N Seal onto a sheet of clear Clearly For Art and add the newsprint. Brayer or just rub your hand over the newsprint, then dry.
 Use Jet Black to stamp both the hydrangea and the hosta 2 times, onto the newsprint side of the Clearly For Art. Cut out one full hosta and remove the flower from the second image. Cut out one full hydrangea flower and cut off a few of the petals from the second image to make it smaller.

 Ink over the hydrangeas with Sky Blue, then add Hydrangea to shade the edges. Warm the Clearly For Art with the Heat-It Tool to soften the material. This will allow you to shape the petals to create dimension. Add the smaller hydrangea over the full flower using foam adhesive.
 Ink the hostas with Leaf Green and add Buttercup to the flower. Heat to shape the petals and then layer with foam adhesive.
 The image with the flower is the bottom layer.
 Die cut a portion of the sprig from black Magic Mat Board. Ink with Fern Green and sprinkle with Fern Green embossing powder, then heat to emboss.
 To assemble, use Multi Medium to glue the large flower pot to the left side as shown, letting the flower pot hang off the edge. Glue the embossed sprig over the right corner of the flower pot and add the hydrangea, using foam adhesive.
 Test drive the positioning of the smaller flower pot and add foam adhesive under the pot, then add overlapping the larger pot. Add the hosta on top of the smaller pot, using foam adhesive.
Use the remnant rub tool to add a small butterfly above the sentiment.
Use the glaze pen to add dots to accent the center of the hydrangea flowers.

Related Posts

Make-It™ You're The Zest Card by Miriam Prantner
Bright, bold, and full of summer vibes! Miriam Prantner created this cheerful citrus-inspired card using the Make-It Fun with Fruit...
Read More
Dylusions Neon Ink Sprays Journal Page by Miranda van den Bosch
Neon color takes center stage on this eye-catching journal page by Miranda van den Bosch! The newest...
Read More