


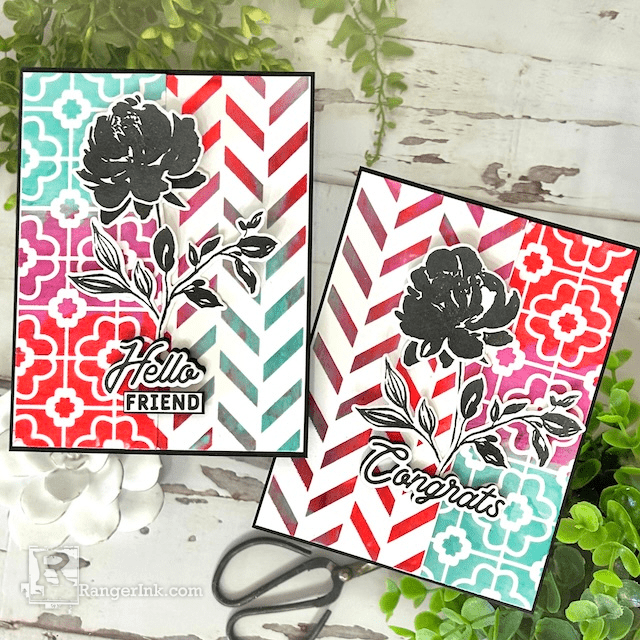
Immerse yourself in a world of color and textured bliss with these stunning cards by Kimberly Boliver! Using the latest Archival Ink Reinkers, she blends them with Ranger Texture Paste to make vibrant backgrounds that truly pop.
Archival Ink™ and Texture Paste Cards by Kimberly Boliver
- Materials
- Instructions
Archival Ink™ Pad Re-inker Wine Cellar
Archival Ink™ Pad Re-inker Aubergine
Archival Ink™ Pad Re-inker Beach Cruiser
Archival Ink™ Pad Graphite
Simon Hurley create. Stamp Watercolor Flowers
Simon Hurley create. Spellbinders Watercolor Flowers Die
Simon Hurley create. The Loo Stencil
Simon Hurley create. Flip Flop Chevron Stencil
Tim Holtz Distress® White Heavystock
Tim Holtz Distress® Black Heavystock
Simon Hurley create. Stark White Cardstock
Ranger Non-Stick Craft Sheet
Tim Holtz Distress Palette Knife
Letter It™ White Foam Roll Tape
Instructions
I love being able to make the color texture paste I need when I am working on a project! It is so easy too. Here I will show you how I made these two cards with some of Ranger’s new Archival Ink Pad Re-inker colors.

Step 1: Scoop three dollops of glossy clear Texture Paste using a palette knife on your nonstick craft sheet. Space them far enough apart so you have room to mix them. Then drop a few drops of Archival Ink Pad Re-inker on top of each dollop. I used three drops of each of the following: Wine Cellar, Aubergine, and Beach Cruiser.

Step 2: Next mix the re-inker into the paste using the palette knife thoroughly. Clean the palette knife off between each color.

Step 3: Place The Loo! Stencil over a 4 1/8” x 5 3/8” piece of Tim Holtz White Heavy Stock. Using the palette knife, spread the Wine Cellar mixed texture paste over the top third of the stencil. Clean off the palette knife.

Step 4: Using the clean palette knife, spread the Aubergine mixed texture paste over the middle third of the stencil, making sure to overlap the Wine Cellar just slightly. Clean the palette knife.

Step 5: Next, spread the Beach Cruiser mixed Texture paste over the bottom third of the stencil. Clean your palette knife. Carefully remove the stencil and clean it to prevent the paste from drying on it. Put the texture paste panel to the side and let it dry completely.

Step 6: Place the Flip Flop Chevron Stencil over a 5 3/8” x 5 3/8” piece of Tim Holtz White Heavy Stock. Using the palette knife spread the left-over texture pastes over the stencil however you would like, just make sure to clean the palette knife between colors. Carefully remove the stencil and clean it and the palette knife. Put that texture paste panel to the side to dry completely.

Step 7: Stamp Flowers, leaves and sentiments from the Simon Hurley create. Watercolor Flowers stamp set using Graphite Archival ink on a piece of Tim Holtz White Heavy Stock and die cut using the matching Watercolor Flowers dies. Using the Hello and Congratulations dies, die cut a piece of Tim Holtz Black Heavy Stock to be used as shadows under the sentiments.

Step 8: Using Letter It foam tape, adhere the flowers to the flower bud image.

Step 9: Cut two pieces of Tim Holtz Black Heavy Stock to 4 ¼” x 5 ½”. Then cut both dry transparent paste panels in half.

Step 10: Adhere a ‘Loo’ panel and a ‘Chevron’ panel to both cards leaving a black border around them. The ‘Loo’ panel will overlap the ‘Chevron’ panel a little.

Step 11: Adhere the stamped sentiments to the black cardstock that was cut using the sentiment dies in step 7 a little off center for a shadow. Use Letter It foam tape to pop up the sentiments. Adhere both finished card panels to card bases cut from Simon Hurley create. Stark White Cardstock 5 ½” x 8 ½” and scored at 4 ¼”.


 My name is Kimberly Boliver. I am a south Jersey Girl now living in Delaware. I love the beach and paper crafting in my downtime when I am not working as a Security Officer. I have been hoarding, I mean crafting in my craft room for over 25 years and love sharing what I have created with others. I am most active on Instagram @KimmieB16, but you can find me on YouTube as well as my blog.
