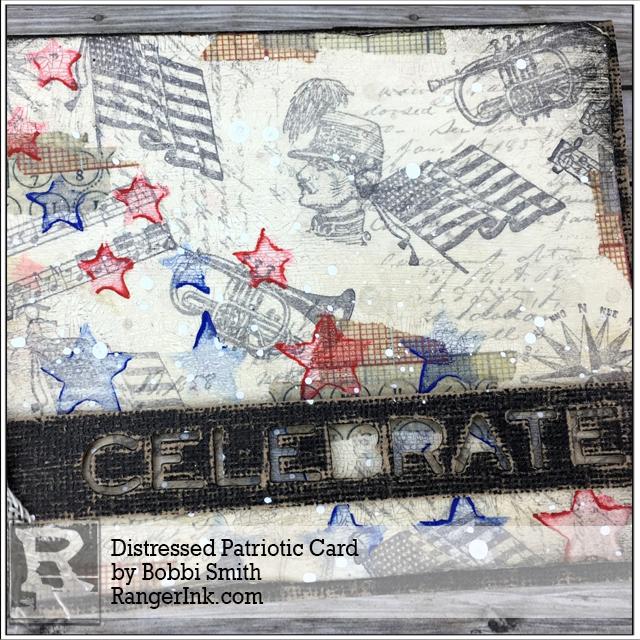
Hi everyone, Bobbi here. I’m really happy to be with you on the Ranger blog today! I’m sharing a fun Patriotic card, hope you’ll join me.

Distressed Patriotic Card by Bobbi Smith
- Materials
- Instructions
- Tim Holtz® Distress Crayons : Candied Apple, Blueprint Sketch, Black Soot
- Tim Holtz® Distress Flip Top Paints : Pumice Stone, Walnut Stain
- Tim Holtz Distress® Mixed Media Heavystock
- Tim Holtz® Distress Collage Mediums : Crazing
- Tim Holtz® Distress Collage Brushes
- Ranger Non-Stick Craft Sheet™
- Ranger Heat it™ Craft Tool
- Tim Holtz® Distress Sprayer
- Ranger Paper Creasers
- Ranger Glossy Accents™
- Tim Holtz® Distress Mixed Media Archival Ink Palette : Black Soot
- Ranger Adhesive Foam Rolls : Black
- Tim Holtz® Distress Splatter Brush
- Dina Wakley Media Brushes
- Dina Wakley Media Gesso : White Gesso
- Tim Holtz Idea-ology: Sanding Grip; Classic Kraft Paper Stash- Black Cardstock; Designer Tape - Postal
- Tim Holtz Stampers Anonymous Layering Stencil - Stars THS008
- Tim Holtz Stampers Anonymous Tiny Things 2 CMS305 and Ledger Script CMS241 Stamp Sets
- Tim Holtz Alterations by Sizzix Thinlits Sentiment Words 661807
Instructions

Step 1: Squeeze a couple drops of Pumice Stone Distress Paint onto a Non-Stick Craft Sheet, and lightly mist the paint with water from Distress Sprayer. Press the Distress Mixed Media Heavystock into the paint mixture until covered. Dry with a Heat it Tool. To add more distress, pick up droplets of color off the Non-Stick Craft Sheet with the Distress Mixed Media Heavystock, blotting to pick up the color (not swiping), then drying with heat tool.

Step 2: Gather stamps from Tim Holtz Stampers Anonymous Tiny Things 2 CMS305 and Ledger Script CMS241 along with Tim Holtz Distress Archival Hickory Smoke and Black Soot Ink. We are going to create 2nd generation stamped images by loading the stamp with ink, then off stamping onto scratch paper before stamping image onto Mixed Media Heavystock. There is still plenty of ink left on the stamp, but it softens the image for this technique. Stamp some of the images with Distress Archival Hickory Smoke Ink, then others with Black Soot Ink, so there is a slight tonal difference. Run the Heat it Tool over the stamped images just to insure it has set.

Step 3: Apply a few pieces of Designer Postal Tape to stamped Mixed Media Heavystock. Then apply a layer of Distress Collage Crazing Medium using a Distress Collage Brush to entire stamped Mixed Media Heavystock card front. Let air dry, you DO NOT want to apply any heat to this.

Step 4: After card front has thoroughly air dried, you should be able to see lots of tiny little cracks everywhere the crazing was applied! Apply a wash of Walnut Stain Distress Paint to card front, then (working quickly) wipe off with wet baby wipe. You really only want most of the Distress Paint worked into the tiny cracks. Then dry with Heat it Tool.

Step 5: Swipe a little Black Soot Distress Crayon onto Non-Stick Craft Sheet. Then pick up color with finger and apply around outer edges of card front to add shading.

Step 6: Lay the Stars Layering Stencil on top of left side/card front and tack down to Non-Stick Craft Sheet with painters tape, washi tape or Design Tape. Apply a little Candied Apple Distress Crayon through a few of the stars. Then smudge color with finger while layering stencil is still in place. Pick up some of the excess Distress Crayon color with a baby wipe. Repeat this step using the Blueprint Sketch Distress Crayon. Then carefully remove layering stencil and dry card front with Heat Tool. You will have to move the Star Layering Stencil to right of card front to continue the pattern.

You can still see all that crackly goodness through the Distress Crayons!

Step 7: Cut a thin strip of Tim Holtz Classic Kraft Paper Stash- Black Cardstock about 7/8 x 5 1/4. Die cut the word “CELEBRATE” from the Tim Holtz Sizzix Thinlits Sentiment Words die set. Sand the black Classic Kraft with a sanding grip on a scrap piece of paper (to protect the Non- Stick Craft Sheet). Distress paper edges with a Bone Folder. Then tie a small piece of Tim Holtz Idea-ology Linen Ribbon, to “Celebrate” border. Attach border to card front using Ranger Black Adhesive Foam.

Step 8: Okay, so I’m keeping it real here. I forgot to add my splatters before I attached the “CELEBRATE” border, so I had to improvise a little. Water down some Dina Wakley Media White Gesso using the Distress Sprayer. Cover black kraft border with scrap paper. Pick up gesso with Distress Splatter Brush. Then pulling bristles back and releasing, splatter white gesso onto card front. Then dry with Heat it Tool. Attach card front to folded 4 1/4 x 5 1/5 black card base using some Glossy Accents as adhesive.


I hope you enjoyed today’s techniques and will give this card a try.
Your Cart
- Choosing a selection results in a full page refresh.


