


by Jenn Shurkus
Fragile Bee Mixed Media Card by Jenn Shurkus
- Materials
- Instructions
- Dina Wakley Media Brushes
- Tim Holtz Distress® Watercolor Cardstock
- Dina Wakley Meida Stamps: Dina Wakley Media Woodcuts, Scribbly Insects
- Dina Wakley Media Stencils & Masks: Essentials
- Dina Wakley Media Heavy Body Acrylic Paints: Tangerine, Lemon, Umber, Gilt
- Tim Holtz Distress Ink Pads: Wild Honey, Rusty Hinge, Gathered Twigs, Pumice Stone
- Archival Ink Pads: Potting Soil
- Tim Holtz® Waterbrush
- Dina Wakley Media Palette Knife
- Ranger Heat it™ Craft Tool
- Ranger Mister
- Ranger Non-Stick Craft Sheet™
- Ranger Adhesive Foam Rolls
Instructions
 Hello Everyone! It’s Jenn Shurkus here from Shurkus.com. I am wicked exited to be sharing on the Ranger Blog again!
This week I have not 1, not 2 but THREE different mixed media cards to share with you. I documented the process so that hopefully you will try your hand at these techniques!
For today’s card I shared a sneak peek the other day on Instagram (https://instagram.com/p/2ZfzLGkqj6/?taken-by=jennshurkus ) because I just loved how this bumble bee came out.
 Mix a little bit of Dina Wakley Media Tangerine, Lemon and Umber to make a “honey” color. Remember a little bit of Umber goes a long way.
 Using a palette knife spread the paint here and there on a sheet of Distress Watercolor Cardstock. Don’t put too much thought into this just be sure to go off the sides and leave some whitespace.
 Working quickly, so that the paint is still wet. Lay the Dina Wakley Media Essentials stencil over the wet paint ( I used the honeycomb pattern) and rub with a baby wipe. Wipe in the areas there are paint and also the white areas. Since your baby wipe is picking up some of the paint it will transfer onto the white areas of the cardstock as well.
 Note: you can gesso your cardstock before doing this step but I chose not to this time. I wanted the texture to be a bit softer. Experiment with both ways.
 Paint some Gilt Dina Wakley Media Paint directly onto the large circle in the Dina Wakley Media Woodcuts Stamp set. Stamp right on the Distress Watercolor Cardstock background. Repeat this process as many times as you would like. Note: this works best with a dry brush.
 Also remember to stamp off the edge of the cardstock to create movement. And can we just talk about how GORGEOUS this gold is!?! The first time I painted with it I literally gasped out loud!
 Take the bumble bee stamp from Dina Wakley Media Scribbly Insects Stamp Set. Start by inking the whole image with Wild Honey Distress Ink. Next, dab on a little bit of Rusty Hinge Distress Ink and then a little bit of Gathered Twigs Distress Ink. Note: I concentrate the darker colors on the edges of the image.
 Lightly mist the stamp with water and then stamp it onto Distress Watercolor Cardstock. While the image is still wet pull some of the color from the stamped line and blend out the image with your waterbrush. Note: be sure to clean your brush by wiping it on a rag or paper towel so that it wont be super wet and it won’t be holding a lot of color.
 Take your 3 Distress Ink colors (Wild Honey, Rusty Hinge and Gathered Twigs) and squish out a palette. I like to do this on an acrylic block that is sitting on white paper, so I can see the colors. Paint in your bumblebee. This is where it will really start to look realistic. Avoid painting in the wings for now.
 Note: don’t worry too much about shading. I usually just pick a side and stick with that so for example here I chose the left side, so I only added shading along the left sides of the shapes.
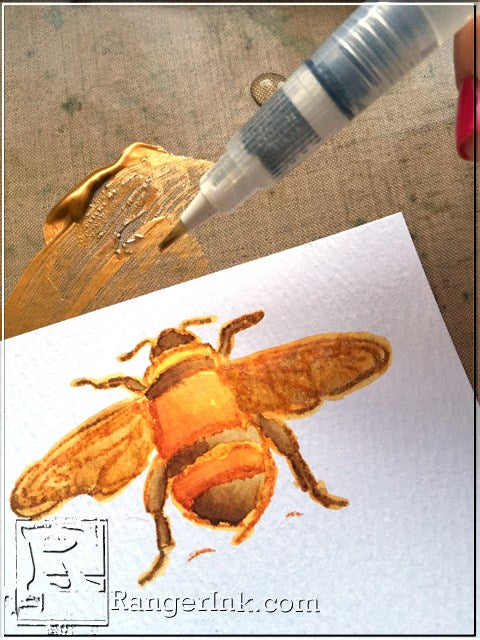 Paint some Dina Wakley Media Gilt paint on the wings. Note: Since these paints are a heavy body acrylic I tend to add a lot of water if I want to paint in an image with it.
 Fussy cut out the image. Leave a little bit of white edging. Paint the edges of the bumblebee with Pumice Stone Distress Ink. Note: You could use an ink blending tool and ink the edges with Pumice Stone Distress Ink to get a different look. I wanted to continue on with the watercolor look.
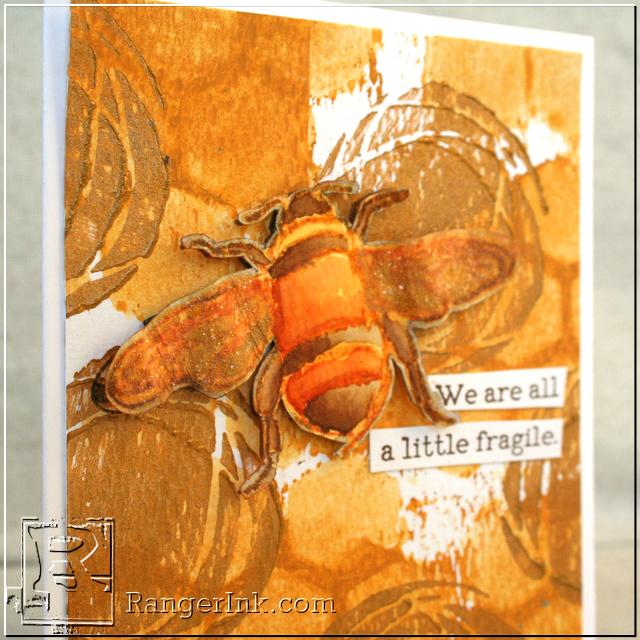
 Stamp the bumblebee with Potting Soil Archival Ink on the card background.
Wrinkle up the wings of the cut out bumblebee a bit. I almost accordion folded them. Adhere the bee on top of the stamped bee on the background with Ranger black foam tape. I let the wings keep a ripple look to them.
Stamp the sentiment “ We are all a little fragile” from the Scribbly Insects stamp set on Distress Watercolor Cardstock with the archival ink. Roughly cut it out in what I like to call “word-fetti” and adhere to the card with your Ranger Collage Gluestick
 Generously dab some Clear Rock Candy Distress Stickles to the wings. Set aside to dry.
 Once dry adhere the background to a card (folded size 4.25×5.5).

