


Frosty Winter Glass Votive: Our Alcohol Ink series continues with this stunning dollar store glass votive makeover! See how we combined elements from the whole series of tutorials into this one project!

Frosty Winter Glass Votive by Tammy Tutterow
- Materials
- Instructions
- Ranger Non-Stick Craft Sheet™
- Ranger Heat it™ Craft Tool
- Ranger Mini Blending Tool
- Ranger Mister
- Tim Holtz® Distress Ink Gathered Twigs
- Tim Holtz® Adirondack® Alcohol Inks: Cranberry, Lettuce, Meadow, Peso, Cloudy Blue, Aqua
- Tim Holtz® Alcohol Ink Applicator
- Tim Holtz® Alcohol Blending Solution
- Tim Holtz Sizzix Dies Holly Branch, Mini Snowflakes
- Tim Holtz Sizzix Embossing Folders Snow Flurries & Snowman
- Tim Holtz Idea-ology Crinkle Ribbon
- Tim Holtz Sizzix Vagabond & base tray
Instructions
 To embellish the votive, die cut 3-4 holly leaves (die: Tim Holtz Holly Branch) from an aluminum can. Be very careful as you cut the can open, the edges can be very sharp. After die cutting the edges will be safe to handle.
For this votive, I also die cut three small snowflakes (Tim Holtz Mini Snowflakes Movers & Shapers) from the scraps of the shrink plastic from the snowflake card in the Alcohol Ink + Canned Air tutorial.
 Although the mini snowflakes don’t match exactly, you can place them in the Snow Flurries Texture Fade to add embossed texture just like we did for the larger snowflake using the Layered Snowflake die in the canned air and shrink plastic tutorial. The snowflake in the upper left corner is the best match in size and shape for the die cuts.
 Use an ink applicator tool with felt to apply assorted shades of green alcohol ink to the silver side of the die cuts. I used 2 drops of Pesto, 1 drop of Lettuce, and 1 drop of Meadow Alcohol Inks. Tap the ink onto the metal. Allow the ink to dry before tapping on a second layer. You will see the fresh ink react with the first layer creating interesting patterns. At first, while the ink on the felt is wetter, the reaction will be bigger and the colors will be more blended. As the ink on the felt dries, each application and reaction will be smaller and more defined. With several several layers the ink will look like it does above.
 You can add texture to the holly leaves by placing them ink side down on a piece of foam and drawing a center vein on them with an embossing stylus.
 To make the vein more defined, pinch it between your fingers to gently crimp it.
 Rub the embossed and crimped lines with a Jet Black Archival Ink pad to make the lines more bold.
 In the colorizing embellishments tutorial I showed you how you can colorize embellishments by simply dripping alcohol ink onto them. I used that same technique to colorize small wired pearl stems. The pearl stems I used are vintage millinery supplies, but you can find stems like these pre-made in floral and wedding supply sections of craft stores. You can also create them fairly easily by placing beads on thin wire and twisting into a stem shape.
 In the Shimmery Holiday Card Tutorial I mentioned that I had colored my Crinkle Ribbon with Alcohol Ink. The trick to using alcohol ink on ribbon is that you have to start with really wet ribbon.
 Alcohol Ink will not wick and spread through ribbon as much as dye inks. If you place it on dry ribbon it will dry very quickly without spreading creating a spot of color. When dripped on very wet ribbon it will wick out but not as much as other inks. Unless you apply enough ink to completely cover the ribbon you will get soft bleeds of color that fade out like shown above. I really like this look and like being able to keep some areas of the ribbon white.
 When you are done applying ink, wring the ribbon out well with a dry cloth. Dry the ribbon with your heat tool. Remember, alcohol inks in the bottle are flammable so take extra caution and keep your bottles of ink away from your heat tool. The ink of the ribbon is safe to heat since the alcohol has been exposed to air and evaporated.
 To add a bit of aging to the ribbon, tap over the ribbon lightly with a brown Distress Ink on an ink blending tool. I use the ink already on my foam without reinking so that the color will be softer.
 Tie the ribbon around the glass votive and add a bow.
 Use a strong quick drying glue to adhere the leaves, stems, and snowflakes to the votive under the bow.
 The votive was also colored with Alcohol Ink. To see how it was created, check out the tutorial I shared on Tim’s blog- Sugar Crackled Glazed Votives. They are so easy to create using bargain glass votives!
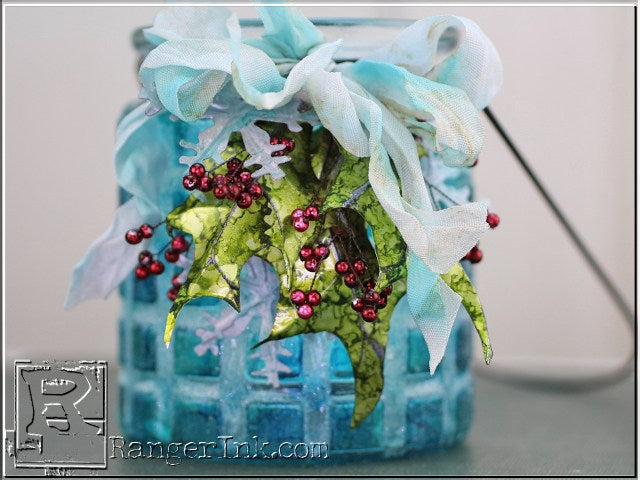 I simply adore the way this votive turned out. It began with a glass votive I picked up in the Dollar Spot at Target this spring and adds in scraps from other projects, and a can from my recycling bin along with ribbon and inks I already had in my crafty stash and vintage pearl stems gifted to me from a friend.
I wish you could see it with a candle glowing inside, it is simply stunning!