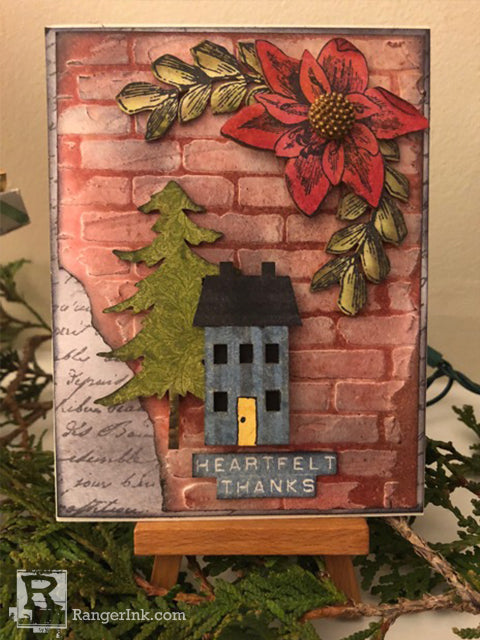
Heartfelt Thanks Card by Cassie Lynch
- Materials
- Instructions
- Wendy Vecchi Archival Ink™: Dandelion
- Wendy Vecchi MAKE ART Blendable Dye Inks: Poppy, Sunflower, Geranium
- Wendy Vecchi Perfect Card Adhesive
- Archival Ink™ #0 Pads : Jet Black
- Ranger Embossing Powders: Clear
- Ranger Mini Blending Tool with Foam
- Ranger Detail Blending Tools
- Ranger Heat it™ Craft Tool
- Wendy Vecchi Studio 490 by Stampers Anonymous Background Stamps: Floral Lace WVBG 051, Les Roses WVBG033, Perfectly Plaid WVBG 023
- Wendy Vecchi Studio 490 by Stampers Anonymous stamp set Flourishing Art SCS148 and Birthday Art SCS159
- Wendy Vecchi Studio 490 by Stampers Anonymous Never Enough Hearts Stencil WVSFA 013
- Wendy Vecchi Studio 490 by Stampers Anonymous Mat Mini Words WVMM019
Instructions

Step 1: Starting with a piece of 4 x 5 ¼ inch piece of card stock spread Wendy Vecchi embossing paste thru the brick stencil. I chose to leave some of the area uncovered.

Step 2: After the paste dries use a blending tool and Wendy Vecchi blendable ink colors red geranium and watering can to color the brick.

Step 3: I inked leaf mat minis with Ranger black archival ink. I find the easiest way to do this is to lay the mat mini on top of the stamped image. It’s much easier to line the pieces up correctly doing it this way.

Step 4: Next I shaded the leaves with the detail blending tool. I used blendable ink color prickly pear, fern green and acorn. Can you see the difference? The one on the left only has prickly pear on it. The right one is shaded. The tiny blending tool really makes a big difference.

Step 5: Next I did the same technique with the flower as I did in step 3 with the leaves. I inked the flower with red geranium.

Step 6: After I inked the mat mini tree with fern green I inked the foliage background stamp with fern green and pressed the mat mini tree onto the stamp.

Step 7: I did the same thing with the mat mini house. To get the subtle striping one the house I inked the simply stripes background stamp with watering can, turned over my house and pressed it onto the stamp.

Step 8: This is a great tip I learned from Wendy Vecchi. To make it easier to adhere the house and roof and to cover the open window areas cut a piece of card stock (in my case I used black) that covers the roof and house. Glue the card stock to the back of the house and roof using Wendy Vecchi Perfect Card Adhesive.

Step 9: For my background paper I inked the script stamp with watering can and stamped it on my 4 1/8 x 5 3/8 inch card stock. Stamp “heartfelt thanks” onto card stock with cornflower blue and cut it out.

Step 10: As Wendy Vecchi says, “test drive your parts” before gluing them down. The Perfect Card Adhesive gives you just enough wiggle time before drying to let you make slight adjustments if needed. I used an art part piece from my stash for the flower center. You could leave off the embellishment or use one of your choosing.


