Perfect Pearls Mist Journey Tag by Patti Behan

Use Perfect Pearls Mists and Masks to create a dazzling background effect for this and all your craft projects.

Instructions

Perfect Pearls Mist Tag Step 1

Step 1: Use Vagabond Machine to cut tag and reinforcement out of black cardstock and small gear out of Grungeboard.


Perfect Pearls Mist Tag Step 2

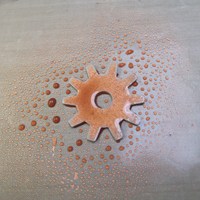
Step 2: Working on the Non-Stick Craft Sheet, spray gear with Perfect Copper Mist until completely covered. Set aside to dry.


Perfect Pearls Mist Tag Step 3

Step 3: Position Timepieces Mask on tag, sticky side down.


Perfect Pearls Mist Tag Step 4

Step 4: Spray randomly with Perfect Copper, Heirloom Gold and Perfect Pearl Mists. Blot with paper towel.


Step 5: Remove mask and dry with Heat it Craft Tool.


Perfect Pearls Mist Tag Step 6

Step 6: Stamp “journey” in clear embossing ink about a third of the way down the tag. Heat emboss with Queen’s Gold Embossing Powder.


Step 7: Attach gears and spinner to tag with a brad. Cut an 8” length of ribbon and fold in half. Place Grungeboard gear and reinforcement in line with the hole in the tag. Thread folded end of ribbon through reinforcement, gear and tag and pull the ends through the folded loop to form a knot.


Perfect Pearls Mist Tag Step 8

Step 8: Spray the tag lightly with Sunflower Sparkle Perfect Pearls Mist. Let dry.

Related Posts

Archival Ink & Stickles Ornaments by Lauren Bergold
December 05, 2024
Archival Ink & Stickles Ornaments by Lauren Bergold

Get ready to shine this holiday season! Follow along as Lauren Bergold transforms festive Dyamond boards like trees, stars, and...

Read More
Embossing on Textured Cardstock by Lauren Bergold
November 11, 2024
Embossing on Textured Cardstock by Lauren Bergold