


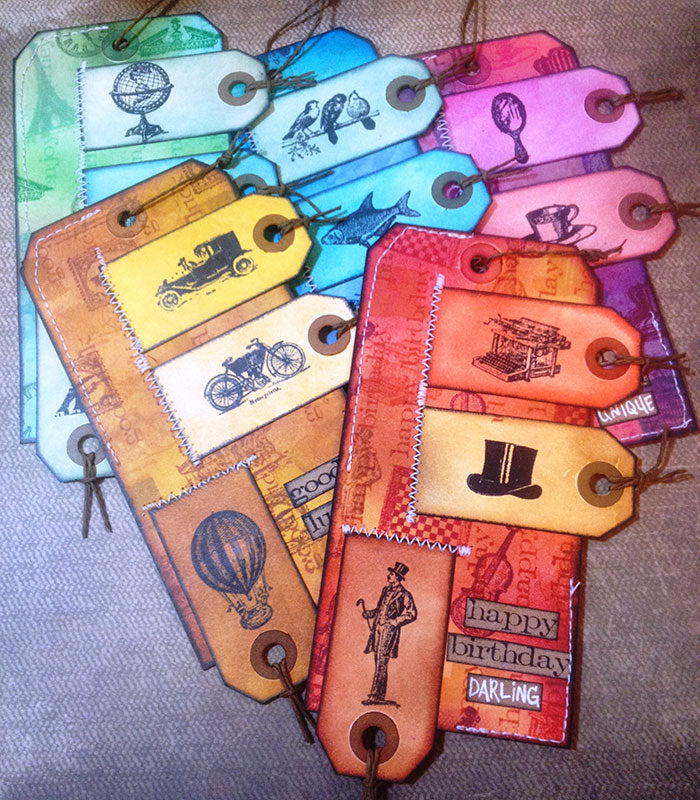
Make a rainbow of All Occasion Tags using Archival Ink.
Archival All Occasion Tags
- Materials
- Instructions
- Archival Ink™ #0 Pads
- Ranger Ink Blending Tool & Foam
- Ranger White Opaque Pen
- Sizzix Alterations by Tim Holtz Tiny Tabs & Tags Bigz Die
- Stamper
- Tim Holtz Idea-ology Paper String Solids
- White thread
- Sewing machine
Instructions
1. Die cut 3 tags using the smaller rectangle tag shape on the Tiny Tabs & Tags die. Use the Kraft Cardstock to die cut the tag hole circles as well. Adhere the circles to the tags.

2. Select 3 colors of coordinating Archival Ink, keeping them in the same type color family…Monarch Orange, Saffron and Sienna for example. Use a different piece of foam on the Blending Tool for each ink, and use light circular motions with the tool to apply Archival Ink color to each of the tiny tags, making each one a solid color. Set them aside.

3. Take the larger #8 tag, and using the same circular inking motion, apply all 3 colors of the Archival Inks, blending the colors as they touch. Try to apply each ink color on different areas of the tag to achieve a marbled effect. Select 3 images from the Tiny Things Stamp Set, and an occasion phrase from the Simple Sayings Stamp Set. Using the same 3 colors of Archival Ink you have already used, stamp all three images randomly on the #8 tag. Choose one of the ink colors to also stamp the phrase you are using, and stamp it going vertically.

4. Select Jet Black Archival Ink and the small trio of tags. Turn two of the tags horizontally with the holes on right, and stamp two of the images on the tags…one per tag. Turn the third vertically but bottom side up so that the hole is on the bottom and stamp the third image. Stamp the phrase onto a small piece of the Kraft Cardstock, and then cut them out. Use the White Opaque Pen to add another sentiment to the phrase, and cut it out as well.

5. Use another new foam piece with the inking tool and apply Jet Black to it, and ink the edges of the small tags, as well as the larger #8 tag, and to the edges of the phrase.
6. (Finished photo) Adhere the tiny tags onto the larger tag, two on the right side horizontally, and one on the bottom of the tag going vertically but turned bottom side up. Adhere the phrase to the bottom right corner.
7. Using white thread, sew a straight stitch around the upper left and bottom right corners of the tag. Use a zig zag pattern to stitch the edges of the smaller tags. Tie Solid Paper String onto all 4 of the tag holes.
8. Repeat the steps using 3 more different Archival Inks and different Tiny Things images.

Related Posts

Dylusions Neon Ink Sprays Journal Page by Miranda van den Bosch
Neon color takes center stage on this eye-catching journal page by Miranda van den Bosch! The newest...
Read More
Tim Holtz Distress Paint Summer Card by Tami Bastiaans
Bring the beach to your craft table! Tami Bastiaans created this bright summer card using Distress Texture Paste, Paints,...
Read More