


In this tutorial, Cheiron Brandon shows you how to create this lovely home décor piece with an inspiring quote using the Tim Holtz Archival Ink, along with a variety of other Distress products.
Distress® Archival Ink™ Vignette Tray by Cheiron Brandon
- Materials
- Instructions
Tim Holtz Distress® Archival Ink™ Black Soot
Tim Holtz Distress® Watercolor Cardstock
Tim Holtz Distress® Spray Stains: Antique Linen, Black Soot, Picket Fence
Tim Holtz Distress® Sprayer
Tim Holtz Distress® Ink Pad: Black Soot
Tim Holtz Distress® Flip Top Paint: Antique Linen
Ranger Heat It™ Craft Tool
Tim Holtz® Ink Palette
Tim Holtz Distress® Ink Reinkers
Tim Holtz® Waterbrush: Detailer Tip
Tim Holtz Distress® Collage Medium: Matte
Tim Holtz® Mixatives™: Gold
Tim Holtz® Alcohol Ink Mini Applicator Tool with Felt
Tim Holtz® by Stampers Anonymous Splat Box
Idea-ology: Vignette Tray, Lace Baseboard Frame, Hardware Heads
Tim Holtz by Stampers Anonymous Stamps: CMS430 Floral Outlines, CMS046 Creative Muse
Instructions
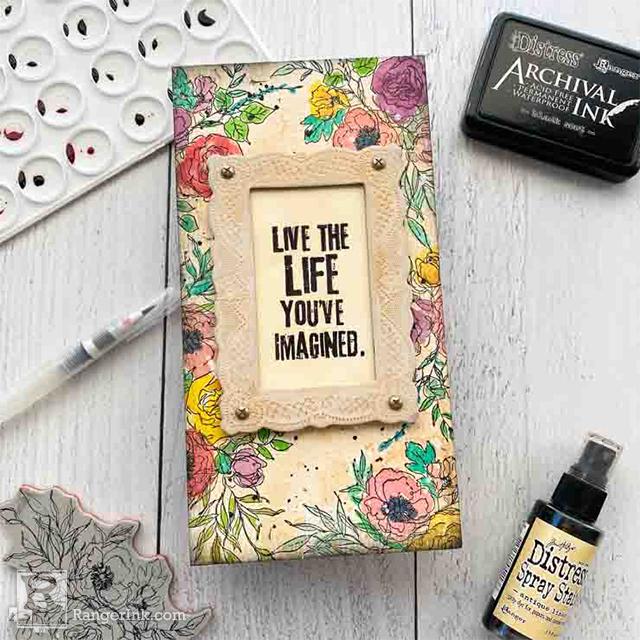
Hi there, crafty friends! It’s Cheiron Brandon here and I am thrilled to be sharing a little home décor piece with your today using the brand new, full size Distress Archival Ink pads. I have been waiting for these for so long (is it too early to ask for more colors?). Archival Ink is great for a multitude of techniques and today my project features it used for watercoloring and stamping on glossy cardstock paper. Today I am using an Idea-ology Vignette Tray to create a home décor piece with an inspiring quote to hang in my studio.

To begin, let’s gather up the supplies we need. I am using the Black Soot Distress Archival Ink Pad, Distress Watercolor Paper, my watercolor palette filled with dots of Distress reinkers, a Tim Holtz Idea-ology vignette tray and a Detailer Water Brush.

Step 1: Cut the watercolor paper to fit the back side of a vignette tray (this will be the front side for this project) and stamp the flower from the Floral Outlines set all around the edges of the paper. Dry with a Ranger Heat Tool.

Step 2: Using a Splat Box, spray over the panel with Antique Linen Distress Spray Stain, and add some water from a Distress Sprayer to blend as you move it around. Dry with Ranger Heat Tool.

Step 3: Now for some painting fun! Using your Distress Watercolor Palette (this is an empty Tim Holtz Ink Palette filled with dots of Distress Ink Reinkers in my favorite colors – a little of the reinker goes a long way and it will not dry out!) color in the flowers and leaves in a loose manner by picking up the color with your Distress Waterbrush. Dry with Ranger Heat Tool.

Step 4: Using your Splat Box again, unscrew the sprayer of the Black Soot Distress Spray Stain and use the tube to splatter ink over the painted panel. Dry with Heat Tool. Then do the same thing with the Picket Fence Distress Oxide Spray.

Step 5: Paint the edges of the Vignette Tray with Antique Linen Distress Paint. I did one coat so that the woodgrain would still show through. Let dry or dry with Heat Tool.

Step 6: Ink the edges of the painted panel with Black Soot Distress Ink. Adhere panel to the back of the vignette tray with Distress Collage Medium.

Step 7: Stamp the sentiment from the Creative Muse stamp set onto a piece of Glossy Cardstock and heat set. Then go over it with an Antique Linen Distress Pad.

Step 8: Color an Idea-ology Lace Baseboard Frame with Antique Linen Distress Ink.

Step 9: Adhere the frame to the covered Vignette Tray, then color four Idea-ology Hardware Heads with Gold Alcohol Ink and add to each of the corners of the frame using Distress Collage Medium.
 My name is Cheiron Brandon. I live in Bayonne, New Jersey with my husband and our two adorable rescue pups, Big Boy and Oreo. I work in the financial district by day and love to play with stamps, ink and paint at night in my studio. I teach monthly card making and mixed media classes in NYC. You can find me on my blog at www.cheironbrandon.typepad.com and posting more often @cheiron on Instagram!
