


Learn how Paula Cheney created this colorful gilded vignette featuring the newest members of the Distress Family: Uncharted Mariner & Distress Foundry Wax.
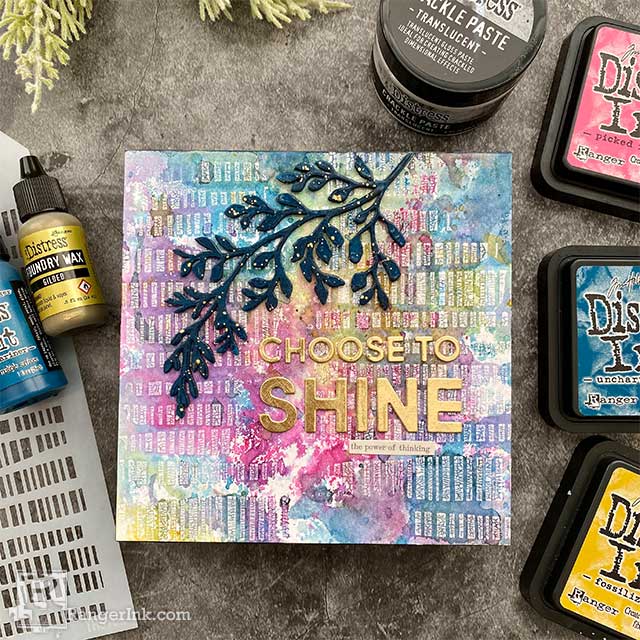
Distress Choose to Shine Vignette by Paula Cheney
- Materials
- Instructions
Other:
Tim Holtz® idea-ology Clippings Sticker Book
Tim Holtz® by Stampers Anonymous Layering Stencil THS102 Code
Tim Holtz® Alterations by Sizzix Bold Text 2 Adhesive Sheets - Permanent
Embossing Tool
Isopropyl Alcohol
Instructions
Hello Friends! I am happy to be here today to share an easy project I created using the newest Distress Color, Uncharted Mariner! You might think it is a basic blue when you see the bottles, but it’s not! It has turquoise undertones that come out when wicked with water…think Mediterranean ocean! It is such a beautiful color! It mixes well with other strong colors like Picked Raspberry, Crackling Campfire, and Fossilized Amber. I think more experimenting is in order, just to see how it plays with the rest of the Distress family. I know you will love it as much as I do!

Step 1: Use Uncharted Mariner Distress Paint to paint the sides of the largest idea-ology Vignette Box Squares (5.5 x 5.5” x 1.5”).

Step 2: Once the paint is dry, add a layer of Collage Medium Matte over the paint to seal and give the surface a finished look. Collage Medium Matte dries clear and leaves a nice sheen over the surface. Set aside to dry.

Step 3: Use Uncharted Mariner Distress Paint to paint one of the organic elements from the Dina Wakley Media Chipboard Shapes -Sprigs. I chose a large one that will cover about 1/3 of the finished square Vignette Box.

Step 4: Once the paint is dry, use a Distress Embossing Dabber over the surface of the chipboard shape. Lay the chipboard on a clean piece of scrap paper and pour Uncharted Mariner Distress Embossing Glaze over the top. Shake off the excess powder and use the scrap paper to slide it back into the jar. Use an embossing gun to melt the glaze over the surface. You will easily be able to see the powder melt and turn shiny over the surface.

Step 5: Lay the glazed element on a craft mat or a piece of disposable paper. Shake the Foundry Wax bottle until you hear the mixing ball (some colors take more shaking than others). Pour a dime-sized amount of wax onto craft mat.
NOTE: Foundry Wax is liquid in the bottle and becomes creamy when exposed to air. You will need to work quickly before it dries on the craft mat. Using a small Artist Brush, pick up the Foundry Wax (I used Gilded), and tap the brush handle on your opposite index finger to create splatters across the organic element. Foundry Wax can be easily cleaned from your brush and craft sheet with Isopropyl Alcohol.

Step 6: Use an embossing tool or the Ranger Heat-it Tool to heat the Foundry Wax. The heat creates a chemical reaction and changes the dull gold to a bright and shiny gold in a matter of seconds, depending on the kind of heat tool you use. Once shiny, the Foundry Wax is permanent and will not scratch off the surface.
PLEASE NOTE: When you are using Foundry Wax, you must place the bottle away from any heat source or you could solidify the wax inside the bottle. Just remember to pour out your liquid, re-cap the bottle, and set it to the side, before moving to the heating step of the process. If you want to learn more about Foundry Wax, please watch Tim’s YouTube Live Video where he gives all the tips and tricks of the product. The video can be found here: https://timholtz.com/distress-foundry-wax/

Step 7: Cut a 5.5 x 5.5” piece of Distress Watercolor Cardstock. I will be adding wet mediums to the surface, so Distress Watercolor Cardstock is the perfect surface because it is strong and can easily stand up to multiple layers of ink and water. Before the addition of the ink, I want to add texture to the surface of the cardstock. I used a Layering Stencil (Codes) and Distressed Crackle Paste Translucent. Lay the stencil over the cardstock and use a small Distress Palette Knife to pull the paste over the pattern. Wash the stencil and palette knife right away. Leave the paste to dry for at least 30 minutes until cracks appear in the paste.

Step 8: Press multiple colors of Distress Ink onto craft mat (I used Uncharted Mariner, Fossilized Amber, and Picked Raspberry) and spritz with water. I also lightly spritzed the surface of the paper with water since the Paste is raised and I wanted the ink to flow into the breaks in the paste. Press paper into ink and pick up.

Step 9: Repeat the process, drying in-between with a Ranger Heat-it Tool and dabbing the excess ink with a paper towel until satisfied with the result.

Step 10: It is very cool to see how the Distress Ink gets into the cracks left by the Translucent Crackle Paste.

Step 11: Use Collage Medium to adhere the cardstock to the surface of the square Vignette Box.

Step 12: Add the glazed chipboard element to the surface with Collage Medium. You may need to place something heavy on top for a few minutes until the element is secure.

Step 13: Adhere a Sizzix Permanent Adhesive Sheet to back of metallic cardstock. Choose a sentiment from the Sizzix Bold Text 2 and cut two sets from the Metallic Cardstock. Peel the Adhesive Sheet from each letter and adhere matching letters together, to make one thicker set of words.

Step 14: Use the leftover negative cut out as a template for placing letters on the square Vignette Panel. Peel the adhesive cover back and press letter back into the matching shape. Once adhered, slowly pull the template from the surface. Press the letters into place to adhere securely to the Vignette Panel.

Step 15: Add Clippings sticker below words to reinforce the sentiment you choose.
 I have been a “maker” all my life. Sewing, stamping, paper arts, I love it all. Creating and teaching is a passion for me, whether it is in the classroom or on my blog, One Lucky Day. I have worked in the scrapbooking/mixed media field since 2005 and for the last 7 years have been the Creative Coordinator for Tim Holtz Brands, a dream job if there ever was one. On a personal note, I live on the Central Coast of California with my husband, Jay. I love to travel to new places to look for old junk and am willing to pack a bag at a moment’s notice. On an ordinary day you can find me working away in my craft room with the windows wide open and music playing in the background. Follow Paula on instagram @luckyday.
 Related Posts

Thanksgiving Place Settings by Patti Behan
Add a personal touch to your Thanksgiving table with handmade place settings by Patti Behan! Using Ranger Embossing Powders,...
Read More