


Follow along as Paula Cheney shows you how to create this lovely Vignette Tray using Saltwater Taffy, the newest addition to the Tim Holtz Distress® line.
Distress Focus on the Good Vignette Tray by Paula Cheney
- Materials
- Instructions
Other:
Tim Holtz® by Tonic Studios Glass Media Mat
Tim Holtz® idea-ology: TH94023 Optical Lens; TH94051 Ephemera Pack - Field Notes
Tim Holtz® Alterations by Sizzix 665847 Bold Text 1; 663094 Skeleton Leaves
Tim Holtz® by Stampers Anonymous CMS190 Distress Damask
Embossing Tool
Foam Pads - Thin + Standard
String
Sewing Machine (optional)
Chipboard
Sticky Back Canvas
97% Isopropyl Alcohol
Instructions

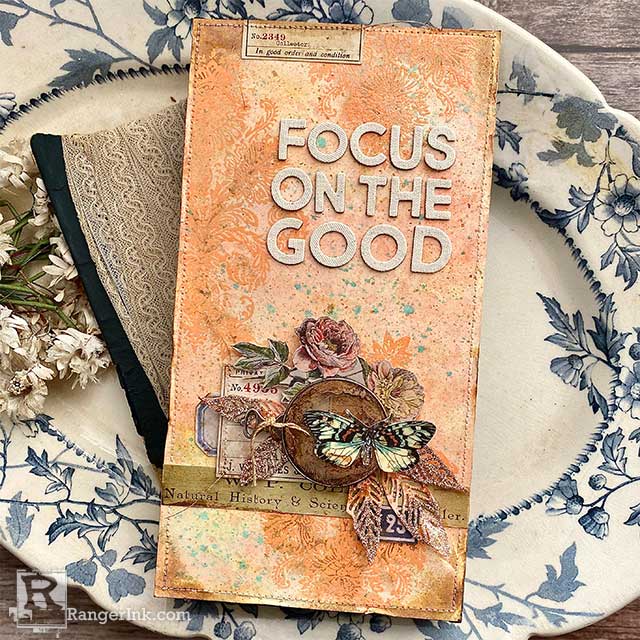
Step 1: Paint the outside of a small Vignette Tray with Black Soot Distress Paint. Set aside to dry.

Step 2: Cut two pieces of Mixed Media Heavystock 4 3/4” x 9”. Press Saltwater Taffy Distress Ink Pad on glass mat. Do the same (but sparingly) with Salvaged Patina and Fossilized Amber. Take caution, as Fossilized Amber is a strong color…best to take the ‘less is more’ approach. Spray water over the ink on the glass mat. Press one piece of Mixed Media Heavystock into the ink. Pick up and dry with Heat It Tool, dabbing off excess with a paper towel. Repeat until satisfied with the layers of color. I had to add more Saltwater Taffy to the glass mat before I was done. Repeat with the second piece of Mixed Media Heavystock. Set aside one piece for later.

Step 3: Use a sewing machine to stitch around the edge of one sheet.

Step 4: Use Distress Embossing Dabber to add embossing ink to a stamp. I used Stampers Anonymous Distress Damask for this project. Press the stamp onto the surface. Lift stamp and sprinkle Distress Embossing Glaze Saltwater Taffy over the surface. Tap-off excess powder and return to jar. Melt Glaze with an embossing gun. NOTE: the Glaze melts almost immediately, so keep the embossing gun moving. If you overheat, the pattern will remain but there will be no texture to the surface. No one wants that!

Step 5: Create a pattern using the image and Distress Embossing Glaze. NOTE: If you are more of a clean crafter, you can skip to Step 8. If you like more grunge or aging then keep on with Steps 6 and 7.

Step 6: Spritz the surface of the card with Distress Spray Stain Salvaged Patina. Push down slowly on the nozzle of the bottle to get the splatter effect. If you are unsure how the ink will come out of the bottle, test on a scrap paper before using on your background.

Step 7: Press the Gathered Twigs Ink Pad onto glass mat. Spritz with water. Using your fingertip, pick up ink and lightly rub over the glazed portions of the surface. I went along some of the sewn edge and corners too. This will give your surface an aged appearance. Remember, don’t overdo it, we are just adding subtle layers for more depth.

Step 8: Use Collage Medium to add card to the Vignette Tray that you previously painted black. Press down until secure (you might consider putting some heavy books on top while it dries).

Step 9: Choose a few pieces of ephemera from the idea-ology Field Notes Ephemera pack. Add stitching to some of the labels if you wish. Rub a thin layer of Collage Medium over the surface of ephemera to strengthen the paper. Let dry or dry with a Heat It Tool.

Step 10: The Optical Lens is a round metal band with glass in the center. I wanted it to look old, so I used a combination of Mushroom Alcohol Ink, Blending Solution, Statue Alloy and 97% Isopropyl Alcohol. Drip Mushroom Alcohol Ink over glass and swirl around until coated. Drip a small amount of Blending Solution onto the surface, then the Alloy (alloy needs a small amount of Blending Solution so it does not flake off). Drip a small amount of 97% Isopropyl Alcohol (found at drugstore) over the Alloy to break up. If you get too much of the Blending Solution or Isopropyl, just dab with a paper towel, then add back what you want (probably more Mushroom). This technique is a bit of give and take but it is fun to watch the solutions work together and create the metal-like layers. I chose to rub away the center portion so I could see through the glass, leaving the edges aged in appearance. Tie string around the neck of the Optical Lens before moving on.

Step 11: Use all the pieces you have just worked on to create a collage in the lower part of the small Vignette Tray. The key to the collage is foam pads to create different levels. The label with the red number has thin foam pads, the flowers have standard foam pads and the Optical Lens has an old bingo chip behind the butterfly, making it highest in position. All other pieces are glued directly to the surface.

Step 12: Cut a leaf shape (Sizzix Skeleton Leaves Thinlit) using the second Mixed Media Heavystock piece.

Step 13: Using a brush, add Collage Medium to the ends of the leaves, then pour Tinsel Distress Glitter over the surface. Pick up leaves and return the excess glitter to the jar. Dry with a Heat It Tool.

Step 14: My leaves did not have much contrast, so I pressed the stem into Gathered Twigs ink spritzed with water (you can see it on my glass mat on the left), then spritzed a bit of Saltwater Taffy directly on the stem. Now that looks better.

Step 15: Pinch off the bottom set of three leaves and add them to the collage with Collage Medium. Use the top set of two leaves on the left side to complete the collage. Now you see the benefit of having the Optical Lens raised…very easy to slip the leaves right underneath.

Step 16: Using the Sizzix Bold Text 1 Thinlit, cut two separate surfaces: thin chipboard and a sticky back canvas. Once the letters are cut, combine to make a thicker letter, chipboard on the bottom, canvas on the top. The canvas has a sticky back so it was easy to add it to the chipboard.

Step 17: Use Collage Medium and a small brush to add the letters to the Vignette Panel.
 I have been a “maker” all my life. Sewing, stamping, paper arts, I love it all. Creating and teaching is a passion for me, whether it is in the classroom or on my blog, One Lucky Day. I have worked in the scrapbooking/mixed media field since 2005 and for the last 7 years have been the Creative Coordinator for Tim Holtz Brands, a dream job if there ever was one. On a personal note, I live on the Central Coast of California with my husband, Jay. I love to travel to new places to look for old junk and am willing to pack a bag at a moment’s notice. On an ordinary day you can find me working away in my craft room with the windows wide open and music playing in the background. Follow Paula on instagram @luckyday.
 Related Posts

Thanksgiving Place Settings by Patti Behan
Add a personal touch to your Thanksgiving table with handmade place settings by Patti Behan! Using Ranger Embossing Powders,...
Read More