


Jump-start your creativity with Distress Stains — make this stunning art journal!
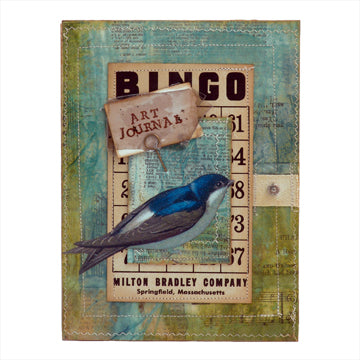
Distress Stains Fabric Paper Art Journal By Lisa Dixon
- Materials
- Instructions
- Archival Ink™ #0 Pads
- Tim Holtz Distress® Ink Pads
- Ranger Mini Misters
- Ranger Ink Blending Tool & Foam
- Ranger Heat it™ Craft Tool
- Ranger Non-Stick Craft Sheet™
- Ranger Artist Brush Set
- Ranger Multi-Medium
- Tim Holtz Distress® Stains
- Tim Holtz® Idea-ology® Memo Pins
- Cold Press watercolor paper - Strathmore
- Blue grosgrain ribbon - May Arts
- Vintage Bingo Card - Sadie Olive
- Mica - USArtquest
- Waxed Linen Thread - Tandy Leather Factory
- Bird image - Bird on a Wire m2592, Artchix Studio
- Alphabet stamps - Printer's Type LL761, Hero Arts
- Unbleached muslin
- Water
- White tissue paper
- Text pages from an old book
- Sheet music
- Old dictionary pages
- Tapestry needle
- Sewing machine
- Cotton quilting thread
- Snap tape
- Foam paintbrush
- Needle tool
Instructions
Make the Fabric Paper (adapted from a technique by Mixed Media artist Beryl Taylor)
(1) Cut or tear a twelve inch square of unbleached muslin and lay it out onto a Non-Stick Craft Sheet.
(2) In a small disposable cup, mix together water and CH Studio Matte Multi-Medium to a heavy cream consistency. Use a foam brush to paint a layer of the diluted medium over the entire surface of the muslin.
(3) Tear or cut squares and rectangles of old book text pages, sheet music and old dictionary pages in various sizes and cover the entire surface of the wet muslin. Don’t overlap the papers, small gaps between the pieces is recommended for a more pliable finished result. Press each piece firmly onto the muslin to remove air bubbles.
(4) Cut eight to ten strips of white tissue paper about three inches wide and twelve inches long.
(5) Brush another coat of the diluted medium over the collaged muslin and then place the tissue paper strips across the surface. Overlap the strips as you go and lightly brush with the diluted medium. Be sure to remove air bubbles and work carefully as the wet tissue is very fragile. If you have leftover tissue, tear bits and pieces and add them to the collage for added texture.
(6) Use the Non-Stick Craft Sheet as a palette to prepare several colors of Distress Stains. Use a mini mister with water to dilute the colors if desired. For this project, use Broken China, Peeled Paint, Forest Moss and Faded Jeans.
(7) Brush the stains randomly over the entire surface of the muslin collage with a paintbrush.
(8) Spray sections of the fabric paper with Sunflower Sparkles and Perfect Copper Perfect Pearls Mists.
(9) Set aside to dry completely. You can speed the drying process using the Heat-it Craft Tool.
Make the Journal Pages
(10) Cut nine eleven inch by seven and one-half inch rectangles of watercolor paper. Score each in the center and fold in half. Nestle three folded pages inside together to create a signature. Do the same for the remaining folded pages for a total of three signatures. Mark the top of each signature.
(11) Make a cardstock template the same size as your folded pages. Open the folded template, measure down one inch from the top and use a needle tool to pierce a hole in the center seam. Measure one inch from the bottom and pierce a hole. Measure and pierce holes two inches from the top and bottom edges. Finally, pierce another pair of holes in the center seam measuring three and one-quarter inches from the top and the bottom. You will end with a total of three pairs of holes all one inch apart. Mark the top of your template.
(12) Nestle the template in the center of one of the signatures. Use a needle tool to punch through each marked hole. Repeat this step for the remaining signatures. Make sure all the tops are at the top.
(13) Thread large-eyed needle with two outstretched arm-lengths of waxed linen thread.
(14) Open the first signature. Sew from the outside bottom hole to the inside. Leave a tail about as long as the journal. Sew through the second hole from the inside to the outside. Be sure not to pull the tail through. Sew down through the next hole from outside to inside. Continue this method all the way up.
(15) Slide two six inch lengths of one-inch wide grosgrain ribbon underneath the large stitches on the outside of the signature.
(16) Take the second signature (be sure the top is at the top) and slide underneath the ribbons. Open it to the middle and hold both together. Sew through the top hole from the outside to the inside of the signature. Sew back down as you did for the first signature. Have your stitches go over the ribbons on the outside. Adjust the tension of thread as needed to keep the stitches tight. When you reach the bottom, open it up flat and make sure the stitches are snug and tight. Tie the two strings at the bottom together.
(17) Add the third signature. Sew in and out from the bottom to the top. When you get to the top, take your needle and go under the thread between the first and second signatures to bind your third signature to them. Pull until you get a loop and sew the needle down through the loop to finish the knot.
Make the Journal Covers
(18) Cut a two and one-half inch by three and one-half inch rectangle from fabric paper.
(19) Use a sewing machine with white cotton thread to sew the fabric paper to a Manila ATC with a zigzag stitch leaving a one-half inch seam allowance.
(20) Ink the edges of the ATC with Walnut Stain Distress ink using a Blending Tool and Foam.
(21) Ink the edges of a vintage Bingo card with Walnut Stain Distress ink using a Blending Tool and Foam.
(22) Sew the ATC to the Bingo card using a straight stitch and one-eighth inch seam allowance.
(23) Cut two eight inch by six inch squares from watercolor paper.
(24) Cut two eight inch by six inch squares from fabric paper.
(25) Sew the Bingo card to one of the fabric paper rectangles using a straight stitch and leaving a one-eighth inch seam allowance.
(26) Layer each fabric paper rectangle to a watercolor paper rectangle and use sewing machine to stitch together to make the front and back covers. Sew using a straight stitch with a one-half inch seam allowance. Then sew using a zigzag stitch with a one-eighth inch seam allowance.
(27) Sew a small length of snap tape to the center of the inside back cover and the center of the front of the front cover.
(28) Use a strong double-sided tape to adhere the covers to the front and back of the journal pages.
(29) Cut a one and one-half inch by two inch rectangle from white cardstock. Tear one long edge and Stamp “art journal” using Coffee Archival inkpad. Ink the edges with Walnut Stain Distress ink with Blending Tool and Foam.
(30) Sandwich the “art journal” block between two thin pieces of mica and place in memo pin. Attach pin to the ATC block on the front cover.
(31) Cut out bird image and collage onto the front cover ATC using CH Studio Matte Multi-Medium to complete your journal.
Related Posts

"My Cup of Care" Journal Page with Dylusions Pastel Paints by Miranda van den Bosch
Read More

Tim Holtz Distress® Micro Glaze Embossing Resist by Tami Bastiaans
Create gorgeous embossed backgrounds with the Micro Glaze Embossing Resist technique! ✨ Tami Bastiaans pairs Tim Holtz Distress® Micro...
Read MoreDrawer Title
- Choosing a selection results in a full page refresh.