


by Bobbi Smith

Everyday Ombre Feather Burlap Panel by Bobbi Smith
- Materials
- Instructions
- Ranger Craft Tags: #12 Manila
- Ranger Watercolor Paper
- Tim Holtz Distress Ink Pad: Walnut Stain, Pumice Stone, Vintage Photo
- Tim Holtz Distress Spray Stain: Abandonned Coral, Picked Raspberry, Spiced Marmalade, Mermaid Lagoon, Peacock Feathers, Cracked Pistachio
- Tim Holtz Adirondack Alcohol Inks: Mushroom
- Wendy Vecchi Archival Ink: Watering Can
- Ranger Embossing Powders: Gold, Verdigris
- Ranger Emboss It™ Dabber
- Ranger Glossy Accents™
- Ranger Non-Stick Craft Sheet™
- Ranger Heat it™ Craft Tool
- Ranger Mini Blending Tool
- Tim Holtz® Alcohol Ink Applicator
- Ranger Mister
- Ranger Paper Creasers
- Tim Holtz Sizzix Alterations: Feather Duo, Postage Stamp Frame, Sized Rectangles, Thinlits-Handwritten Journey Set, Wood Planks Texture Fades
- Tim Holtz by Idea-ology: Burlap Panle 6x8, Label Pull, Typed Token, O-Ring
- Vintaj - 1.5mm Rivet Hole Punch Pliers
Instructions
 Guest Artist Bobbi Smith shares a step by step tutorial for creating a layered decor piece. This piece is perfect for your own home, to give as a gift, or adapted to a card design!
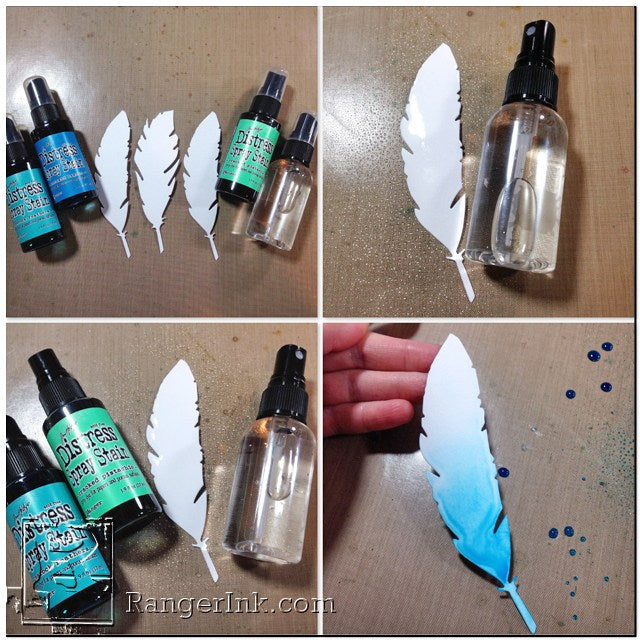 Die cut a piece of Ranger watercolor paper using the Tim Holtz Feather Duo die. I cut 2 thinner feathers and 1 thicker feather.
Color 1 feather at a time to have greater control in achieving the ombre affect. Lightly mist 1 feather with water. Mist puddles of Tim Holtz Mermaid Lagoon and Peacock Feather Distress Spray Stain onto the bottom half of feather. Mist again lightly with water to get the colors to move and blend (the more water you add, the less intense the color will be). To achieve the ombre look, tilt the top of the feather so that color pools to the lower half and dry with a heat tool. Now you have all the lovely color still left on your nonstick craft sheet.
 To add more distress to the feather, pick up droplets of color off the nonstick craft sheet with watercolor cardstock feather blotting to picking up the color (not swiping) then drying with heat tool. Repeat this process with each feather changing the colors slightly. Mermaid Lagoon, Cracked Pistachio and Peacock Feathers all work beautifully together and can be mixed for color variations. Using the embossing folder that is accompanied with the Feather Duo die, run the feathers back through the Vagabond to create the embossing with the folder. Apply Pumice Stone & Black Soot Distress Inks (very, very sparingly using the Black Soot) with the blending tool to the raised portion of the feathers.
 Taking the larger/wider feather tape off 1.25” with tissue tape to non stick craft sheet. Using the Embossing Dabber, swipe the top taped off portion of feather with dabber (making sure to get down in the cracks and crevices. Take off tape and sprinkle Ranger Gold Embossing Powder over ink and shake off excess. Melt embossing powder with heat tool. Put tissue tape on feather to keep line crisp, swipe some Wendy Vecchi Watering Can Archival Ink over the raised portion of the gold embossing to highlight. Dry with heat tool.
 Cut a piece of Ranger Mixed Media Cardstock 4.25”x5.50”. Using Tim Holtz Wood Plank Texture Fade, run the Mixed Media Cardstock through the Vagabond to create the embossing with the folder. Shade the entire surface with Pumice Stone Distress Ink and a blending tool. Flick water droplets onto surface and dry with heat tool.
 The water creates a bleaching effect. Shade outer portion of card with Vintage Photo Distress Ink and blending tool. Then apply Walnut Stain Distress Ink with a blending tool to some inner portions and outer portions of the cardstock. This will give you beautiful depth and shading. Distress edges with bone folder.
 Sprinkle sparingly Ranger Verdigris Embossing Powder from the top left to bottom right of Wood Plank cardstock. Carefully pick up cardstock and using heat tool on the under side heat to melt embossing powder. This is going to ensure the embossing powder is not disturbed and melts nicely to cardstock, because we did not use any embossing ink. Die cut a piece of Ranger Mixed Media Cardstock using Tim Holtz Postage die and Large Mover and Shaper Sized Rectangle die. Shade outer edges with Vintage Photo and Walnut Stain Distress Inks and blending tool. Distress edges with bone folder
 Using a Ranger #12 Giant Manila Tag, lightly mist water with mister over entire surface. Then mist puddles of Tim Holtz Abandoned Coral, Picked Raspberry and Spiced Marmalade Distress Spray Stain over surface of tag. Then mist again lightly with water to get the colors to move and blend (the more water you add, the less intense the color will be). Dry with heat tool. Pick up droplets of color off the nonstick craft sheet with tag blotting to picking up the color (not swiping) then drying with heat tool. Unevenly, tear off the bottom 2 1/2 inches of the tag. Shade outer portion of tag with Pumice Stone & Walnut Stain Distress Inks and blending tool. Distress edges with bone folder.
 Place Tim Holtz Typed Token, Label Pull, Brads and O-Ring on Non Stick Craft Sheet. Using your finger apply Picked Raspberry, Spiced Marmalade and Abandoned Coral Distress paint sporadically to metal surfaces. Dry with a heat tool. Drip a couple of small drops of Mushroom Alcohol Ink onto metal pieces and dry with heat tool. Punch a small hole in Label Pull using Vintaj – 1.5mm Rivet Hole Punch Pliers to attach Typed Token charm. Die cut Tim Holtz Thinlit Handwritten Journey word “everyday” die and scrap piece of the manila tag that was tore off, run through Vagabond.
 Attach Giant tag to Burlap Canvas with wet adhesive. Attach Wood Plank cardstock and Postage Frame with Ranger Adhesive Foam. Attach the Feathers using Ranger Adhesive Foam, the 3 center foams are 2x stacked one on top of the other. The top and bottom adhesive foam is only a single layer, this will give even dimension to the feathers. Use Glossy Accents to attach “everyday” wording to center of feathers and metal Label Pull to bottom center of tag.


Related Posts

Thanksgiving Place Settings by Patti Behan
Add a personal touch to your Thanksgiving table with handmade place settings by Patti Behan! Using Ranger Embossing Powders,...
Read More