


Hi everyone! Carisa here with you today and I’m so excited to be back on the Ranger blog after a little break to share what I’ve been creating using the Gel Plate that was released at Creativation 2018! I’m pretty much obsessed with this new tool to create awesome backgrounds and love that you can use it on pretty much anything! To get started you’re going to need the new Gel Plate, Brayer, Marking Tools, Texture Combs, some of your favorite paint colors, stencils and stamps! When I first started working with the Gel Plate, I did the usual create a layer, add you paper and get a print then repeat on your paper until you have achieved the layered look you like. However, I recently saw someone do a one pull print and I was determined to give that technique a try which is what I’m showing you today as we create a mixed media art envelope. Today I’m using a 5×7 watercolor envelope but you can use anything for this technique!
Gel Plate Mixed Media Envelopes by Carisa Zglobicki
- Materials
- Instructions
- Gel Plates
- Gel Plate Printing Brayers
- Gel Plate Texture Combs
- Gel Plate Marking Tools
- Dina Wakley Media Acrylic Paints: Elephant, Turquoise, Blushing, Sky, Magenta
- Dina Wakley Media Stamps: Circles, Oops Oh Well
- Dina Wakley Media Stencils & Masks: Variegated Stars, Swirling Dashes
- Dina Wakley Mixed Media Archival Ink Palette: Night
- Tim Holtz Distress® Mixed Media Archival Ink Palette: Hickory Smoke, Black Soot
- Tim Holtz Distress® Crayons: Abandoned Coral, Shaded Lilac, Cracked Pistachio
- Fude Ball Pen
- Ranger Heat it™ Craft Tool
- Tim Holtz by Stampers Anonymous Tag Stencils Mini Set14
- Watercolor Paper Envelope
- Stamp Block
Instructions

Step 1: I start by laying down a few dots of different color paints directly on my gel plate.

Step 2: Using the brayer, I blend and spread the color on my plate keeping a few spaces empty without color.

Step 3: This is what you should have left on your plate.

Step 4: While it’s still wet you can press some stamps into the gel plate to create texture. Let this dry a bit (but not completely) before adding your second layer. One thing to keep in mind when using your stamps in paint is to clean them off right away. I like to keep a water bottle and baby wipes on hand to do this right away when I don’t feel like taking them to the sink.

Step 5: Included in the variety pack of Gel Plates from Ranger Ink is a smaller rectangle plate and I like to use this as my palette off to the side to pick up my paints. It’s especially nice when I’m doing any type of stencil techniques on top of the Gel Plate.

Step 6: Continue to add layers directly to your Gel Plate using different colors of paint along with stamps and stencils to create texture in your layers. One thing to remember with this technique is to let each layer you lay down dry a bit before adding another. Once you are happy, add one last thin layer of a lighter or contrasting paint over the entire gel plate. Your plate will look something like this and now you are ready to place your envelope on top to get your print. THIS is where the magic happens!

Step 7: Take your envelope and press it firmly against the gel plate. I like to do the front side first since the back side we’ll have to do a couple of pulls on different areas of the plate to fill it up and I like the front to have one cohesive kind of look. Once you feel like you’ve pressed your paper enough into the Gel Plate, gently lift it up starting at one corner, you’ll start to see the layers lift from the Gel Plate onto your envelope.

Step 8: This is an example of what you’ll be left with on your paper or envelope. (I did a couple different examples for this tutorial and didn’t take a picture of the actual envelope pull but this gives you an idea of what it looks like!) Each time I do this, it’s like opening a present! I never know how it will look or if it will work but so far I’ve always been so happy with the print!

Tip 1: Don’t let the paint on your gel plate palette go to waste either! Place a stencil on top and press your envelope over it to create more texture all over. Since these are the colors you already used to make your print, you know it will match and blend beautifully.

Tip 2: If your envelope gets muddy or too busy, my favorite way to tone that down is to add some white with a stencil. I do this by placing my stencil on the (semi clean) Gel Plate and then use the brayer to add the white paint over the stencil. Remove the stencil so all you are left with is the design on your Gel Plate and press the envelope to the plate on various areas to break it up.

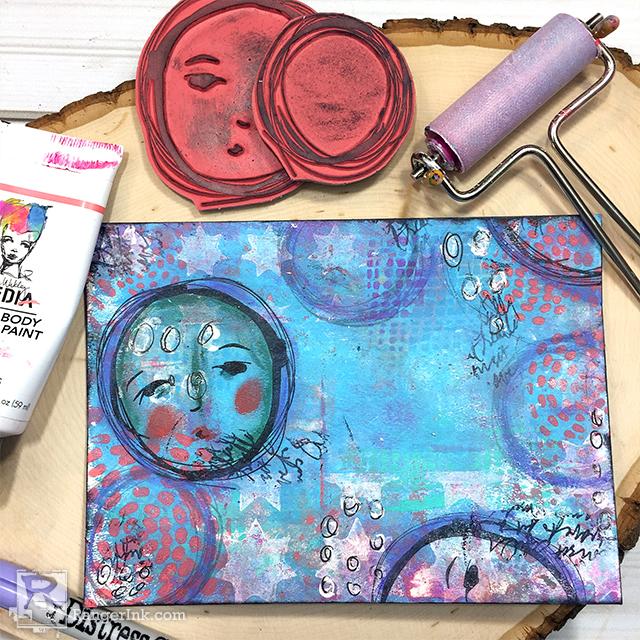
Step 9: Finally, once your envelope is fully dry you can then continue to add texture on your envelope with stamps. Let’s be honest, I sped that up with my heat tool, I just can’t help myself. However, when you are working with the Gel Plate most likely you’re doing several prints at once because it is seriously that addicting and you can just let them air dry in between. I pulled out several texture stamps and this awesome circle face from the Oops Oh Well stamp set to create my focal point on the front of my envelope. I take care to only decorate along the outside edges keeping the middle where I’ll be writing the recipient’s address clear so it can easily be read. I also added more color to my envelope creating more depth and dimension with some Distress Crayons in similar colors.


I’ve filmed my entire process for you today which I hope helps to make it a lot clearer how I use the Gel Plate to create my mixed media art envelopes. I love creating these and sending out my handmade cards in them! I like to think it brightens up the day of everyone who sees it along the way and encourage you to give it a try today!
Thank you to Ranger again for inviting me back to the blog after a short break to share my art with your readers using my favorite Ranger Ink products. They truly are some of my favorite mediums I turn to again and again as I continue my journey as a mixed media artist. I hope you all will be inspired by my use of the new Gel Plate to make your own unique prints!

Related Posts

Simon Hurley create. Woodland Hello Card by Lieschen Harshbarger
Step into the woods with this enchanting card tutorial by Lieschen Harshbarger! Crafted using the Simon Hurley create...
Read More
Distress Embossing Glaze Christmas Card by Cheiron Brandon
Get into the holiday spirit with this stunning “Peace on Earth” card by Cheiron Brandon! Learn how to layer...
Read More