


by Kassa Hayselden

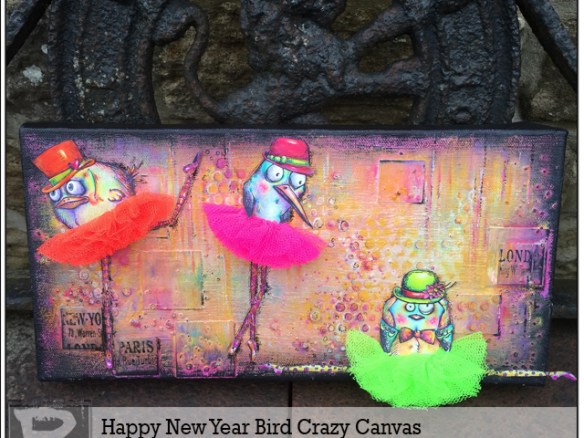
Happy New Year Bird Crazy Canvas by Kassa Hayselden
- Materials
- Instructions
- Dina Wakley Media Brushes
- Ranger Texture Paste Opaque Matte
- Ranger Non-Stick Craft Sheet™
- Archival Ink™ #0 Pad Jet Black
- Fude Ball Pen: Black
- Tim Holtz® Distress Markers: Ripe Persimmon, Squeezed Lemonade, Picked Raspberry, Abandoned Coral, Dried Marigold, Spiced Marmalade, Crushed Olive, Mowed Lawn, Cracked Pistachio, Shaded Lilac, Black Soot
- Tim Holtz® Distress Ink Pad Black Soot
- Tim Holtz by Stampers Anonymous: • Papillion Stamps - cms 106, Bird Crazy Stamps - cms 212, Crazy Things stamps - cms 237
- Tim Holtz Layering Stencil – Bubble, Speckles, Stripes
Instructions
Hi there everyone, Kassa here with a tutorial on how I created this deep edged 12″ x 6″ canvas – before I get going I’d like to wish you all a ‘Happy New Year.’
So if you were wondering where I got the inspiration for this little cheerful and vivid piece from well being that it is the new year and all that – I am, like many of us out there, looooves to do the ‘New Year’s resolution thing!’ So I got these ‘Crazy Birds’ doin’ a ‘Crazy’ dance for the new year – a sort of new year/new dance/ new you idea – long may it last!
 Step 1: Apply a generous layer of gesso with an old brush to the canvas (front and sides) Then add talcum powder to the front of the canvas along with the wet gesso (apply enough powder to form a grungy mix) Use horizontal brush strokes.
 Step 2: The gesso and talcum powder leave a ‘tree bark’ look once fully brushed in and your ‘pokey’ tool leaves fabulous indentations if you write into this wet mixture.
 Step 3: Once dry, adhere onto the canvas small squares of various sized card using Dina Wakley’s Matte Gel Medium. Apply the medium to the back of the card as well as the canvas and to seal, and press down the squares perfectly in place. Brush a couple of strokes of medium on top of the squares (not forgetting the edges).
 Step 4: Take the Ranger Opaque Texture Paste and apply it through Tim Holtz Bubble and Speckles Layering Stencils.
 Step 5: Once the Texture Paste has fully dried, take Tim Holtz’ Picked Raspberry Distress Paint and paint all the sides and front edges. Once this is finished, dry brush by pulling the paint towards the centre of the canvas with a dry paint brush/the one you have been painting with that has just about run out of paint. This achieves softer, dustier edges. Dina Wakley Paint Brushes are ace for this job, especially the largest one – they are quite firm and bouncy.
 Step 6: Now using the large Dina Wakley Paint Brush again apply Dina Wakley Black Gesso to the sides of the canvas, but this time only kiss the very front edges of the canvas with the Black Gesso. When you start to pull the gesso out more on the edges (approx ¼”) with your dry brush technique from step 5, the pink should still show through.
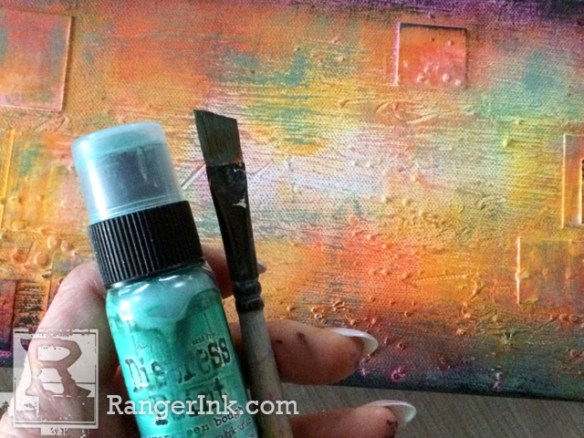
 Step 7: To add the pop of color I take Tim Holtz’ Distress Paint and Distress Re-Inkers and add a dab/drop or 2 or 3 onto the Ranger Non-Stick Craft Sheet. The 1st color I went with was Spiced Marmalade Distress Paint and Ripe Persimmon Distress Re-Inker. I don’t mix them on the sheet, but opt for picking a little of each up with my paint brush. They mix themselves as you apply to the canvas and from there you can see if you need a little more paint or ink. (The ink gives the brightly colored paints and extra vavavoom.
 Step 8: Once the paint has dried, apply as in step 7 the Mustard Seed Distress Paint and Squeezed Lemonade Distress Re-Inker.
 Step 9: Again, once the paint has dried, apply a small amount of Evergreen Bough Distress Paint – the dry brush method is best for this contrasting colour so you get a better blend (When I pick up the small amount of paint for dry brushing, I test that there is not too much paint on my brush in my Dyan Reaveley Journal, this is win-win as I get the correct amount of paint on my brush and I start to build painterly backgrounds up in my Journal!)
 Step 10: Once everything has dried, apply just a little Mowed Lawn Distress Paint and Squeezed Lemonade Distress Re-Inker as in step 7. When this step dries, you may feel you need to dry brush a little more Picked Raspberry Distress Paint here and there for balance and that extra ‘pop’ of pink. You can repeat any or all of the steps from 7 to 10 to build up your layers of yummy color, I always lose count how many layers I go for, but I’d rather do more layers using thin layers of paint as the end result blends seamlessly.
 Step 11: Dry brush the edges of the canvas again. You could use this step as your last step as the canvas looks amazing and bright at this point, it’s up to you. Leave to dry whether you stick at this point or continue to the next.
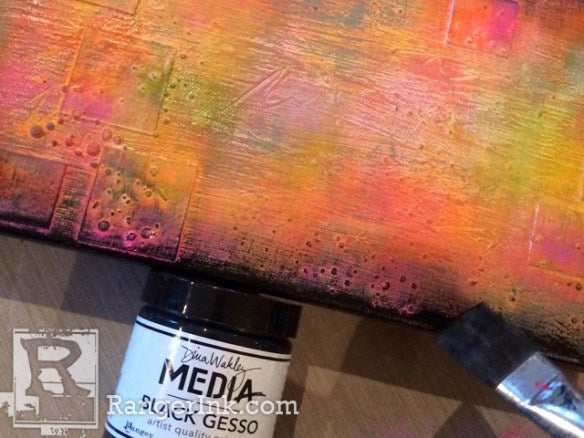
 Step 12: But as I want my brightly colored-in Tim Holtz Bird Crazy birdies to ‘pop’ off the page I apply a thin coat of Dina Wakley’s White Gesso to my canvas front using the dry brush method. This gives a toned down dusty look but leaves all the beautiful colored layers peeping through – if you apply too much wipe off quickly with a wet wipe. Again I add very thin coats, leaving to dry between coats and building the layers till I’m happy. If need be, apply a little more Black Gesso to the edges.
 Step 13: Dab a little of the Tim Holtz Picket Fence, Mustard Seed & Picked Raspberry Distress Paint (in that order making sure each layer is dry before laying down the next) through Tim Holtz Layering Stencil Bubble. I used more of the Mustard Seed through the stencil to give a warm happy and sunny feel.
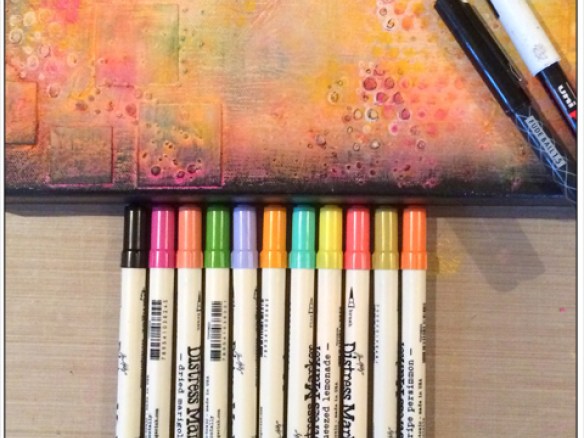 Step 14: More layers, fun colourful layers using Tim Holtz Distress Markers Ripe Persimmon, Squeezed Lemonade, Picked Raspberry, Abandoned Coral, Dried Marigold, Spiced Marmalade, Crushed Olive, Mowed Lawn, Cracked Pistachio, Shaded Lilac, Black Soot I add various random doodles, to boost the colour on my canvas, basically anywhere on my canvas, around the ‘bubbles’ the ‘squares’ the edges etc. Rubbing in the ink with your finger blends the ink perfectly or simply let the scribbles, dots, dashes, circles, doodles dry as is for the ‘pop’ of color. Now I highlight with a white marker pen then lastly with a Ranger Ink Fude Ball Pen.
 Step 15: Now I add a few vertical stripes in irregular bursts along the top of my canvas using Tim Holtz’s Stripes Layering stencil and Mustard Seed, Spiced Marmalade and Picked Raspberry Distress Paints. I apply each color after the previous color has dried and only pull the color through to approx midpoint on my canvas, wipe off any excess paint from your Black Gesso’d edges.
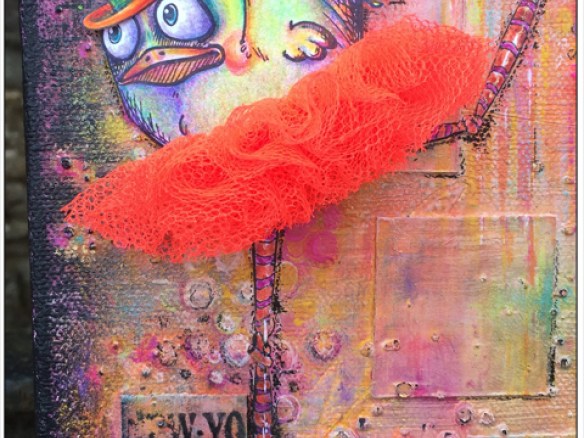
 Step 16: Stamp out 3 of your fav Tim Holtz ‘Bird Crazy’ images onto artist quality paper using Ranger Archival Jet Black ink and colorise – I chose to colorise with my color pencils. Here they are all dress in their neon tutu’s – too cute!
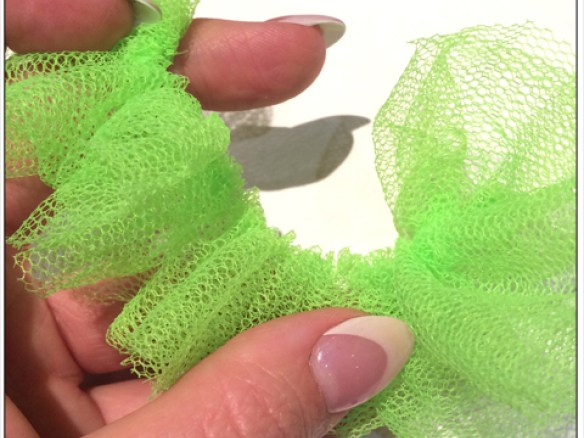 Step 17: The tutu is a length of netting 90cm x 8cm, fold the net in half lenghtways so it becomes 90 x 4cm and on the fold sew in ‘running stitch’ along the fold pulling the tiny pleats together as you go. When finished, fold the pleats together to form a tutu that fits your birdie’s girth perfectly – mine took 3 folds. Adhere to your birdies.
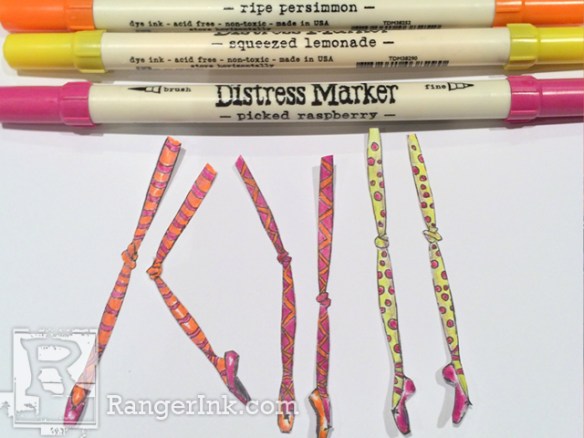 Step 18: The birdies legs I thought woud be fun uber long, I sketched them out in pencil, then a black waterproof fineliner, then colorised with Tim Holtz Distress Markers – ‘Picked Raspberry, Squeezed Lemonade & Ripe Persimmon’ I also used these Coloured Markers to color-in the Tim Holtz ‘Crazy Things’ hats, flowers, heart and bow-tie!
 Step 19: To adhere the Birdies and legs and hats etc in place I use Dina Wakley’s Matte Gel Medium, carefully so as not to catch the Distress Inks. I then take an old credit card and add a little extra colour stripes, moving onto white and black gesso touches to finish off the stripes.
 Step 20: Tying the whole piece together is vital, because I used coloring pencils to color the birdies. I now take the same colors and doodle here and there on my canvas. As there is a coating of White Gesso as one of the last layers the colored pencils have a great base to grip and sit beautifully allowing me to create the perfect cohesion. A black outline around the birdies and under their feet especially (to anchor them) give them more depth, a shadow, pushing them to the foreground.
 Step 21: Finally, I add just a little more detail, those squares are shouting out for something – Tim Holtz ‘Papillion’ Stamp Set, the words just finish off my piece, stamped in Tim Holtz Distress Ink Black Soot!
By the way, I’ve meant to leave the ballet foot off the bottom edge corner, it’s a real nice easy exit for the eye once it’s stopped darting around all the layers of amazing Ranger color and my added tiny and Happy details.


Thanks so much for stopping by today, it would be totally amazing to link your inspired ‘Happy New Year’ Bird Crazy art over on the Ranger fb page. After all art is all about sharing with friends – Mwah xoxo Kassa

Related Posts

"My Cup of Care" Journal Page with Dylusions Pastel Paints by Miranda van den Bosch
Read More

Tim Holtz Distress® Micro Glaze Embossing Resist by Tami Bastiaans
Create gorgeous embossed backgrounds with the Micro Glaze Embossing Resist technique! ✨ Tami Bastiaans pairs Tim Holtz Distress® Micro...
Read MoreDrawer Title
- Choosing a selection results in a full page refresh.