


Joy Baldwin shares a step-by-step tutorial on how she creates this delightful Hello Friend greeting card using an assortment of Letter It™ products, Tim Holtz Distress® Oxide® Ink & Ranger Liquid Pearls.
Hello Friend Card by Joy Baldwin
- Materials
- Instructions
- Letter It™ Stencil: Flower Burst
- Letter It™ Cardstock: A2 Size Grey & White Panels
- Letter It™ Clear Stamp Set: Greetings
- Letter It™ Stamping Ink: Belize Blue
- Letter It™ Embossing Ink Pad Clear
- Letter It™ Acrylic Stamping Block
- Tim Holtz Distress® Oxide® Ink: Wilted Violet, Peacock Feathers
- Tim Holtz Distress® Clear Rock Candy Glitter
- Ranger Mini Ink Blending Tool
- Ranger Non Stick Craft Sheet
- Ranger Heat It Craft Tool
- Ranger Liquid Pearls: Gold Pearl, Peacock
- Ranger Opaque White Pen
- Ranger Sticky Embossing Powder
- Ranger White Adhesive Foam 1/2"
- Ranger Multi Medium Matte
- Simon Hurley create. Stark White Cardstock
- Scissors
- Paper Trimmer
Instructions

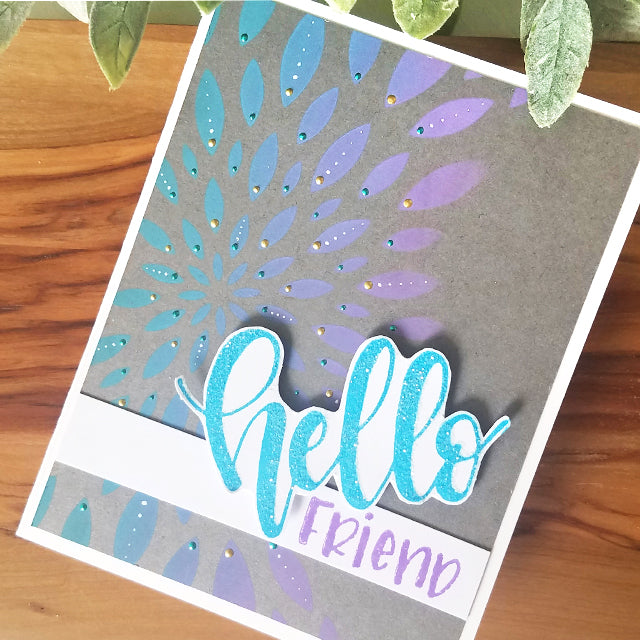
Step 1: Lay down the Ranger Non-Stick Craft Sheet. Using a piece of Letter It Grey Cardstock, trimmed to 4 x 5-1/4 inches, line up the Letter It Flower Burst Stencil on the left side of the card leaving some open area on the right side.

Step 2: Use Ranger's Mini Ink Blending Tool with the Foam to blend Tim Holtz Distress Oxide Inks in Wilted Violet and Peacock Feathers. Start blending Peacock Feathers from the left side (or top if you flipped the card), blend about half way down. Then use Wilted Violet and start blending from the bottom of the stencil toward Peacock Feathers and meetin the middle. The two colors will blend nicely and make a third color. Don't blend over all of the Peacock Feathers, you still want that true color.

Step 3: To adorn the beautiful stencil background, use Liquid Pearls in, Gold Pearl and Peacock. Alternate the color dots on one corner of each petal from the Flower Burst Stencil.

Step 4: To add more design to the petals use the White Opaque Pen. Add dots to some of the petals, start next to the liquid pearls and decrease the size of the dots as they go down. Set that aside to dry.

Step 5: Time to make the sentiment. Use the “Hello” sentiment from the Greetings Stamp Set by Letter It and stick that to an Acrylic Block. Ink the Sentiment with Belize Blue Ink by Letter It and stamp that on White Cardstock (Letter It). Trim around the sentiment using scissors, leaving a white border.

Step 6: Now use Clear Embossing Ink by Letter It and stamp over the same image previously stamped in blue. Apply the Sticky Embossing Powder, dump off excess and heat set that with Heat It Craft Tool. Once melted, apply Tim Holtz Distress Glitter to hot Sticky Embossing Powder. Don't let the Embossing Powder cool before applying the Glitter.

Step 7: For the second sentiment use the word “Friend” from the Greetings Stamp Set. Adhere that to an Acrylic Block and ink it using Tim Holtz Distress Oxide Ink in Wilted Violet. Stamp the image onto White Cardstock (Letter It) and trim it down into a long strip.

Step 8: Adhere the long sentiment strip using Ranger Multi Medium Matte Glue to the bottom portion of the card. Trim off any excess from the sides of the card. Then using ½ inch Adhesive Foam behind the “Hello” sentiment, adhere that on an angle slightly overlapping the other sentiment.

Step 9: Finally adhere the panel to an A2 size, side folding card base (Simon Hurley's Stark White Cardstock), using Ranger's Multi Medium Matte Glue.

Related Posts

Simon Hurley create. Woodland Hello Card by Lieschen Harshbarger
Step into the woods with this enchanting card tutorial by Lieschen Harshbarger! Crafted using the Simon Hurley create...
Read More
Distress Embossing Glaze Christmas Card by Cheiron Brandon
Get into the holiday spirit with this stunning “Peace on Earth” card by Cheiron Brandon! Learn how to layer...
Read More