


By Wendy Vecchi
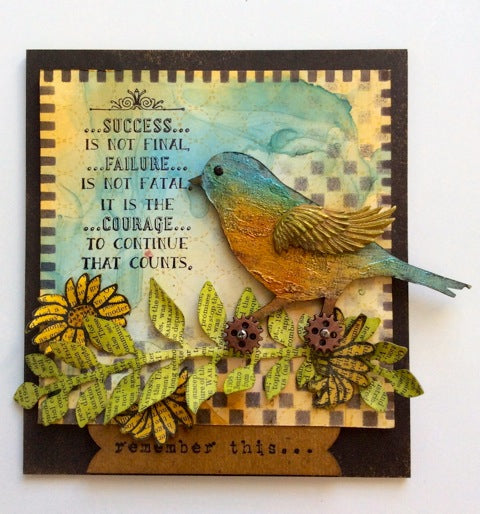
It Takes Courage
- Materials
- Instructions
- Archival Ink™ Designer Series: Wendy Vecchi: Orange Blossom, Tree Branch, Fern Green, Leaf Green, Watering Can, Dandelion, Forget-Me-Not; Reinkers - Forget-Me-Not, Orange Blossom
- Archival Ink™ #0 Pads: Jet Black
- Tim Holtz® Distress Stains™: Brushed Corduroy
- Tim Holtz® Distress™ Markers: Brushed Corduroy, Gathered Twigs, Wild Honey, Bundled Sage
- Ranger Ink Blending Tool & Foam
- Ranger Mini Blending Tool
- Ranger Non-Stick Craft Sheet™
- Ranger Brayers
- Ranger Specialty Stamping Paper
Instructions
1. Create an Archival reinker background on Specialty Stamping Paper, making sure to heat dry each layer, using Orange Blossom and Forget-Me-Not. See video for complete instructions.
2. Trim background to fit base and adhere to base with Glue N Seal. (4 1/2 inches square)
3. Use Tree Branch to stamp the dots and dashed background stamp over the background.

4. Use Jet Black to stamp the sentiment in the top left corner.
5. Use Watering Can with a blending tool to stencil randomly across the bottom and the right side, using the checkmate stencil.
6. Use a blending tool with Jet Black and the stripes stencil to add stripes along the top and sides.

7. Use the Gathered Twigs Marker to ink the beak and Brushed Corduroy Marker to ink the legs.
8. Apply a thin layer of silver metallic embossing paste to the bird body, using a palette knife. Heat the paste to bubble the paste and create texture. Keep the Heat-It tool close to the paste.
9. Use the mini blending tool with multiple Archival colors to ink over the dry embossing paste and dry. Make a hole to fit a mini fastener. This will create the eye.

10. Cover a sheet of Clearly for Art (CFA) with vintage dictionary page. Apply Glue N Seal to the CFA, add the page, brayer and dry.
11. Die cut a full stem of leaves and a smaller section of just the top 5 leaves.
12. Ink over the leaves, on the paper side with Fern Green and Leaf Green.
13. Use Jet Black to stamp 3 flowers on the paper side of the CFA. Ink the petals with Dandelion, using the mini blending tool. Ink the flower center with the Wild Honey Distress Marker and the base of the flowers with Bundles Sage Marker.
14. Heat the pieces to soften the CFA and shape.
15. Add a bit of Tarnished Brass Distress Paint to the wing and dry. Add shading with Fern Green.

16. Ink the art parts banner with Brushed Corduroy stain, dry and use Jet Black to stamp the sentiment.
17. Use Black Soot Distress Paint to paint the art parts base. (5 x 51/2 inches)
18. Glue the banner to the bottom center of the black base and add the background piece.
19. Assemble the pieces as shown. The flower on the far right will cover the seam where the leaves meet.
20. Accent the birds feet with Mini Fasteners and Mini Gears and add the wing to the bird.

Things to note:
1. Clearly for Art can be reheated and reshaped many times and it will always return to flat.
2. Heating the metallic embossing paste will cause the paste to bubble and create amazing texture.
3. Glue N Seal is AWESOME for adhering paper to many surfaces. Even with a vintage dictionary page, there’s no bubbling of the paper.
4. Save Jet Black for main image stamping and other colors for backgrounds and stenciling. This makes the Jet Black really pop.
5. Archival inks can be blended over the embossing paste.
6. Rubbing Alcohol will remove the Archival ink from the stencils.
