


Put the quirky and fun new Tim Holtz Distress® Kitsch Flamingo to use with this framed, mixed media panel by Paula Cheney. See how this bold pink color can vary depending on the medium and type of paper you use, making it a versatile pink you're going to have to add to your Distress collection!
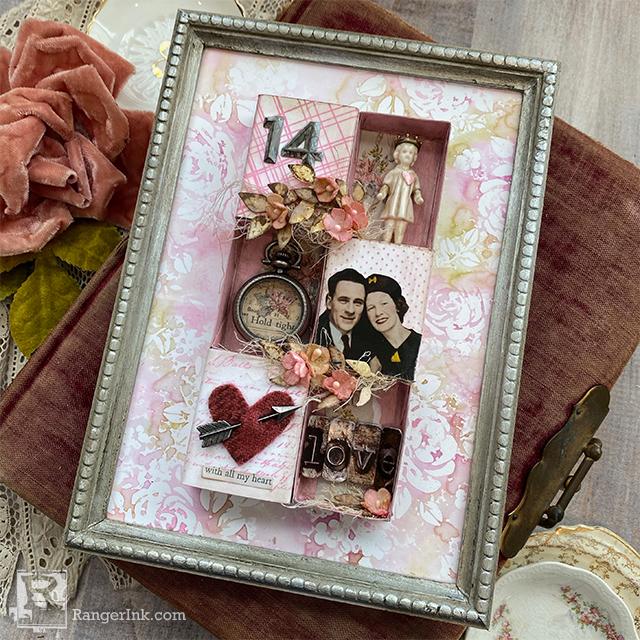
Love is in the Air by Paula Cheney
- Materials
- Instructions
Instructions
Hello friends,
I am happy to be here on the Ranger Website to showcase the new Distress Color, Kitsch Flamingo! Just by looking at the color you might think this is a bold pink. Well you are right, but only some of the time. Depending on the medium (ink, spray or oxide) and the kind of paper you use, the bold Kitsch Flamingo can very subtle and sometimes even peachy (like the flowers in this project). Follow along and I’ll show you how I created this sweet Framed Panel, just in time for Valentine’s Day.

Step 1: Gather needed supplies to create a Monoprint background. Today I’m using Distress White Heavystock (paper cut to size) + Distress Ink colors: Kitsch Flamingo, Milled Lavender, Peeled Paint and Seedless preserves. You also will need some paper towels, a water bottle, and a stencil of your choosing, along with a Craft Sheet to work on.

Step 2: Pounce multiple Distress Ink Pads directly on the stencil. Make sure you have good coverage.

Step 3: Spray the stencil with water until the ink beads up. NOTE: If something goes wrong in the Monoprinting, it is usually with this step because not enough water was added.

Step 4: Flip the stencil over onto the Distress White Heavystock.

Step 5: Quickly cover with a paper towel and press down two or three times (work fast).

Step 6: Uncover and quickly remove the stencil. Dry with a Heat-it Tool. NOTE: You can create a very subtle image by pressing a clean paper towel over the ink before drying.

Step 7: Repeat steps until paper is covered.

Step 8: Paint the idea-ology Framed Panel in Pumice Stone Distress Paint. Let dry.

Step 9: Add a coat of Collage Medium to seal the frame, let dry. Then use Dina’s Media Acrylic Paint in Sterling to add highlights on the inside and on the raised portion of the frame. Let dry.

Step 10: Use a Walnut Stain Distress Crayon and a damp paintbrush to add depth to the metallic part of the Frame. If you get too much on, use a wet wipe to remove by pouncing over the surface.

Step 11: Add the Watercolor Cardstock to the Frame with Collage Medium.

Step 12: Open three idea-ology Matchboxes. Paint the inside of the “drawers’ with Kitsch Flamingo Distress Paint, let dry. Seal the paint with Collage Medium before moving to the next step.

Step 13: Used a Distress Crayon to age the inside of each box (just like you did the frame).

Step 14: Add ripped pieces of Worn Wallpaper to the back of each box. I also used the wallpaper for the inside of a Mini Pocket Watch.

Step 15: Cut three pieces of white Heavystock (about 2” x 3”). Stamp each card using Kitsch Flamingo Oxide Ink.

Step 16: Add Collage Medium to the back of a stamped card, then wrap around the Matchbox cover. There is no need to cover the back as it will not show.

Step 17: Use Collage Medium to secure the 6 Matchboxes pieces to the surface of the Framed Panel.

Step 18: Once secure, start adding embellishments to the boxes. It really can be anything you think of…think the number 14, a heart, a photo, a souvenir…just anything that fits in or on the box.

Step 19: To finish out the project, spray a piece of White Heavystock with Antique Linen Distress Spray Stain, dry with Heat-it Tool. Use the paper to die cut leaves, adding Walnut Stain Distress Ink for more depth.

Step 20: Spray Bouquet flowers with water. Then spray with a combination of Antique Linen and Kitsch Flamingo Spray Stain. Blot off excess ink and dry with Heat-it Tool.

Step 21: Add the leaves to the boxes with Collage Medium. They might seem limp when you do, but trust me, once Collage Medium in dry, it is rock hard. I clipped the stem from each flower, then added to the leaves with more College Medium.
 I have been a “maker” all my life. Sewing, stamping, paper arts, I love it all. Creating and teaching is a passion for me, whether it is in the classroom or on my blog, One Lucky Day.. I have worked in the scrapbooking/mixed media field since 2005 and for the last 7 years have been the Creative Coordinator for Tim Holtz Brands, a dream job if there ever was one. On a personal note, I live on the Central Coast of California with my husband, Jay. I love to travel to new places to look for old junk and am willing to pack a bag at a moment’s notice. On an ordinary day you can find me working away in my craft room with the windows wide open and music playing in the background. Follow Paula on instagram @luckyday.
Related Posts

Colorful Layering with Dina Wakley Transparencies & Paints by Laura Dame
Let your creativity fly with this bold and textured burlap page by Laura Dame! Featuring Dina Wakley Media...
Read More
