


By Candy Colwell

Melt Art Noel Frame
- Materials
- Instructions
- Ranger Wonder Tape™
- Tim Holtz® Distress Ink Pads: Peeled Paint, Fired Brick, Aged Mahogany
- Tim Holtz® Distress Glitter: Fired Brick
- Stickles™ Glitter Glue
- Ranger Non-Stick Craft Sheet™
- Ranger Ink Blending Tool & Foam
- Sizzix – Vintage Noel, Tattered Poinsettia, Holly Branch
- Ideaology – Long Fastener, Trimmings, Plain Grungeboard
- Seasonal Paper Stash
- Wooden Frame
- Heating Stylus
- Holiday Ribbon
- Craft Brush (dedicated to beeswax use)
- Hot Glue Gun and Glue Sticks
Instructions
Step 1. Turn Melt Pot to highest setting to melt the Natural Beeswax and then reduce heat to around 180. Paint a couple of light coats of Beeswax over the entire surface of the wooden frame.

Step 2. Lay tissue or top layer of a napkin over the top of the beeswax covered frame and begin fusing the two together with a heat stylus. Start in the center of the wooden sides of the frame. Press and move the stylus across the paper towards the outside edges, smoothing the surface as you go.

Step 3. Continue to work the heat stylus over the entire frame; including the back side and the indentions for the photograph. If you need to add some paper to cover the frame, just cut out a piece, lay it on the frame and fuse it in place.
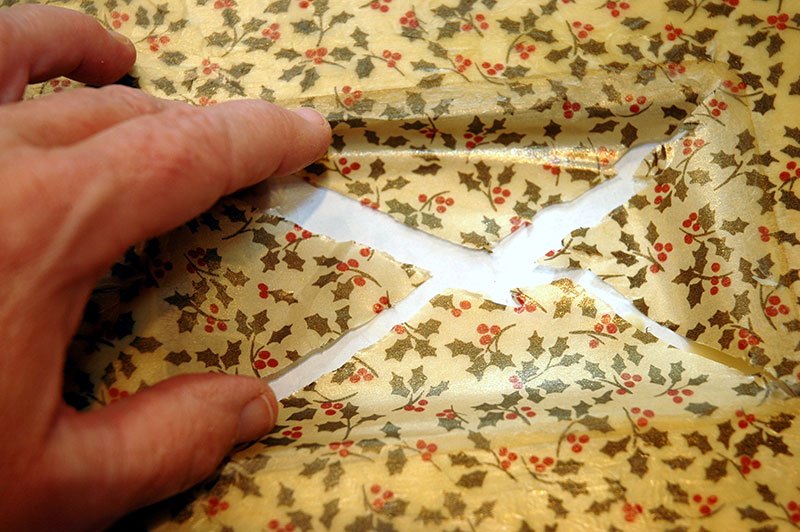
Step 4. Cut an “X” in the center of the frame and shape the excess paper to the back side, tearing off the excess and fusing to the wooden frame. If you wish to add Perfect Pearls Powders to the frame for an added sheen, this would be the time to do that.
Step 5. Die cut the Tattered Poinsettia and Holly Branch leaves out of Tim Holtz’ Seasonal Paper Stash Sheet Music paper. Place the die cuts on a Non Stick Craft Sheet and distress them using Distress Inks and an Ink Applicator Tool: Poinsettia – Fired Brick followed by some shading with Aged Mahogany Holly Leaves – Peeled Paint

Step 6. Brush Rock Candy Stickles over all of the Poinsettia and Holly leaves and let dry.

Step 7. Dab a Gold Paint Dabber onto the Non Stick Craft Sheet and using your finger, add highlights around the edges of the petals of the Poinsettia. Also add some very light swipes of gold inside the petals. Then apply Mercury Glass Stickles just to the edges of the petals and set aside to dry.

Step 8. Create a “wash” of gold paint by adding a small amount of water to some gold paint from the dabber that is on the Non Stick Craft Sheet. Use your finger to rub the gold wash over the surface of the crackled holly leaves. This gives them a really pretty sheen. Then edge the leaves with your finger and gold paint. Bend and work the paper leaves for more dimension.

Step 9. Die cut “NOEL” and the holly berries from Holly Branch out of Plain Grungeboard and apply Fired Brick Distress Ink over them. Heat set.

Step 10. Brush Glue ‘N Seal over the surface of “NOEL” and place it onto a sheet of plain paper (so you can capture excess glitter and return it to the jar). Sprinkle Fired Brick Distress Glitter over the glue and gently pat it down. Lightly shake off the excess, return extra glitter to the jar. Repeat this process for the berries. Set all aside to dry.

Step 11. When dry, edge around “NOEL” with Mercury Glass Stickles.

Step 12. Cut a piece of Tim Holtz’ elastic and ruffled Trimmings to fit on one long side of the frame. Lightly Paint Tarnished Brass Distress Paint Dabber over the trimmings, stretching it as you paint. Lightly heat set. Add a piece of 1/8” Wonder Tape down the center of the trimmings and add a piece of narrow Christmas ribbon. Add a piece of ¼” Wonder Tape and adhere the trim to the frame.
Step 13. Assemble the poinsettia by poking a hole in the center of each petal grouping. Attach with a Long Fastener. Shape the leaves. Arrange the holly leaves in the upper left and right corners of the frame and hot glue in place. Hot glue the poinsettia to the upper left corner. Add the holly berries to both sides. Add Mercury Glass Stickles dots to the center of the poinsettia. Make a small bow out of Christmas ribbon and hot glue it in place on the upper right of the frame.
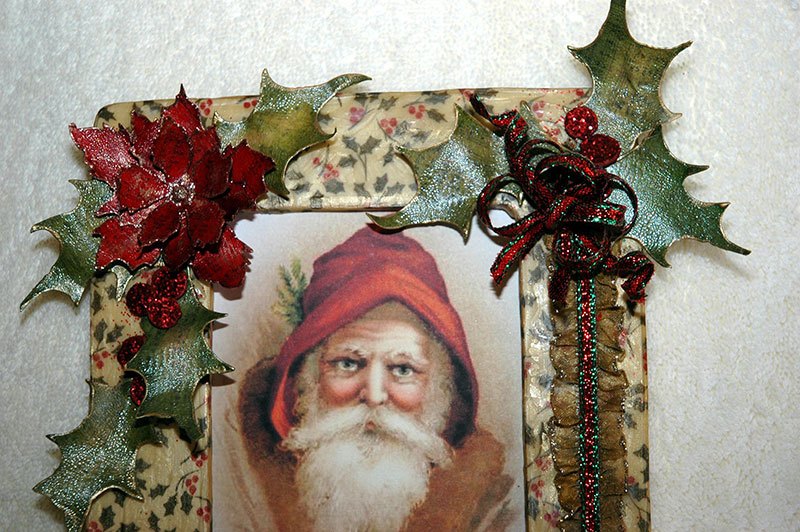
Step 14. Apply hot glue to the back side of “NOEL” and glue it in place at the center bottom of the frame.

Step 15. Make a small bow out of the Christmas ribbon and hot glue it in place among the holly leave on the upper right corner.
Related Posts

Thanksgiving Place Settings by Patti Behan
Add a personal touch to your Thanksgiving table with handmade place settings by Patti Behan! Using Ranger Embossing Powders,...
Read More
Distress Embossing Glaze Christmas Card by Cheiron Brandon
Get into the holiday spirit with this stunning “Peace on Earth” card by Cheiron Brandon! Learn how to layer...
Read More