


Follow along with Laura Volpes as she uses Letter It Stamps and Tim Holtz Distress Inks to make this fun and cheerful card. It's sure to spread some sunshine and brighten someone's day!
Sending Smiles Card by Laura Volpes
- Materials
- Instructions
Letter It™ Clear Stamp Set: Hello Sunshine
Letter It™ Background Stencil: Organic Stripes
Letter It™ Embossing Pad Clear
Ranger Embossing Powder Super Fine White
Ranger Embossing Powder Super Fine Clear
Letter It™ Perfect Pearl Kit 2, 4pc
Letter It™ Background Stencil: Organic Stripes
Letter It™ Embossing Pad Clear
Ranger Embossing Powder Super Fine White
Ranger Embossing Powder Super Fine Clear
Letter It™ Perfect Pearl Kit 2, 4pc
Ranger Archival Ink Pad™: Jet Black
Tim Holtz Distress® Watercolor Cardstock 8.5" x 11", 10pc
Wendy Vecchi Perfect Cardstock Grey Panels 10pk
Wendy Vecchi MAKE ART Stay-Tion 7"
Wendy Vecchi MAKE ART Perfect Stamp Block
Tim Holtz Distress® Watercolor Cardstock 8.5" x 11", 10pc
Wendy Vecchi Perfect Cardstock Grey Panels 10pk
Wendy Vecchi MAKE ART Stay-Tion 7"
Wendy Vecchi MAKE ART Perfect Stamp Block
Paper Scraps
Instructions

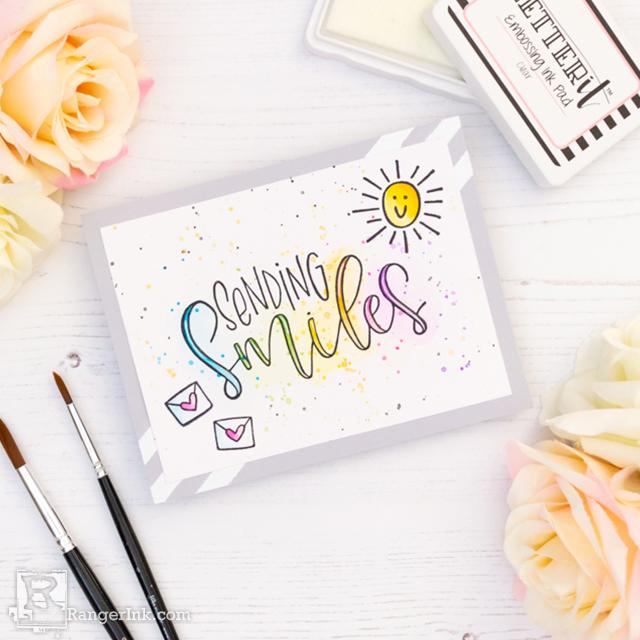
Step 1: Stamp the sentiment from the Hello Sunshine Stamp Set on Tim Holtz Watercolor Cardstock. Use Jet Black Archival Ink and heat emboss with Super Fine Clear Embossing Powder.

Step 2: Paint the letters in the word "smile", as well as the the areas around them, with Distress Inks. Keep the letter more intense and the background more faint by using different amounts of water. For this card, the following colors were used: Salty Ocean, Mowed Lawn, Mustard Seed, Spiced Marmalade, Picked Raspberry, and Wilted Violet.

Step 3: Stamp a smiley sun and two envelopes with Black Archival Ink and paint them with Distress Inks in Mustard Seed, Spiced Marmalade, Salty Ocean, and Picked Raspberry.

Step 4: Work on the card base. Take a Perfect Cardstock Grey Panel and use the Make Art Stay-tion to secure the Organic Stripes stencil diagonally across the panel. Use some paper scraps to mask off the stecil and leave three stripes exposed.

Step 5: Blend the Letter It Embossing Ink through the stencil and emboss the stripes with White Embossing Powder. Repeat on the opposite corner and don't worry if the lines don't meet in the middle. That part will be hidden in the final card.

Step 6: Add some droplets to the card front. Use Distress Ink in Black Soot, Gold Perfect Pearls, and the same colors of Distress Inks used to paint in the letters.

Step 7: Glue the card front to the card base and add some finishing touches. Add White Pen highglights to the word Smiles and coat the letter with Glossy Accents.
 I am an Italian crafter with a huge passion for card making and paper crafting. I currently live in England with my husband, who always supports and encourages me, and is the reason I started exploring my crafty side in the first place. I love crafts in general, but paper crafts really stole my heart! I like bright and cheerful cards, and I am always trying to experiment with new media and techniques.
I love sharing my creations on my blog, YouTube channel and social media, where you can find me as @lauravolpescards. Come over and say hi!
Related Posts

"My Cup of Care" Journal Page with Dylusions Pastel Paints by Miranda van den Bosch
Read More

Tim Holtz Distress® Micro Glaze Embossing Resist by Tami Bastiaans
Create gorgeous embossed backgrounds with the Micro Glaze Embossing Resist technique! ✨ Tami Bastiaans pairs Tim Holtz Distress® Micro...
Read MoreDrawer Title
- Choosing a selection results in a full page refresh.