


Cardstock glazed with Stickles is an easy way to add subtle shimmer to holiday cards and tags. Learn how with this festive tag tutorial.

Stickles Glazed Holiday Tag by Tammy Tutterow
- Materials
- Instructions
- Ranger Non-Stick Craft Sheet™
- Ranger Heat it™ Craft Tool
- Ranger Mini Blending Tool
- Ranger Cut n’ Dry™ Foam and Felt Pads
- Ranger Mister
- Tim Holtz® Distress Spray Stains: Picket Fence, Festive Berries, Tumbled Glass, Peeled Paint
- Liquid Pearls Daffodil
- Stickles Glitter Glue: Cranberry, Pine, Mercury Glass, Star Dust
- Tim Holtz® Distress Ink Gathered Twigs
- Tim Holtz Sizzix Dies: Festive Greenery, Mini Cardinal & Poinsettia
- Tim Holtz Sizzix Texture Fades Embossing Folders: Holly Branch & Pine Branch
- Tim Holtz Idea-ology: Crinkle Ribbon, Paper String, Tidings Tokems
- Tim Holtz Sizzix Vagabond & Base Tray
Instructions

 Cut a strip of manila cardstock the same size as the Tim Holtz Festive Greenery strip die. Die cut the manila cardstock with the die. When working with small die cuts, coloring the cardstock before die cutting or after die cutting while the elements are still in the strip.
 Remove any pieces of die cut that you don’t want to color the same as the other pieces. In this case, the swirls from the end of the strip are removed. Apply a fine mist the strip with Picket Fence Distress Spray Stain. If you hold the mist further away the color will be lighter and more speckled. Use a heat tool to dry the manila cardstock.
 Mist the manila cardstock with water. Mist again with Peeled Paint Distress Spray Stain. If you hold the mist close to the surface you will get a heavy layer of color. If you hold the mist further away the color will be lighter and more speckled. The dried Picket Fence Distress Spray Stain will resist the Peeled Paint Distress Spray Stain helping to create a speckled effect. The mist of water will mix with the Peeled Paint and help create areas where the color is lighter.
 Color a yard of Crinkle Ribbon with the left over stain on the craft sheet.
 Use a heat tool to dry the manila cardstock strip.
 Squirt Pine Stickles onto the craft sheet. Cut a small square of Cut & Dry Foam. Use the foam to pick up and dab the Stickles onto the manila cardstock.
 After the Stickles has dried, punch the die cuts out. Use an ink blending tool to apply Gathered Twigs Distress Ink onto the edges of the die cuts.
 You can also color strips of manila before die cutting. For the small flowers, mist a piece of manila cardstock with Picket Fence Distress Spray Stain. After drying the stain, mist with water and Festive Berries Distress Spray Stain. After drying the manila cardstock again, use Cut & Dry foam to apply Cranberry Stickles to the inked cardstock. After the Stickles has dried, die cut three Tim Holtz Mini Poinsettias.
 Use an ink blending tool to apply Gathered Twigs Distress Ink onto the edges of the die cuts.
 Apply dots of Daffodil Liquid Pearls to the centers of each flower. Set aside to dry.
 Mist a #8 manila tag with Picket Fence Distress Spray Stain. Mist the tag so that it is mostly speckles of stain rather than solid white.
 Use a heat tool to dry the stain.
 Mist the tag with Tumbled Glass Distress Spray Stain. Allow the stain to set for a few moments.
 Blot the excess mist with a dry cloth. Use a heat tool to dry the stain.
 Use Cut & Dry foam to spread Star Dust Stickles over the tag.
 When the Stickles has dried, place the tag in the Tim Holtz Pine Branch Texture Fade. You can cut an opening in the center fold of the embossing folder so that the top of the tag can slip through it. This allows you to place the design on the folder further down on the tag.
 After embossing the tag, sand over the raised embossed areas on the tag. Sanding will remove most of the Stickles from the embossed design while leaving it in the intricate places between the pine branches. Sanding will also take some of the color off of the raised areas helping to accent the design.
 Use an ink blending tool to apply Gathered Twigs Distress Ink to the edges of the tag. Lightly brush over the embossed design with the blending tool to accent the embossed design.
 Lightly pounce the ink blending tool over the die cut scrolls to add a base color to them.
 Apply Mercury Glass Stickles to the top of the two die cuts. Set aside to dry.
 Adhere a base layer of greenery pieces to the tag over the embossed design.
 Tie a piece of Paper String to a Tidings Token. Adhere the string to the front of the tag over the top of the greenery.
 Create a bow with the dyed Crinkle Ribbon. Adhere the bow to the front of the tag.
 Shape the holly leaves by bending them with your fingers.
 Adhere the holly leaves around the bow on top of the other greenery pieces.
 Adhere the flowers around the bow.
 When the Stickles on the swirls has dried, snip each swirl into two pieces.
 Adhere the swirl pieces around the other die cuts by tucking them into the other pieces.
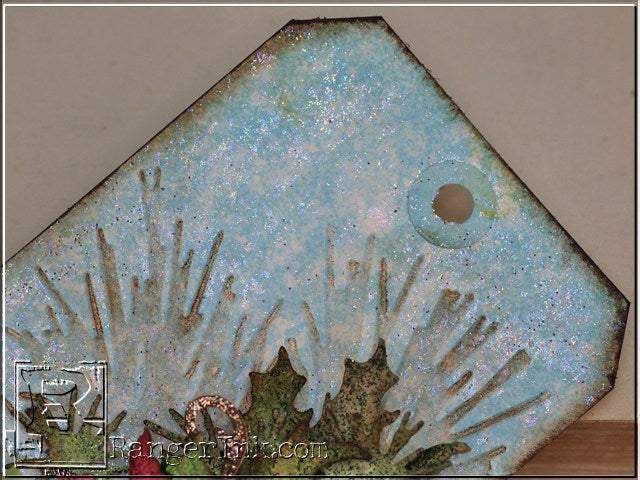 The glazing on the background of the tag is so frosty. Combined with the light blue speckled background, you get the feeling of a cool clear wintery sky.
 How fabulous are all of the hints of sparkle on this tag? They add just the right amount of sparkle to add the shimmery feel. The swirl pieces remind me a perfectly adorned Christmas tree.


Related Posts

"My Cup of Care" Journal Page with Dylusions Pastel Paints by Miranda van den Bosch
Read More

Tim Holtz Distress® Micro Glaze Embossing Resist by Tami Bastiaans
Create gorgeous embossed backgrounds with the Micro Glaze Embossing Resist technique! ✨ Tami Bastiaans pairs Tim Holtz Distress® Micro...
Read MoreDrawer Title
- Choosing a selection results in a full page refresh.