


by Kassa Hayselsen

Sunshine and Daisies by Kassa Hayselsen
- Materials
- Instructions
- Dina Wakley Media Brushes
- Ranger Non-Stick Craft Sheet™
- Ranger Watercolor Paper
- Archival Ink™ Designer Series: Wendy Vecchi: Hydrangea
- Fude Ball Pen Black
- Dylusions Stencils: Bubbles Large
- Dylusions Cling Mount Stamps: Fancy Florals, How Does Your Garden Grow
- Dylusions Square Creative Journals
- Dylusions Paint: After Midnight, Cherry Pie, Pomegranate, Tangerine Dream, Black Marble, Bubblegum Pink, Fresh Lime, Lemon Zest, Squeezed Orange, Vibrant Turquoise, White Linen, Post Box Red, Crushed Grape
Instructions

Awe hi there everyone, Kassa here, eeeeeep! Excited to be back again – and as the sun is shining over here in the UK (summer is finally on the way hurray!) I thought I’d share a little of it with you all…through my ‘watercolor style’ happy art!
As I take you through this easy to follow step-by-step tutorial, I share my tips and techniques of how I emulate ‘watercolor art’ using the amazing Dylusions Acrylic paints, which are perfect for the job!!!I
 Step 1: Before I start my art I do a sort of plan – not that I stick to it ever – as a rule I don’t, but today I did! Well nearly! I take some scrap paper (cut to the size I will eventually work on) and stamp the various sized daisies. I did this three or four times till I found a ‘shape/flow’ I was happy to work with. As you can see it’s no masterpiece! It’s simply ideas thrown down onto scrap paper (the more you do this the easier it becomes – trust me:-))) Tip:Archival ink is great as it won’t smudge when applying the paint and the color Hydrangea is a soft shade that is perfect for watercoloring as its soft tones sit perfectly under the softness of a translucent paint. When the black Fude ball marker doodle lines are placed over the top of it later to add shade, there’s a much needed ‘pop’ and emphasis.
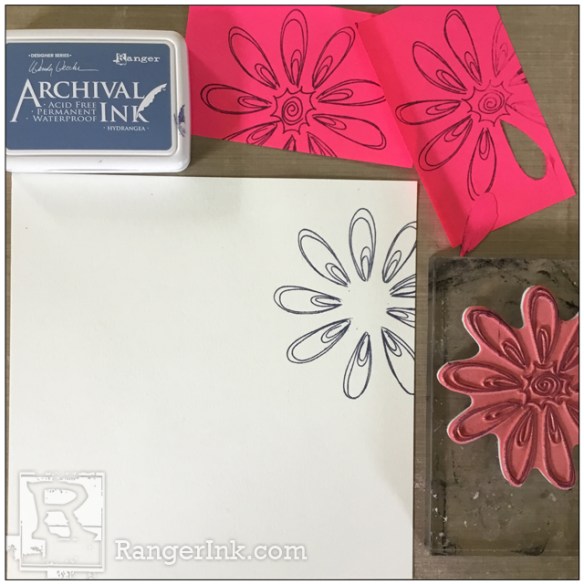 Step 2: Trim the watercolor paper to 8″x 8″. Using the largest daisy from the ‘Fancy Florals’ set, stamp the first daisy off the edge of the paper. Also stamp out another daisy on scrap paper and trim out the petals – these ‘scrap paper’ petals will sit over the corresponding petals on the watercolor stamped daisy and ‘mask’ the daisy when you stamp your second image – this masking technique gives the illusion of one image sat behind another, giving a depth to your art. Remember to stamp the image you want in the foreground first.
 Step 3: Then taking one of the partial petals stamps carefully ink up just one petal at a time to stamp in the gaps of the large daisy – use all the various-sized petals as it gives the daisy movement not being totally uniform.
Step 4: Now ink up another of the large daisy (I did not ink up three of the petals this time) and I stamped it next to the first daisy – remember to mask the petals again.
Step 5: I took the medium-sized daisy next and stamped then masked, once masked I added more individual petals from the partial petals stamp.
Step 6: The smaller daisy was from the ‘How Does Your Garden Grow’ set and just finished off and filled in gaps – so strange because I did an even number of flowers and not my usual odd number, but I did go for a three, two, one combo so that’s why the ‘flow’ works!
 Step 7: Now I gather all the colors of paints I need as I like to work fairly fast where necessary. I take a little of each paint and mix them with a little water, thinning them down thus giving the ‘watercolor’ effect when laying them down on the paper. You will see that even watered down and translucent the paints do not lose any vibrancy at all! I use three brushes basically, one for mixing the paint, one for laying down clean water on my paper, which I use a separate clean pot of water for too, and one for painting with. I do use finer brushes to add detail at the end. Keep changing your water! Holding your brush towards the brush tip keeps your worm more precise (best for detail) but holding way further down the handle leads to a lovely loose flow…
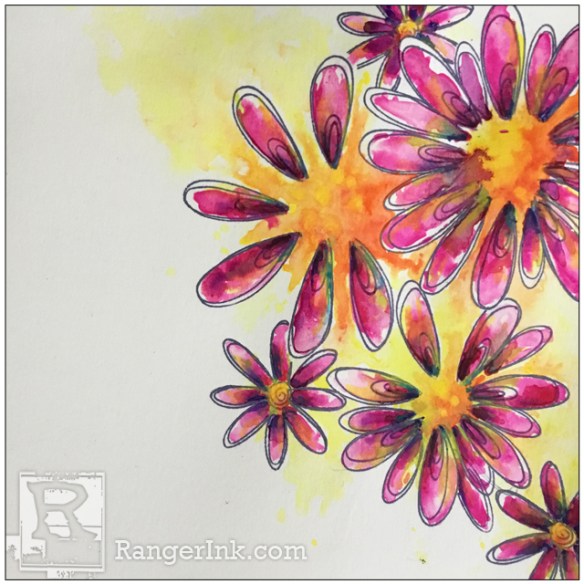
 Step 8: First I start with my lighter colors, Lemon Zest in this case. I add a little clean water with a paint brush to where I am about to add paint – the centre of the flower, then…
Step 9: …lightly dab the paint into the watered down flower centre. You will see the paint flow/bleed and spread before your eyes. If you have put too much water down and the paint is flooding into places you don’t want it to, the corner edge of kitchen roll dipped into the ‘flooded’ paint/water soaks up excess nicely. If the paint is too thick, it won’t readily flow and spread. Also, if you don’t put enough water down initially or it dries before you get to it there will be no natural color flow/bleed. (Practice on the scrap of watercolor paper you have trimmed earlier – I always practice on the paper I am about to use as every paper and paint reacts differently)
Step 10: Now quickly, whilst the yellow paint is still wet, drop a tiny amount (less is more. You can always add more) of the Squeezed Orange paint into the yellow centre (brush in more clean water with your clean brush into any areas you wish your paints to flow to. I have added a little between the petals and an odd tiny drop in the middle of the paints to keep the flow/bleed of paint going.
Step 11: I do the same, add the yellow with the rest of the flower centres and between the petals, then add deeper colors, Tangerine Dream, Post Box Red, but very little of these as these colors are so strong they will take over the gentle yellows. Just keep adding the clean water to re-wet any area you are going to work on if it’s dried before you get to it.
 Step 12: If the reds have taken over – no worries before it dries add a few tiny drops of the yellow into it, and watch the color burst!
Step 13: Now it’s time to extend your background into the surrounding area, simply add the clean water to where you will add the yellow paint, I build this up bit by bit, standing back to see if the shape I’m painting looks balanced as I build the layers.
Step 14: And – exciting bit now! Whilst the background is still wet add a few splats of the light oranges, Simply load your brush with the paint and gently tap the paint into the yellow – the tiny splatters will bloom and look kool!
Step 15: The petals are painted in the same way, adding water but only a touch of the Bubblegum Pink as again being a strong color only a little is needed. Start by dabbing the pink into the inner edges of the petals and as the paint spreads out towards the outer petal edges leave some white space.
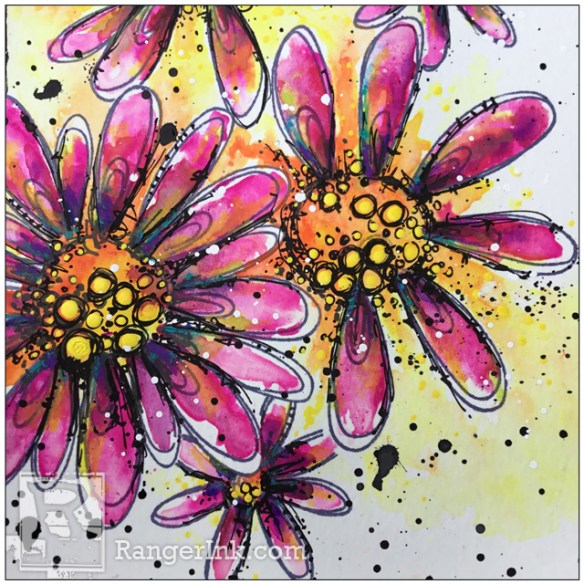
Step 16: Now the darker, shading colors are layered over the Bubblegum Pink in the inner petal edges and sometimes to an outer edge. The water will let the paint spread naturally down the petal, so do not use much of the shading paints or you’ll lose too much of the initial bright pink layer. Start with Cherry Pie, then Pomegranate, Crushed Grape, and After Midnight.
 Step 17: When the petals are dry, I add a touch of water to where I will paint in Fresh Lime as a highlight color (usually in a few of the white spaces and a touch over the Bubblegum Pink) Vibrant Turquoise and After Midnight are added without thinning the paint down so it is dense and rich, which makes for a fabulous contrasting touch.
 Step 18: Now it’s time to stand back and take a long look at your art, maybe with a cuppa tea so you can see everything with eyes that have rested for a while. Then maybe you may see areas that need more layers of perhaps, brighter color, shading or even highlights – just follow the above steps and layer to your hearts content, the watercolor paper will take the lush layering.
 Step 19: And here is my fav bit where everything pulls together what may look flat and in need of that something you just can’t put your finger on usually happens with the doodle pen. Hold your pen loosely and doodle various sized scribbly circles, dots, dashes, lines, ‘n’ just plain old scribbles! Plus don’t forget the paint splats with the watered down White Linen and Black Marble (if I’m patient enough, I prefer to let the white splats dry before adding the black ones to stop the splats mixing) And use the end of your paintbrush to add big and little dots of the Lemon Zest paint into the big and little scribbly circles and tiny yellow dots throughout the background! Hahaha! I held myself back cos I soooo wanted to add Vibrant Turquoise splats too – but I went for the less is more option, rare for me :-))) and teehee did you notice I decided to turn my picture round!!! Hahaha

Awe thanks so much for stopping by today, I can’t wait to see your watercolour style art using your Dylusions paints. I know you’ll looooves how the color blooms, flows and merges, ‘tis very exciting and makes me soooo happy – mwah xoxo Kassa

Related Posts

Colorful Layering with Dina Wakley Transparencies & Paints by Laura Dame
Let your creativity fly with this bold and textured burlap page by Laura Dame! Featuring Dina Wakley Media...
Read More
Creative Fun with Dina Wakley Media Canvas Pages by Laura Dame
Unleash your free spirit on canvas! In this tutorial, Laura Dame creates a vibrant expressive journal page using...
Read More