


In this tutorial, Theresa Hammond uses Tim Holtz Distress® products to create a fluid Springtime backdrop for you to try in your next mixed media project on Dina Wakley MEdia board.
Tim Holtz Distress® Follow Your Heart Media Board by Theresa Hammond
- Materials
- Instructions
Tim Holtz Distress® Paint: Squeezed Lemonade, Twisted Citron, Mermaid Lagoon, Broken China, Kitsch Flamingo, Vintage Photo, Chipped Sapphire
Tim Holtz Distress® Spray Stain: Kitsch Flamingo
Tim Holtz Distress® Oxide Spray: Kitsch Flamingo
Tim Holtz Distress® Collage Brush 0.75"
Tim Holtz Distress® Collage Medium Matte
Tim Holtz Distress® Sprayer
Tim Holtz® Distress Mixed Media Heavystock Tags #8 - have a few on hand
Dina Wakley MEdia Board Multipack 6pk: 5" x 7" Panel
Dina Wakley MEdia Collage Paper Backgrounds 7.5" x 10" - Cathedral Window used
Dina Wakley MEdia White Gesso
Dina Wakley MEdia Scribble Sticks Set 1
Ranger Gel Plate 3 Pack Assortment: 3.5" X 6.75" used
Ranger Gel Plate Brayer: Small
Ranger Non-Stick Craft Sheet (15 x 18)
Ranger Archival™ Ink Pad: Jet Black
Ranger Mini Blending Tool with Foam
Ranger Heat It™ Craft Tool
Tim Holtz® idea-ology Paper Dolls
Tim Holtz® idea-ology Quote Chips
Tim Holtz® by Stampers Anonymous Cling Mount Stamp Set - Royal Script CMS 016
Other:
A piece of copy paper
Scraps of dictionary paper
Paper towel
Instructions
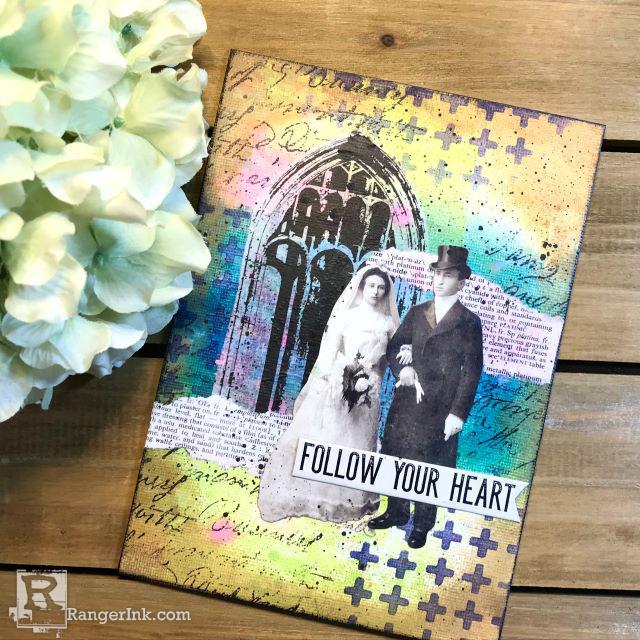
Hi Everyone! Today I used Distress Paints and Inks to create a fluid springtime background on a piece of DWM Media Board. It’s a fun way to gradually move from tags into bigger substrates using your favorite mixed media techniques. Let’s get started.
Step 1: Apply a thin coat of DWM White Gesso to the Media Board panel. Using the gel plate as a palette, apply 2 drops of Twisted Citron at the bottom half of the Gel Plate and 2 drops of Squeezed Lemon on the top half of the Gel Plate. Using the small brayer and starting with the lighter color at the top, begin rolling the paint onto the Gel Plate working down to the darker color. Apply the paint to the media board with the brayer to start the background. To apply additional layers, reload the brayer from the gel plate and go again. Once you have your desired coverage on the media board, take any excess paint on the brayer or the gel plate and apply it to an art journal page or tags to save for another make.

Step 2: Generously spray the paint on the media board with water using the Distress Sprayer. As the color begins to wick and move around, feel free to pick up the piece and move the color where you like.

Step 3: While the first layer is still wet, take Mermaid Lagoon Paint and put 2-3 drops directly onto the Media Board. Swipe through the paint with your finger 2-3 times to spread the color around. Try to get some of your first layer to mix with this color, but don’t overmix the colors. Repeat this step with 2-3 drops of Broken China above the area where you swiped Mermaid Lagoon, being sure to overlap the colors a bit. If needed, spray with more water to keep the pigment moving. Repeat one last time with Kitsch Flamingo, but this time use only 1-2 drops of paint.

Step 4: Using the Distress Spray Stain in Kitsch Flamingo, use the spray stem to flick ink into the wet paint and water to get some colors mixing. Repeat with the Oxide Spray in the same color. Pick up the piece to move the colors, if desired.

Step 5: Use a paper towel to lift any big pools of color. Use a Heat Tool to dry or let this air dry completely.

Step 6: Once the piece is dry, use the Mini Blending Tool with Foam to add Vintage Photo paint to corners and borders of the Media Board using a circular motion.

Step 7: Stamp script writing in various spots using Jet Black Archival™ ink. Also add black ink to the border of the media board for definition.

Step 8: Now with the Mini Blending Tool, add a stenciled pattern in Chipped Sapphire.

Step 9: Apply paper layers: Using Distress Collage Medium and Distress Collage Brush, adhere one cathedral window image from the DWM Backgrounds Collage paper pack. Then adhere some dictionary paper scraps or other ephemera. Then adhere the wedding couple Paper Doll, overlapping the cathedral window. Lastly, adhere a quote chip to the focal point, making sure the sentiment overlaps the image.

Step 10: Use a DWM Scribble Stick in Black and a wet paint brush to create a speckled look on the background. If you want to keep your focal point speckle free, mask it with scrap pieces of paper before flicking the whole piece with pigment. Dry with a Heat Tool.
 Hi! My name is Theresa Hammond. I started my mixed media journey as a scrapbooker and card maker, but it wasn’t long before altered chipboard books and canvas took my art to the next level. And then I discovered art journaling which not only pushed me to learn about different mediums, techniques, and tools, it pushed me to learn more about myself. Art journaling saved me and I am so grateful to have it in my life. I love drawing, painting, stamping, and collage, and I also love cooking, baking, photography and (just recently) videography. In additional to all of that, I am the mother of two amazing teenagers who are the best people on the planet. They are both artists and I am so proud of them and all that they do. Thank you for welcoming me and my art into this community. You can find me on Instagram @thamm2012.
Related Posts

Colorful Layering with Dina Wakley Transparencies & Paints by Laura Dame
Let your creativity fly with this bold and textured burlap page by Laura Dame! Featuring Dina Wakley Media...
Read More
Creative Fun with Dina Wakley Media Canvas Pages by Laura Dame
Unleash your free spirit on canvas! In this tutorial, Laura Dame creates a vibrant expressive journal page using...
Read More