


Follow along as Paula Cheney shows you how to create this beautiful and elegant Etcetera Tag using Tim Holtz Distress® products and featuring the newest color in the line, Salvaged Patina.
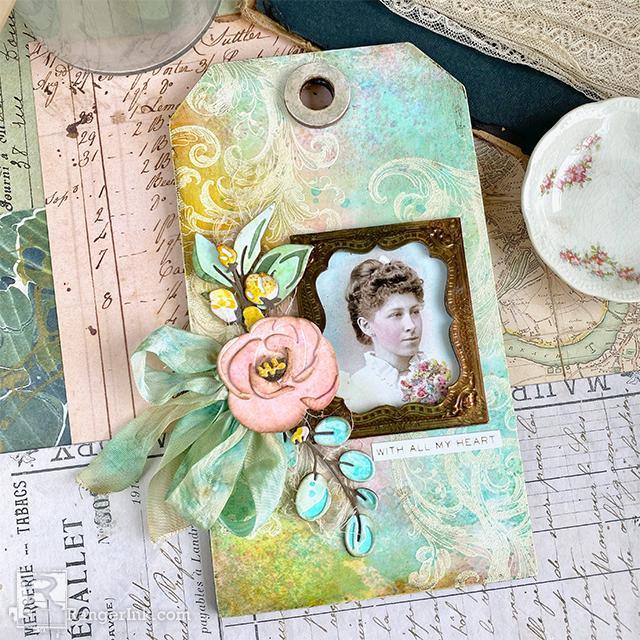
Tim Holtz Distress® Salvaged Patina Etcetera Tag
- Materials
- Instructions
Tim Holtz® by Stampers Anonymous: Mini Etcetera Tag, CMS400 Baroque Stamp
Tim Holtz® Alterations by Sizzix: Bloom Thinlits, Die Cut Machine
Other:
Embossing Gun
Baby Wipes
Cheesecloth
Self-healing mat + cutting knife
Foam Squares
Instructions

Step1: Gather project supplies. You will need a Mini Etcetera Tag, Distress White Heavystock (Distress Watercolor Paper will also work), Stampers Anonymous Baroque Stamp, Distress Embossing Ink and White Embossing Powder.

Step 2: Cut a piece of Distress White Heavystock to cover the Mini Etcetera Tag. Stamp the Baroque stamp with Distress Embossing Ink, then pour Embossing Powder over the ink. Dump the excess powder from the tag onto a sheet of scrap paper and return to the jar.

Step 3: Repeat the stamping on the other side of the paper. Be careful to avoid touching the powder from the first stamping.
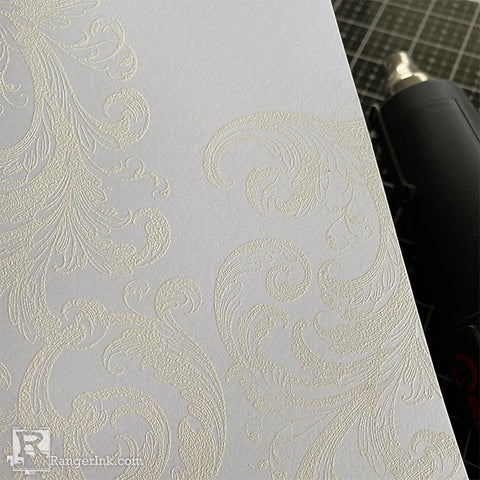
Step 4: Melt the Embossing Powder with an embossing gun.

Step 5: Spray Craft Sheet with Salvaged Patina, Kitsch Flamingo, and Wild Honey (use sparingly). Spray ink with water from the Distress Sprayer.

Step 6: Press the embossed paper into the ink. Flip onto a paper towel.

Step 7: Begin to dry with a Heat Tool. Work back and forth into the ink as many times as needed to add more layers of color. You can pounce off any excess with a paper towel.

Step 8: The finished paper will have patches of all of the colors used, making the white embossing stand out.

Step 9: Adhere dry embossed paper to the Mini Etcetera Tag with Collage Medium. Place on a self-healing mat board (right side down) and use a cutting knife to trim away any excess paper. Let dry.

Step 10: With a light touch, brush Collage Medium over surface to seal. Sealing the surface allows you to use the Distress Crayon in the next step. Dry with a Heat It Tool.

Step 11: Scribble Walnut Stain Distress Crayon on the edges and over the white embossing. Use a damp finger to rub the Distress Crayon over the surface. Pounce with a wet wipe to take away any harsh lines or fingerprints.

Step 12: Cut out the hole at the top of the tag and add the reinforcer with Collage Medium.

Step 13: Tint a Found Relative card using Distress Crayons and a Detail Water Brush. Scribble the crayon onto the glass mat or Craft Sheet. Dip the tip of the Water Brush into a puddle of water. Dab off on a paper towel. Pick up one color of crayon and dot over the flowers. Add one color at a time. Tap your finger over the top of the flower bunch to remove some of the crayon (it’s a simple trick that helps to mottle the colors). For the background, scribble the crayon around the edges then rub with a damp finger till the color almost disappears.

Step 14: Add the Found Relative card to a Curio Frame.

Step 15: Adhere the Curio Frame to the tag on the right side. Add a sentiment from the Metallic Sticker Book.

Step 16: Color Distress Watercolor paper with Distress Ink to use for the die cuts in the next step. I created a card for each of these 4 color combinations:
Salvaged Patina + Antique Linen
Kitsch Flamingo + Antique Linen
Fossilized Amber + Antique Linen
Salvaged Patina + Bundled Sage (not shown)
Salvaged Patina + Antique Linen
Kitsch Flamingo + Antique Linen
Fossilized Amber + Antique Linen
Salvaged Patina + Bundled Sage (not shown)

Step 17: Use the colored papers and the Sizzix Bloom Thinlits to create flowers and leaves. Colorize dies take a bit more time to put together but the result is worth it. So many levels of color. Once the flowers and leaves are complete, lightly ink the edges with your favorite brown Distress Ink.

Step 18: Add some shredded cheesecloth beside the Curio Frame. Add a double stack of foam squares under the pink flower to raise it from the tag surface. Continue to add the other flowers and leaves with Collage Medium and Adhesive Foam to create a 3D effect.

Step 19: Color seam binding ribbon with Salvaged Patina and dry with a heat tool. Spray Walnut Stain onto Craft Sheet and spray with water to dilute. Lightly toss the Salvaged Patina ribbon into the Walnut Stain to pick up just a bit of the brown. Dry with a Heat Tool.

Step 20: Fold ribbon in half and tie a bow. Add Collage Medium on the knot and push bow under the raised pink flower. Let dry.
 I have been a “maker” all my life. Sewing, stamping, paper arts, I love it all. Creating and teaching is a passion for me, whether it is in the classroom or on my blog, One Lucky Day.. I have worked in the scrapbooking/mixed media field since 2005 and for the last 7 years have been the Creative Coordinator for Tim Holtz Brands, a dream job if there ever was one. On a personal note, I live on the Central Coast of California with my husband, Jay. I love to travel to new places to look for old junk and am willing to pack a bag at a moment’s notice. On an ordinary day you can find me working away in my craft room with the windows wide open and music playing in the background. Follow Paula on instagram @luckyday.
 Related Posts

49 and Market 'The Looking Glass' Journal Page by Jessica Mikels
Soft color, beautiful texture, and layers of dreamy detail come together in this stunning journal page by Jessica Mikels!...
Read More
Make-It™ Fun with Fruit Card by Lauren Bergold
What’s fun, fresh, and bursting with summer sweetness? The Make-It™ Fun with Fruit Stamp Set! Follow along as...
Read More