


Audrey Pettit joins us today with a card tutorial that is perfect for spring greetings. It combines soft colors with gentle texture and life-like paper flowers!

True Heart Tattered Floral Card by Audrey Pettit
- Materials
- Instructions
- Tim Holtz® Distress Ink: Frayed Burlap, Mustard Seed, Scattered Straw, Tattered Rose, Festive Berries
- Tim Holtz® Distress Stains Peeled Paint
- Ranger Embossing Powder White
- Ranger Ink Blending Tool & Foam
- Ranger Heat it™ Craft Tool
- Ranger Mister
- Ranger Non-Stick Craft Sheet™
- Tim Holtz Idea-ology Textured Surfaces- Corrugate
- Tim Holtz Sizzix Alterations Tattered Florals Bigz L Die
- Embossing Folder: Tim Holtz Sizzix Alterations Dot Matrix Texture Fade
- Tim Holtz Idea-ology Crinkle Ribbon, Loop Pin, Shield Charm, Tissue Tape- Hobgoblin; vintage millinery; wooden skewer
- Tim Holtz Idea-ology Sanding Grip, Tiny Attacher
- Tim Holtz Sizzix Vagabond Die Cutting Machine
Instructions
 Dab Tattered Rose, Scattered Straw, and Mustard Seed Distress Ink randomly onto a non-stick craft sheet, and spritz the ink liberally with a Mister Bottle.
 Cut a 3.75”x 5” piece of manila cardstock. Press the cardstock down into the ink mixture, moving and swiping the paper to make sure it is fully covered in the ink. Dry the cardstock with a heat tool. Repeat the process a second time to deepen the color of the inked paper, if desired.
 Cut approximately 2’ of crinkle ribbon, and use the ribbon to mop up any remaining ink mixture on your sheet. Tap additional ink onto the ribbon, if needed, and blend the ink with a few squirts of water from the Mister Bottle. Dry the crinkle ribbon with a heat tool, or set it aside and let it dry completely.
 Place the dried cardstock panel into the Dot Matrix Texture Fade Embossing Folder, and emboss using a Vagabond die cutting machine.
 Dab Picket Fence Distress Paint onto a few random areas of the embossed panel.
 While the paint is still wet, sprinkle white embossing powder onto the painted areas, then heat set the powder using a heat tool.
 Apply a bit of additional Mustard Seed Distress Ink onto a few spots of the embossed panel using an ink blending tool.
 Then apply Frayed Burlap Distress Ink to the edges of the panel using an ink blending tool.
 Adhere embossed cardstock panel onto a 4”x5.25” piece of green Core’dinations Distress Collection cardstock, then machine stitch around the edge of the panel. Sand the edges of the Distress cardstock using a sanding tool. Apply a bit of Frayed Burlap Distress Ink to the edges.
 Cut two strips of Core’dinations Distress Collection cardstock; one approximately 1.5”x4” and the second one approximately 2”x4.75”. Cut V-notches into the bottom ends of both strips. Sand the papers with the sanding tool, edge each piece with Frayed Burlap Distress Ink, and then adhere the banner flags to the top left corner of the cardstock panel. Machine stitch around some of the edges of the flags to create the illusion of depth.
 Cut two small pieces from the inked Crinkle Ribbon… just enough to span the front of the card. Wrap one end around to the back side on either side of the card, and secure in place with a Tiny Attacher staple. Cross the two ribbon pieces into a knot.
 Wrap the remaining length of inked Crinkle Ribbon loosely around your fingers to create a figure 8. Place the looped ribbon down onto the knot, and tie the ends closed.
 Make a 4.25”x5.5” card base from white cardstock. Cover the front of the card base with a panel of Corrugate Textured Surfaces paper. Paint the edges of the corrugate with Picket Fence Distress Paint. Dry the paint with a heat tool.
Tear two pieces of script print tissue tape and apply them to the top banner flag.
 Die cut two daisy flowers from manila cardstock using the Tattered Forals Bigz die. Dab Festive Berries and Mustard Seed Distress Inks onto the non-stick craft sheet. Spritz the ink generously with water, and then drag both flower die cuts through the ink mixture.
 Dry the die cuts with a heat tool. Repeat the process to darken the ink color, if desired. Ink the edges of the die cuts with Frayed Burlap Distress Ink using an ink blending tool. Don’t worry about scrunching or bending the individual petals too much as you are applying the ink, because we’ll be distressing the flower quite a bit.
 Adhere the two flowers together using a dab of strong tacky glue. Then working in your hand, begin to shape the flower by bending and pulling all the petals upwards and together, pinching the base a bit with your fingers as you work. Once you have the petals shaped as you wish, curl the tips back down by rolling them over a pencil. Spritz some water into your hand and then flick the water onto the flower to create water spots.
 Apply Peeled Paint Distress Stain to a section of wooden skewer, and then snip off about 2” to create a flower stem.
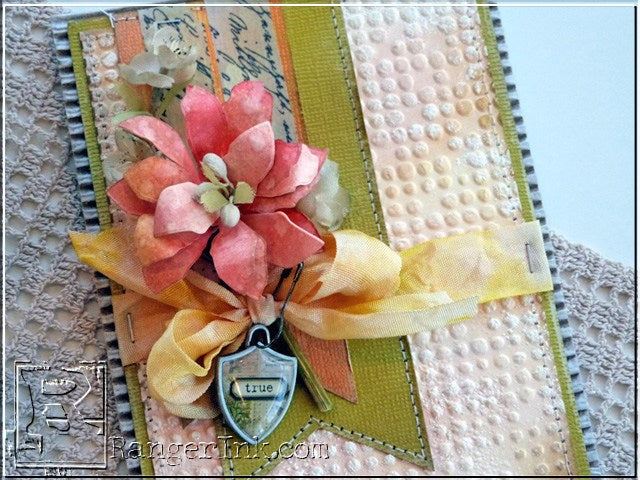 Tuck the wooden skewer up underneath the Crinkle Ribbon bow and secure with a bit of tacky glue. Adhere the flower at the top of the stem, above the bow.
 Tuck a few vintage millinery flowers around the paper flower. Snip some stamens from a millinery piece to add to the center of the paper flower.
 Attach a new shield charm to a loop pin, and secure the pin to the center of the bow.
 Enjoy!

