


Mother's Day is just around the corner! In this tutorial, Lauren Bergold uses Wendy Vecchi Stamps, Dies, Stencils and Archival Inks to create a bouquet for Mom that will last forever.
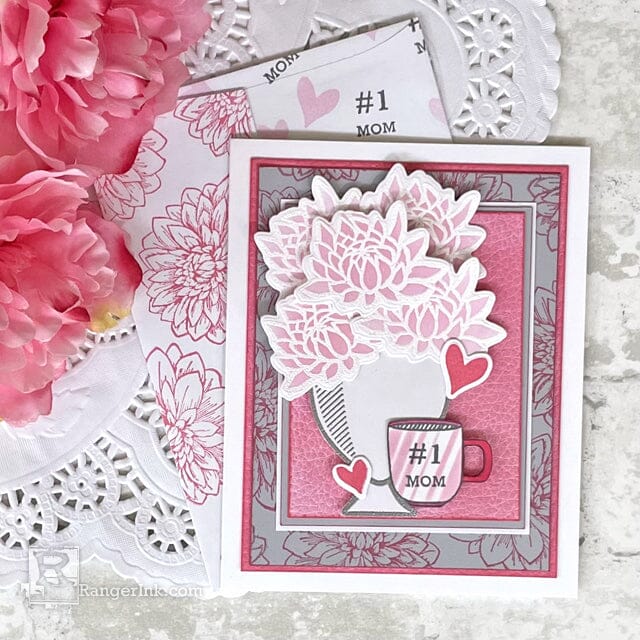
Wendy Vecchi #1 Mom Card by Lauren Bergold
- Materials
- Instructions
Instructions
Of course everyone thinks theirs is the World's #1 Mom and luckily... we're ALL correct on that point!

Step 1: Gather your materials: This card features the large and small peonies from Wendy Vecchi's Bravo Stamp, Die and Stencil Set; the trophy from Wendy's Award Winning Set; Perfect Cardstock in Grey and White; and coordinating shades of Archival Ink and Embossing Powder.

Step 2: Stamp the small peony from the Bravo set five or six times with clear Ranger Emboss It Ink and emboss with White Embossing Powder. When the images are cool, use a Mini Ink Blending Tool and Domed Foam to apply Pink Peony Archival to each flower. Lightly burnish the peonies with a tissue or soft cloth to remove any excess ink from the embossed areas.

Step 3: Use the coordinating die to cut out the peonies and set them aside.

Step 4: Stamp the trophy from Wendy vecchi's Award Winning Stamp, Die and Stencil set in clear Emboss It ink and emboss with Silver Powder. Cut the trophy out neatly with scissors, carefully trimming off the handles... thus turning it into a vase.

Step 5: On a panel of soft grey Perfect Cardstock, stamp the larger peony from the Bravo set multiple times in Rosey Posey Archival Ink. Start at the center of the panel and work outwards until the panel is covered. Be sure to shift the position of the flower each time and allow some of the blooms to go off the edge of the panel.

Step 6: Using a Mini Ink Blending Tool and a Domed Replacement Foam, apply Rosey Posey Archival all over a 3 x 4" panel of Tim Holtz Distress Cracked Leather Cardstock; and just around the edges of a 4.25 x 5.25" panel.

Step 7: Stamp the mug from Wendy Vecchi's Let's Shop Stamp, Die and Stencil Set in Watering Can Archival on a scrap of white Perfect Cardstock. Mask the edges with sticky notes and use the stencil from the Birthday Bash set to add diagonal stripes of Pink Peony Archival Ink. Use the small stamps from Award Winning to add, "#1 Mom" to the mug; and a coordinating marker to color the handle and rim.

Step 8: Cut out the #1 Mom mug neatly with scissors. Stamp the two small hearts from Merci and More in Rosey Posey and use the coordinating dies to cut them out.

Step 9: Assemble the card: Using Wendy Vecchi Perfect Card Adhesive, mat the small pink Cracked Leather panel first on a scrap of grey Perfect Cardstock and then on white. Attach the grey stamped panel to the larger Cracked Leather piece and add the smaller panel to it. Affix the vase to the card with Letter It White Foam Roll Tape and add the peonies, mug, and hearts around the vase. Create a 4.75 x 6" card from Simon Hurley create. Stark White Cardstock and center the design panel on top.

Step 10: Use the same stamps and inks to decorate the back of an A6 envelope, and your best penmanship to address the front of the envelope. Mail to Mom with your heartfelt Mother's Day wishes!
 My name is Lauren Bergold, and I live in central New Jersey with my husband of 30+ years and A LOT of art supplies! My favorite medium is paper, and I especially love making cards. I teach papercrafting classes, as well as collecting and compiling vintage and found papers. You can find me on my blog, All the Good Blog Names Were Taken, and on Instagram as @llaurenb where I love to connect with other artists and makers!
 Related Posts

Tim Holtz Distress Birthday Wishes Card by Dominique Bennani
This bold birthday card by Dominique Benanni uses Tim Holtz Distress Inks, Embossing Glaze, Stamps, and more to create a layered,...
Read More
49 and Market Nostalgic Memories Journal Page by Jessica Mikels
Soft layers, flowing color, and rich depth come together on this stunning art journal page by Jessica Mikels! Created with the...
Read More