


by Anita Houston

Wendy Vecchi Archival Ink Halloween Cards by Anita Houston
- Materials
- Instructions
- Wendy Vecchi Perfect Cardstock: White Panel, White Portrait Card, White Landscape Card
- Wendy Vecchi Archival Ink™: Acorn, Peat Moss, Prickly Pear, Buttercup, Tiger Lily, Poppy, Thistle, Bluebird
- Wendy Vecchi 1 oz. Mica Sprays: Pearl
- Ranger Mini Blending Tool with Foam
- Ranger Mister with Rubbing Alcohol
- Letter It™ Adhesives: Double Stick Tape
- Ranger Detail Blending Tools
- Letter It™ Fineliners
- Archival Ink™ #0 Pads: Jet Black
- Wendy Vecchi Perfect Card Adhesive
- Ranger Non-Stick Craft Sheet™
- Tim Holtz® Waterbrush
- Stamper’s Anonymous Wendy Vecchi Studio 490 Background Stamp: In the Background
- Stamper’s Anonymous Wendy Vecchi Studio 490 Stencils for Art: Fence and Foliage
- Stamper’s Anonymous Wendy Vecchi Studio 490 Mat Minis: Autumn Essentials
- Stamper’s Anonymous Wendy Vecchi Studio 490 Stamp Set: Autumn Art
- Tim Holtz Idea-ology: Mirrored Stars
- Sizzix Tim Holtz Alterations Thinlits: Swirling Stars
- Halloween Ribbon with Sentiment
- Stabilo Pencil: Black, White
Instructions
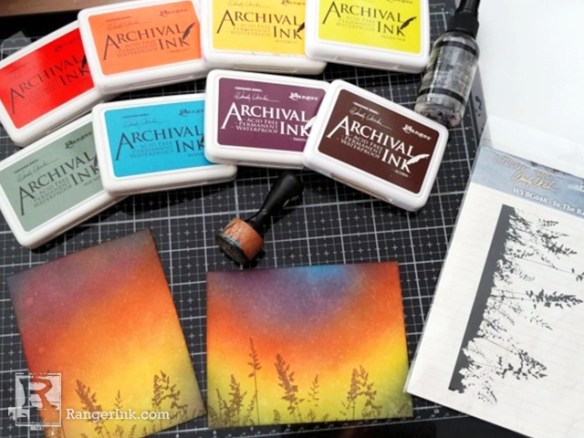
Step 1: If you are making both orientations of the cards, trim four pieces (set two aside) of White Perfect Cardstock Panels to 4 x 5 1/8 inches (one for landscape and one for portrait). Using a Mini Ink Blending Tool and all eight colors of Wendy Vecchi’s Archival, begin inking the cards using circular motions (bottom to top), starting with Acorn in the bottom corners, then layering with Peat Moss, Prickly Pear, and finishing up to the center with Buttercup. From the center up, start with Tiger Lily, then Poppy and Thistle, and finally finishing up with Bluebird. Go back over the colors again to deepen them while blending them together. Mist and flick rubbing alcohol over the cards for a mottled look. Stamp the In the Background Stamp along the bottom of the cards using Acorn Archival. Ink the edges of the cards with Tiger Lily.

Step 2: Place the Fence and Foliage Stencil over the bottom of the cards, and ink in the fence with Acorn, moving the stencil over to have fencing from side to side. Stamp more foliage between the fence slats with the In the Background Stamp if desired. Use a black Stabilo pencil to trace around the fence for depth.

Step 3: Using a magnetic base plate and one cutting pad, die cut the Swirling Stars on the top portion of the sky, using the smaller swirl on the left side, and add a large and two smaller stars randomly around the swirl. Add double stick tape to the backs of the cards (not over the stars), and mount them on the other two panels that you set aside. Add a strip of double stick tape across the bottom portion of the fence, and then add the Halloween ribbon over the tape, trimming off excess. Cut two pieces of black cardstock to 4 ¼ x 5 ¼ inches, and mount the cards onto the black cardstock using the double stick tape. Then mount the cards to the Portrait and Landscape Perfect Cardstock Cards.

Step 4: Take two large pumpkins from the Autumn Essentials Mat Minis, and ink over them completely with Tiger Lily. Using another sheet of White Perfect Cardstock Panel, ink a small portion (enough for two small pumpkins) with Tiger Lily. Stamp the large pumpkin from the Autumn Art Stamp Set onto the large pumpkin Mat Mini using Poppy, and then stamp again using Acorn, only applying the Acorn to the top and bottom portions of the stamp. Stamp the small pumpkin twice onto the panel over the Tiger Lily ink, first in Poppy and then again with Acorn on the top and bottom. Cut the small pumpkins out.
Ink over the stems of all four pumpkins with Prickly Pear and a little Acorn using the Detail Blending Tool, one tip for each color. Ink the edges of the pumpkins with Tiger Lily and the stem areas with Acorn. Use a Detail Blending Tool to add Tiger Lily ink along the lines of the pumpkins to define the sections adding shadow to them. Use the White Stabilo pencil to add white highlights to some of the lines on the pumpkins. Adhere the large pumpkins to the bottom right of the cards using Perfect Card Adhesive, and add the small pumpkins just above them along the top portion of the fence using the adhesive.
Take two small leaves from the Mat Minis, and stamp the small leaf image over them using Peat Moss, and again add white highlights along the stem of the leaves. Adhere a leaf to the large pumpkins. Use the Fineliner to freehand a jack-o-lantern face to the smaller pumpkin. Stamp the bird image to the top of the left hand side of the fence using Jet Black Archival.

Step 5: Shake the Pearl Mica Spray well, and pour a little out onto the craft sheet. Pick some up with an empty Detail Water Brush, and paint in the die cut stars so they shimmer. Flick some of the mica into the sky area to give the illusion of more stars, using the brush. Clean the water brush with water to remove the mica. Adhere three Mirrored Stars to the sky randomly around the swirl, using Perfect Card Adhesive.


