


Wendy Vecchi MAKE ART Stamps, Stencils, and Chippies are perfect for so much more than cards. See how Lauren Bergold takes them off the page and onto a lovely Autumnal frame.
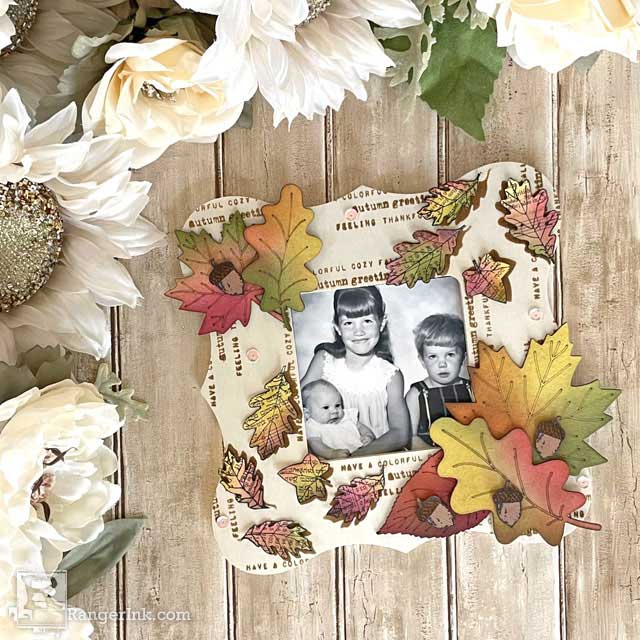
Wendy Vecchi Autumn Greetings Frame by Lauren Bergold
- Materials
- Instructions
Scraps of vintage paper
Brown cardstock
Sequins (optional)
Instructions
I love making special, personalized gifts for my family and friends. This frame, featuring Wendy Vecchi's MAKE ART Autumn Greetings Stamp, Die and Stencil set, holds a portrait of myself with my brother and sister circa 1970. It's a birthday present for our mom.

Step 1: Gather your materials: An unpainted wood frame from the big box store; Wendy Vecchi MAKE ART Autumn Greetings Stamp, Die and Stencil Set; "Lots of Leaves" Chippie Embellishments Set; various Autumnal shades of Wendy Vecchi Designer Series Archival Inks; Ranger Jet Black Archival Ink; scraps of vintage text paper and brown cardstock.

Step 2: With a wide flat brush, apply a light coat of Dina Wakley MEdia Clear Gesso to your wooden frame. Set the frame aside and allow the gesso to dry completely.

Step 3: Use a Ranger Mini Ink Blending Tool and Domed Foams to apply autumnal shades of Archival Ink directly to three large and two smaller Wendy Vecchi MAKE ART Lots of Leaves Chippies. Experiment with various colors on the back of the chippies until you find combinations you like. As a rule of thumb, three distinct shades per leaf is an optimum amount of color, and it's good to let them overlap and transition gradually into the next shade. Leaves in the sample feature: Buttercup, Sunflower, Goldenrod, Tea Rose, Orange Blossom, Red Geranium, Mulberry, Acorn, and Leaf Green. If your colors are too bright or not blended well enough, use a small amount of Potting Soil or Peat Moss Archival, applied very lightly, to tone down the shift between colors.

Step 4: Use the Mini Ink Blending Tool and Domed Foams again to apply some of the same Autumnal shades of Archival Ink to a 4 x 5" collage made of random torn vintage text papers or a mix of Dina Wakley MEdia Collage Papers and Typed Ledgers. Apply the colors randomly, and don’t worry too much about placement. You can easily adjust in later steps.

Step 5: In Jet Black Archival Ink, stamp the three largest leaves from Wendy Vecchi‘s MAKE ART Autumn Greetings Stamp, Die and Stencil Set randomly all over the collaged panel, leaving space between the images if you plan to diecut the leaves. Vary the direction and position of the leaves as you stamp. You'll want approximately nine to twelve leaves. Use the coordinating leaf dies from the Autumn Greetings set to cut out the leaves, or fussy-cut them for a more compact silhouette. If any of the color-blends are not to your liking, this is a good time to adjust them with a small amount of ink on a Blending Tool. Bend some of the edges of the finished leaves up so they have a bit of dimension.

Step 6: Stamp the acorn from the Autumn Greetings set four to five times on a scrap of medium brown cardstock and diecut or fussy-cut the acorns. Color the tops of the acorns in with a Tea Dye or Rusty Hinge Distress Marker.

Step 7: To “test drive” your placement of images and elements, you might like to trace your frame onto a piece of cardstock to create a template that’s the same size and shape as your frame. This will let you practice before committing to the un-erase-able wooden frame. Remember that the inks may look and act slightly differently on wood than on cardstock, so a further test of specific colors on the BACK of the frame is not a bad idea!

Step 8: Making sure that the gesso-ed frame is thoroughly dry, apply Potting Soil Archival Ink through the leaf stencils in the Autumn Greetings set. Shift and turn the stencil between applications to achieve a more natural look, like leaves fluttering to the ground. If you like, use a Post-It note to block unused portions of the stencil and prevent unwanted ink spots on your project.

Step 9: On a Wendy Vecchi MAKE ART Perfect Stamp Block, line up a few of the sentiments from the Autumn Greetings set. The sample uses "Have a Colorful Fall,” "Autumn Greetings,” and "Feeling Thankful.” Ink the stamps with Potting Soil Archival Ink and stamp the word art randomly around the frame, allowing some of the words to go off the sides of the frame and some to overlap the stenciled leaves.

Step 10: Assemble the frame: Adhere the Chippies Leaves to the corners of the frame, letting a couple of them overlap the others. Add small pieces of Ranger Adhesive Foam Tape to the backs of the acorns and arrange them on top of the Chippies. Use a sparing amount of Wendy Vecchi Perfect Card Adhesive to affix the stamped leaves to their shadows. Add a sprinkling of sequins, if desired.

Step 11: Add a photo, a favorite quote, or some original artwork to the frame’s window and display it proudly!
 My name is Lauren Bergold, I live in central New Jersey with my husband of 30+ years and A LOT of art supplies! My favorite medium is paper and I especially love making cards. I teach papercrafting classes, as well as collecting and compiling vintage and found papers. You can find me on my blog, All the Good Blog Names Were Taken and on Instagram as @llaurenb where I love to connect with other artists and makers!
 Related Posts

Thanksgiving Place Settings by Patti Behan
Add a personal touch to your Thanksgiving table with handmade place settings by Patti Behan! Using Ranger Embossing Powders,...
Read More