


In this tutorial, Lauren Bergold creates a chic vintage Valentine using the new Wendy Vecchi MAKE ART Chippies, Archival Inks, and Stamp, Die & Stencil Sets.
Wendy Vecchi Chippies Valentine by Lauren Bergold
- Materials
- Instructions
Other:
Kraft-Colored A2 Card
Fine-tipped pens in white and black
Self-Adhesive Pearls (optional)
GlueDots
Sewing Machine and Thread (optional)
Instructions
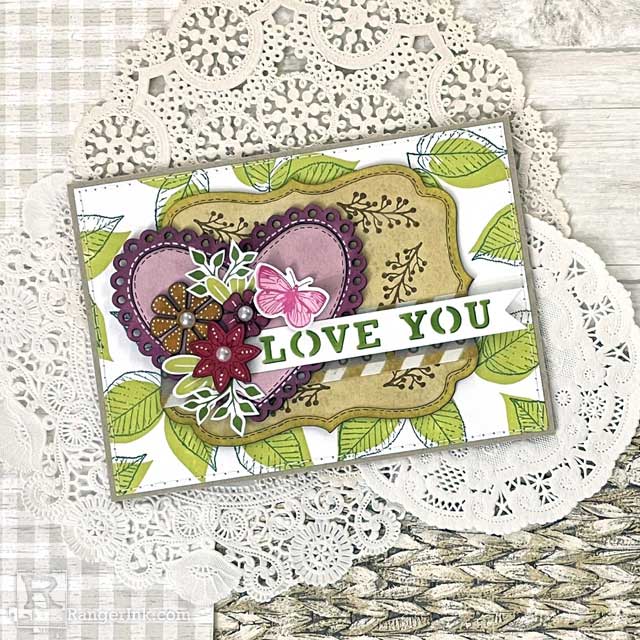
Wendy Vecchi Chippies are sturdy, pre-primed chipboard embellishments, ready to customize with inks, stamps, stencils, pens or any other media your heart (and flowers) desire!
This vivid Valentine features hearts from the Bases and Frames set, as well as intricate flowers from the Blossoms collection; also available are Lots of Leaves, Beverages and Wreathes.

Step 1: Gather your supplies, and lay out a basic design featuring the label shape, heart and scallop heart from the Bases and Frames Chippies; with some flowers from the Blossoms set. Note that this is going to be an A7 card, measuring approximately 5x7" in landscape format.

Step 2: Choose a palette of Wendy Vecchi Archival Ink colors with which to tint the Chippies. It's helpful to make a swatch with all of the colors, so you know they'll work well together.

Step 3: Use Ranger Mini Domed Ink Blending Foams to apply Pink Peony Archival to the heart, Vibrant Fuchsia to the scalloped heart frame, Pale Ochre to the center of the label shape and Sunflower to the border, and Tiger Lily, Carnation Red and Fuchsia to the flowers.

Step 4: Trim a piece of Simon Hurley create Stark White Cardstock to just under 5x7" and stamp the solid leaves from Wendy Vecchi's Country Flowers Stamp, Die and Stencil Set randomly all over in Prickly Pear Archival Ink, changing the position each time and letting some of the leaves go off the edges. Then stamp the leaf outlines slightly offset, for a casual look, in English Ivy.

Step 5: Use the stencil from Wendy's Bravo Stamp, Die and Stencil Set and Leaf Green Archival to add a sentiment to a scrap of white cardstock. Trim into a neat flag, with a fishtail at one end.

Step 6: Embellishments! Stamp the berry sprig from the Country Flowers set in Acorn randomly on the label Chippie. Stamp the solid butterfly in Pink Peony and the outline in Vibrant Fuchsia and diecut. Make a border using striped and dotted tapes from Wendy Vecchi Washi Tape Assortment #1 and apply to the lower half of the label. Stamp and diecut a few small leaves from Wendy's Flower Pot Stamp, Die and Stencil Set, in Prickly Pear and Leaf Green. If desired, use fine-tipped black and white pens to add dots or stitching to the tinted Chippies, and optional stick-on pearl accents to the centers.

Step 7: Assembly: Affix the foliage panel to a kraft colored A7 card with Perfect Card Adhesive and machine stitch around the edges, if desired. Adhere the Chippies with double sided tape. Add the flowers, extra foliage and sentiment with GlueDots or Ranger Adhesive Foam.
 My name is Lauren Bergold, I live in central New Jersey with my husband of 30+ years and A LOT of art supplies! My favorite medium is paper and I especially love making cards. I teach papercrafting classes, as well as collecting and compiling vintage and found papers. You can find me on my blog, All the Good Blog Names Were Taken and on Instagram as @llaurenb where I love to connect with other artists and makers!
 Related Posts

Simon Hurley create. Woodland Hello Card by Lieschen Harshbarger
Step into the woods with this enchanting card tutorial by Lieschen Harshbarger! Crafted using the Simon Hurley create...
Read More
Distress Embossing Glaze Christmas Card by Cheiron Brandon
Get into the holiday spirit with this stunning “Peace on Earth” card by Cheiron Brandon! Learn how to layer...
Read More