


'Tis the season to get a jump on holiday cardmaking! Lauren Bergold creates a festive card using Wendy Vecchi's newest Stamps, Chippies and Liquid Pearls.
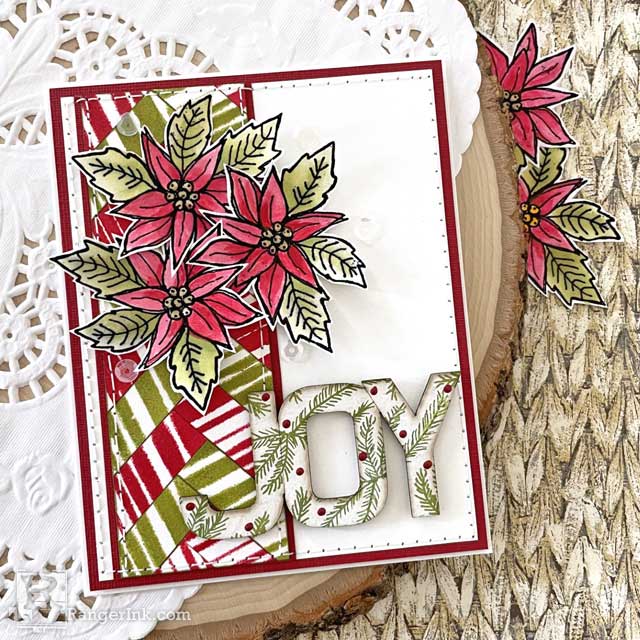
Wendy Vecchi Doodle Christmas "Joy" Card by Lauren Bergold
- Materials
- Instructions
Other:
91% Isopropyl Alcohol
Rich Red Cardstock
Clear Sequins
Sewing Machine (optional!)
Instructions
Christmas cards are much more fun to make when there isn't a stressful rush involved, so I like to make them a few at a time throughout the year. Wendy Vecchi's Doodle Christmas Stamps, Statements Chippies and Liquid Pearls are the perfect additions to my stash of favorite holiday products.

Step 1: Stamp the poinsettia from Wendy Vecchi's MAKE ART Doodle Christmas Stamp Set three times in Ranger Emboss It Clear Embossing Ink on Simon Hurley create. Stark White Cardstock and emboss with Black Embossing Powder.

Step 2: Smoosh some Fern Green Archival Ink onto a Ranger Non-Stick Craft Sheet and use a Tim Holtz Distress Waterbrush with Detailer Tip full of Isopropyl Alcohol to "watercolor" the leaves.

Step 3: Dispense some Wendy Vecchi Red Geranium Liquid Pearls onto the Craft Sheet and mist lightly with water; use a finetipped paintbrush to paint the poinsettias.

Step 4: Rinse the waterbrush well and use Sunflower Archival to paint the berries.

Step 5: Using a Ranger Mini Ink Blending Tool, apply Red Geranium Liquid Pearls through the striped stencil from Wendy's MAKE ART Birthday Bash Stamp, Die and Stencil Set. Make two or three repeats in Red Geranium; then, making sure the stencil is completely dry and changing to a new foam, do the same thing with Fern Green Liquid Pearls. Set aside and allow to dry completely. (Please note that the Liquid Pearls may stain your stencil, though it will still be perfectly useable afterwards.)

Step 6: When dry, neatly trim the striped pieces to 1 x 3 5/8". Then trim them in half by both directions. You will now have a small pile of .5 x 1.75" "tiles" in red and green. Ink the edges lightly with coordinating Archival Inks.

Step 7: Use the tiles from step 6 to create a herringbone pattern on a scrap of cardstock approximately 2 x 5.5". Work carefully to align each tile neatly, with no gaps between. Alternate red and green tiles until they cover the entire piece lengthwise. When finished, trim the piece to 1.75 x 5.25 and set aside.

Step 8: On the "Joy" Chippie from Wendy's MAKE ART Statements Set, stamp the Evergreen Bough from Doodle Christmas randomly in Fern Green, until the entire word is covered without any of the boughs overlapping. If desired, add a few "berries" between the branches by applying tiny dots of Red Geranium Liquid Pearls. Set aside and allow to dry completely.

Step 9: Assembly: Using Wendy's Perfect Card Adhesive, mat the Herringbone panel on a 1/8" mat of rich red cardstock and affix to the left side of a 4.25 x 5.25" panel of Stark White that is similarly matted. Machine stitch around the perimeter and scatter a few clear sequins, if desired. Affix the "Joy" Chippie with Letter It Clear Foam Adhesive; and the poinsettias with Double Sided Tape. Mount the completed panel to a white 4.5 x 5.75" card.
(
Step 10: To really get ahead on holiday card production, take time to add a sentiment to the interior, put your maker's mark on the back, and select an envelope. Designate a special place to keep your growing stash, and come December you'll only need to sign, seal and send your personalized greetings!
 My name is Lauren Bergold, I live in central New Jersey with my husband of 30+ years and A LOT of art supplies! My favorite medium is paper and I especially love making cards. I teach papercrafting classes, as well as collecting and compiling vintage and found papers. You can find me on my blog, All the Good Blog Names Were Taken and on Instagram as @llaurenb where I love to connect with other artists and makers!
 Related Posts

Dylusions Pastel Rainbow Notecards by Jess Peters
Soft pastel rainbows, playful splatter, and a handmade touch make these notecards a joy to create and send! 🌈...
Read More
Tim Holtz Distress® Paint Golden Summer Card by Dominique Bennani
This card is proof that simple techniques can create breathtaking results. ✨ Dominique Bennani stamped with Tim Holtz Distress®...
Read More