


In this tutorial, Terri Burson shows you how to create a striped background using a clever masking technique with Wendy Vecchi Archival Inks. Then she adds a textured element to this colorful card with some Distress Crackle Texture Paste andWendy's Let's Shop Stamp, Die and Stencil Set.

Wendy Vecchi Gift Bag Card by Terri Burson
- Materials
- Instructions
Die Cut Machine
Scissors
Masking Tape
Trimmer
Tissue Paper
Instructions
Hey Crafty Friends! We’re going to get inky today and dress up an easy inked striped card base with a decorative die cut mini-purse for gift cards, using brand new products from Wendy Vecchi. The decorative options are endless! Let’s get started, shall we?

Step 1: Begin by cutting a 4x4 inch piece of Simon Hurley Stark White Cardstock. Use the purse die from the Wendy Vecchi Let’s Shop Stamp, Die & Stencil Set and place on your cardstock, cutting with a die cut machine . Blend the die cut with Wendy Vecchi‘s Archival Ink color, Night Sky using the Ranger Mini Ink Blending Tool and the new Domed Replacement Foams.

Step 2: Have some masking tape or washi tape on hand for this next step. Fold the flaps back on your die cut purse and center the polka dot stencil included in the Let’s Shop set, on top. It may be helpful to hold this up to the light to better find your focal point. Once you’ve found your center, secure a piece of masking tape to the back of your die cut and stencil.
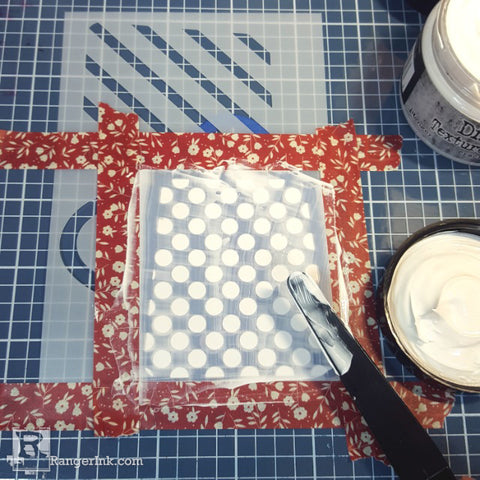
Step 3: Unfold the flaps of your purse and place flat with the stencil on your MAKE ART Stay-tion. Mask the area around the focal point with tape and apply a small amount of Tim Holtz Crackle Texture Paste, using the Tim Holtz Distress Palate Knife.

Step 4: Gently remove tape and carefully remove the stencil by peeling back from the die cut purse. Allow to dry or speed the process along using the Ranger Heat It Craft Tool. Set the die cut purse aside.

Step 5: Next, trim an A2 sized card panel from Simon Hurley Stark White Cardstock and mask a border with tape that is just under ½” around the entire panel. Create masked, diagonal stripes using Wendy Vecchi‘s Archival Ink in Night Sky, Petunia and Mulberry and the Ranger Mini Ink Blending Tool with Domed Replacement Foams. Adhere to a Wendy Vecchi white A2 sized landscape card and set aside.

Step 6: To create the filling for the gift bag, trim 2-3 strips of tissue paper, approximately 3x10 inches. Blend with your choice of Archival Ink to coordinate with the striped background panel. Embellish, if desired, with Lavender Stickles Glitter Glue. Set aside to dry.

Step 7: Stamp your sentiment from the MAKE ART Let’s Shop stamp set using the Wendy Vecchi MAKE ART Perfect Stamp Positioner and Stamp Block. Trim a 2x4 inch strip of Stark White Cardstock and stamp the sentiment by masking and inking each word with coordinating colors using the Wendy Vecchi Archival Ink in Night Sky and Mulberry.

Step 8: Last, assemble the purse by folding the die cut purse flaps and adhere to the center of the striped card panel using Wendy Vecchi Perfect Card Adhesive. Fold the decorative tissue and place inside gift bag. For added dimension, pop up your sentiment with Ranger Adhesive Foam Tape.
Bonus Tip: Add special touches, if you desire, such as the trimmed adhesive foam and foiled “buckles” on the purse handle.
 Hello, my name is Terri Burson. I’m a native New Yorker, transplanted in the deep South. My husband and I are parents to a 19 year old son and numerous fur babies. I’m an avid card make but love dabbling in many forms of art and mediums. You can find me on most social media platforms @wavingmywand and on my blog at wavingmywand.blogspot.com.
Related Posts

Simon Hurley create. Woodland Hello Card by Lieschen Harshbarger
Step into the woods with this enchanting card tutorial by Lieschen Harshbarger! Crafted using the Simon Hurley create...
Read More
Distress Embossing Glaze Christmas Card by Cheiron Brandon
Get into the holiday spirit with this stunning “Peace on Earth” card by Cheiron Brandon! Learn how to layer...
Read More