Follow along as Cheiron Brandon creates a set of gorgeous, inspiring notecards using the Tim Holtz Alcohol Ink Dura-Bright Black surface with Alcohol Inks and Pearls.
Follow along as Cheiron Brandon creates a set of gorgeous, inspiring notecards using the Tim Holtz Alcohol Ink Dura-Bright Black surface with Alcohol Inks and Pearls.
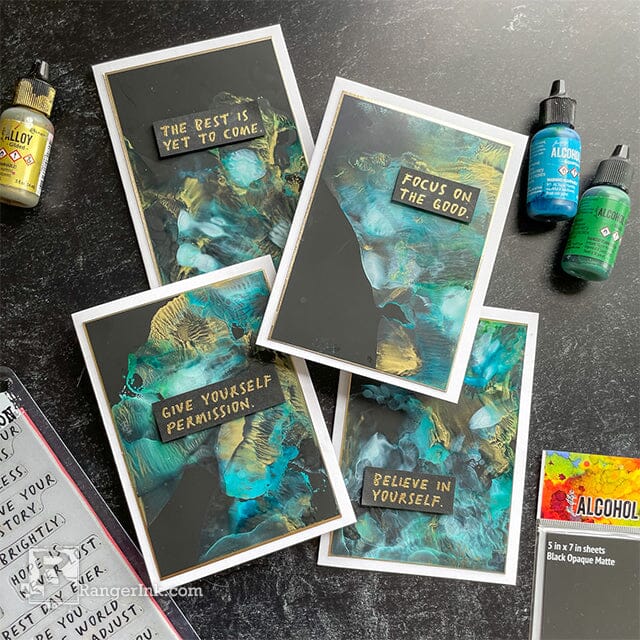
Hi there crafty friends! It’s Cheiron Brandon here and I am back with a new project to share with you using one of the newest Alcohol Ink Surfaces in the Distress line, the Alcohol Ink Dura-Bright Black. I wanted to create a project that gets the most out of this surface and make it easy to recreate, even for a beginner.
Today I created a set of notecards with an easy technique to make your Alcohol Ink colors pop on this black surface. These backgrounds reminded me of the ocean and I thought it would be fun to pair them with simple sentiments for a set of inspiring notecards.

Step 1: Gather your supplies. You will need Black Dura Bright, Alcohol Inks in Patina and Aquamarine, Alcohol Pearls in Tranquil and Elixir, Alcohol Ink Alloy Gilded, Alcohol Ink Mixative Snow Cap, Alcohol Blending Solution, Gold Embossing Powder and the Noteworthy Stamp Set.

Step 2: I used two pieces of Black Dura-Bright and cut them in half to 3 1/2 x 5 to create 4 panels.

Step 3: Before you get started, set up your Alcohol Inks, Alloy and Mixative so you are ready to use them. I line them up on my glass mat and place the corresponding cap near the open bottle of whatever I am using.

Step 4: Add some blending solution to your Glass Mat (hard to see in the photo but it is there).

Step 5: Add some drops of Snow Cap Mixative. This is what is going to help all your colors pop on the black surface.

Step 6: Add some drops of the rest of your inks and alloy on top of the mixative.

Step 7: Swipe the panels through the alcohol inks. I just did one swipe on each. Be careful to swipe them through, not press them into the ink and smoosh around, or you will not get this look.

Step 8: Stamp and emboss your sentiments onto a piece of black cardstock using Gold Embossing Powder.

Step 9: Add sentiments to your panels, add the panels to a piece of Metallic Kraft Stock, then to a white notecard.
I hope you will try this technique out for yourself. It is something a bit different for me, but I love the overall look of the inks on this paper.
 My name is Cheiron Brandon. I work in the financial district by day and love to play with stamps, ink, and paint at night in my studio. You can find me on my blog at www.cheironbrandon.typepad.com, on my new YouTube Channel, and posting almost every day @cheiron on Instagram!

Shine bright with this shimmering floral card by Cassie Trask! In this tutorial, she uses the latest Simon Hurley create. Heartfelt...
Read More