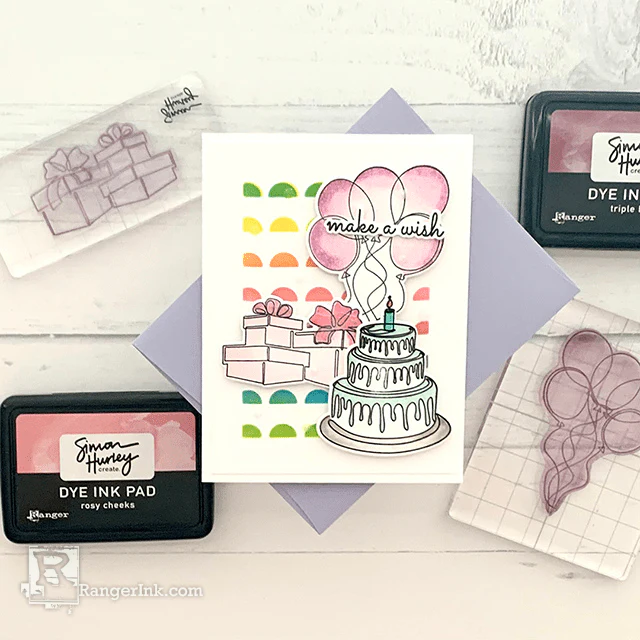
It's time for some birthday magic! In this fun tutorial, Lieschen Harshbarger creates this festive card using the new Simon Hurley create. Birthday Party Stamp & Die Set.
Simon Hurley create. Make A Wish Card by Lieschen Harshbarger
- Materials
- Instructions
Simon Hurley create. Birthday Party Stamp & Die Bundle
Simon Hurley create. Stencil Flip Flop Circles
Simon Hurley create. Rectangle Blend Stencil & Mask
Simon Hurley create. Dye Ink Pads: Piggyback, Prom Queen, Sidewalk Chalk, Triple Berry, Shooting Star, Rosy Cheeks, Clear Skies, Minty Fresh, Tropical Tango, Guppy, Woof!
Simon Hurley create. Stark White Cardstock
Simon Hurley create. Acrylic Stamping Blocks
Wendy Vecchi MAKE ART Perfect Card Adhesive
Wendy Vecchi MAKE ART Stay-tion 7"
Archival Ink™ Pads Jet Black
Ranger Artist Brushes
Ranger Handle It Tool
Ranger Anti-Static Pouch
Ranger Silicone Mat
Ranger Mini Ink Blending Tool
Ranger Mini Blending Tool Replacement Foams
Ranger Detail Blending Tool
Ranger Glossy Accents
Dylusions Designer Series Stickles - Stardust
Embossing Powder Clear
Tim Holtz Tools by Tonic Studios – Trimmer
Other:
Die cutting machine
Scissors
Heat gun
Low tack tape
Foam adhesive
Scoring board
Envelope
Instructions
Hi crafty friends! I’m so excited to share with you today’s card tutorial featuring one of Simon Hurley’s newest stamps and dies that are perfect to celebrate a loved one’s birthday, the Birthday Party set. I hope you enjoy this tutorial and that it gives you inspiration to do something fun and creative today!

Step 1: Trim a front panel piece for an A2 card base out of Stark White cardstock. Then, use the Rectangle Blend stencil and place it on the card stock. Next, place the Flip Flop Circles stencil on top of it and ink the background with Shooting Star, Rosy Cheeks, and Clear Skies.

Step 2: On separate pieces of card stock, stamp the cake, balloon, and present images from the Birthday Party stamp set and ink them with Jet Black ink. Next, heat emboss with Clear Embossing Powder.

Step 3: Use the coordinating stamp for the cake to ink the frosting with Minty Fresh. Next, use the coordinating stamp for the candle and ink image with Guppy and Tropical Tango.

Step 4: Use the coordinating stamp for the presents and ink with Piggyback and use mini blending brush to add Prom Queen ink. Then, use the coordinating stamp for the balloons to ink image with Sidewalk Chalk and use mini blending brush to add Triple Berry ink.

Step 5: Die cut the images from the Birthday Party using the coordinating dies. Die cut extras and glue them together for dimension.

Step 6: Glue front panel piece onto the A2 card base.

Step 7: Decide where the stamped images will go on the card and only glue parts where each image touches. Then, add foam adhesive.

Step 8: Stamp one of the sentiments from the Birthday Party set with Jet Black ink. Next, heat emboss with Clear Embossing Powder and die cut using the coordinating dies.

Step 9: Place images on the front panel piece. Then, add glossy accents on the ribbons and candle flame. Add Stardust Stickles on the background of the card.

Step 10: To finish the card, match it with a complimentary envelope and it is ready to be sent to a loved one on their birthday!
 Hi! My name is Lieschen Harshbarger. I’m married to my best friend and even though we don’t have children yet, our dog Sophie fills our hearts with lots of love and joy. By day, I work for the State of Texas, but during my evenings and weekends you’ll find me in my craft room – making cards and trying out new techniques with my crafty supplies. I enjoy being creative, but mostly I have enjoyed getting to know others and learning fun new things in this wonderful crafty industry! You can see more of my crafty projects on my blog Harshgurl and Instagram at @harshgurl.
 Related Posts

Simon Hurley create. Solar Spray Card by Cassie Trask
Shine bright with this shimmering floral card by Cassie Trask! In this tutorial, she uses the latest Simon Hurley create. Heartfelt...
Read More