


by Zoe Hillman

365 Summer Themed Mixed Media Canvas by Zoe Hillman
- Materials
- Instructions
- Ranger Sticky-Back Canvas
- Tim Holtz Distress Ink Pads: Weathered Wood, Walnut Stain
- Archival Ink: Jet Black
- Tim Holtz Distress Markers: Abandoned Coral, Broken China, Fossilized Amber, Gathered Twigs, Hickory Smoke, Mermaid Lagoon, Tumbled Glass, Twisted Citron, Weathered Wood
- Tim Holtz Distress Spray Stains: Antique Linen
- Tim Holtz Distress® Micro Glaze™
- Embossing Powders: Clear
- Ranger Texture Paste
- Ranger Glossy Accents™
- Ranger Emboss It™ Dabber
- Ranger Mini Blending Tool
- Dina Wakley Media Palette Knife
- Tim Holtz Distress® Marker Spritzer
- Ranger Artist Brush Set
- Ranger Heat it™ Craft Tool
- Ranger Non-Stick Craft Sheet™
- Tim Holtz Stampers Anonymous Stamps: CMS083 - Oddities Stamp Set, CMS090 - Going Somewhere Stamp Set
- Tim Holtz Stampers Anonymous Layering Stencils: 020 - Numbered Stencil, 035 - Wildflower Stencil
- Tim Holtz Sizzix Alterations: 660220 Mixed Media, 660217 Handwritten Journey
- Tim Holtz Idea-ology Grid Block
- Tim Holtz Tonic Snips Scissors
- cheesecloth
Instructions
 Hello everyone. I’m excited to be here at the Ranger Blog with a tutorial for a summer themed mixed media canvas.
 To begin cut a piece of sticky back canvas (7 x 7 inches) and spread a generous layer of white gesso over the top and set aside to air dry.
 Die cut mixed media cardstock with the Tim Holtz mixed media die. Run it through a die cutting machine several times making sure to move and slightly overlap the die each time to create a large continuous die cut shape.
Place the honeycomb die cut in the centre of the canvas and in the spaces above and below spread a thin layer of texture paste through stencils and set aside to air dry.
 Cover the canvas with 2 coats of white gesso allowing it to air dry between coats.
Dab fossilized amber distress paint on a craft sheet. Paint the honeycomb frame, working quickly so the paint remains wet.
Spritz the canvas with water and let the colour wick across the honeycomb and set aside to air dry.
 Dab mermaid lagoon and hickory smoke distress paints on a craft sheet.
Place the stencils back over the (now dried) texture paste and paint mermaid lagoon distress paint through the stencil and allow to air dry.
Once dry, add hickory smoke distress paint allowing some of the base paint to show through.
 Once the paint has completely air dried place the stencil back over the dried texture paste and stamp over the top with jet black archival ink. Dependant on the size of the stamp, mask off other parts of the stencil to protect the canvas.
 Dab twisted citron distress paint on a craft sheet and paint the wildflower stems (no need to use the stencil).
Dab abandoned coral and hickory smoke distress paints on a craft mat, mix and paint the wildflower heads.
 Once dry, mask off the stencil to protect the canvas. Ink up a stamp with jet black archival ink and stamp through the stencil. Carefully remove the stencil and allow to air dry.
 Once dry, cover with a generous layer of glue n’ seal and allow to air dry, (it dries super fast). The glue n’ seal will make the surface ready to take distress markers.
Scribble a little distress marker directly on the canvas and blend with your finger.
Once satisfied with the look, cover lightly with distress micro glaze and buff with a paper towel. Next add a final layer of glue n’ seal because it gives the canvas a really nice finish.
 Stitch the edges by machine or hand or add some detail to the edges with stamps or a journalling pen.
 Spritz the canvas with a distress marker spritzer and gathered twigs distress marker.
 Take a blank canvas (8 x 8 inches) and swipe weathered wood distress ink over the top and sides. Spritz with antique linen distress spray stain and set aside to dry.
Once dry spritz with gathered twigs distress marker and distress marker spritzer.
 Take a piece of cheesecloth large enough to overlap some of the edges of the backing canvas. Spray with antique linen distress spray stain and air dry or with the a heat tool.
Once dry, lay across the canvas and brush glue n’ seal generously over just the centre of the cheesecloth.
Peel the backing off the sticky back canvas and stick down. Add a generous squeeze of glossy accents along each edge and smooth down until stuck in place.
 Wrap the loose bits of cheesecloth around the back of the canvas and brush glue n’ seal over the back to secure in place. Set aside to air dry while making some embellishments…
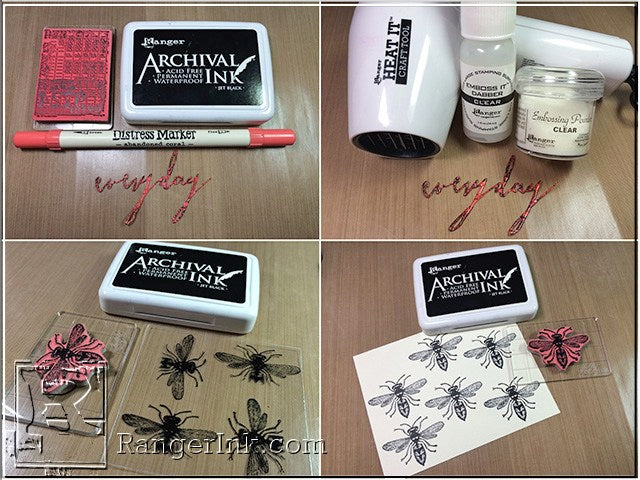 Die cut a word from Tim Holtz thinlits dies, colour using abandoned coral distress marker and stamp with jet black archival ink. Next cover with emboss it dabber and sprinkle clear embossing powder over the top. Shake off the excess and melt the powder with the heat it tool.
Stamp the bee from Tim Holtz oddities stamp set on shrink plastic 3 times and mixed media cardstock 6 times with jet black archival ink.
 Colour the body with fossilized amber, the wings with tumbled glass and the legs with gathered twigs distress markers.
Fussy cut 3 full bees and 3 bee bodies from the mixed media cardstock and 3 bee wings from the shrink plastic and assemble using glossy accents.
 To assemble put a dab of glossy accents under the central section of the shrink plastic wings and glue to the full bee. Then glue the bee body over the top to hide the wing join.
 Attach the bees to the canvas with a dab of glossy accents.
 I hope you have enjoyed my mixed media canvas and I encourage you to make one.


