


Milagros Rivera shares how to create a stunning DIY statement necklace using QuickCure Clay and ICE Resin.
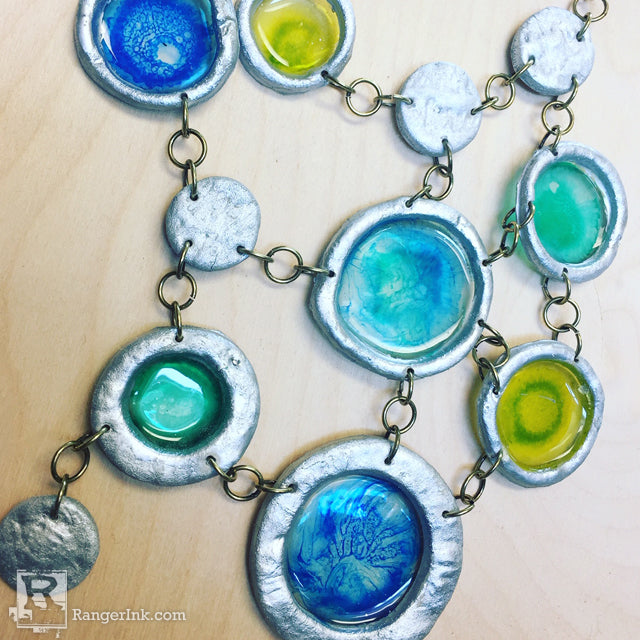
A Passion for Circles Necklace by Milagros Rivera
- Materials
- Instructions
- ICE Resin®
- ICE Resin® Tints: Hacienda, Turquoise, Beryl
- ICE Resin® Findings: Jump Rings
- QuickCure Clay
- Ranger Heat It Craft Tool
- Tim Holtz® Mixatives: Silver
- Circle Template
- Cookie Cutters
- Parchment Paper
- Heavy Duty Packing Tape
- Toothpick
- Dremel or other Jewelry Drill
- Jewelry Pliers
Instructions
Can you reign inspiration? I sometimes wonder how it all happens in my head. This one was a screaming moment while luckily my husband was driving and I could sketch my idea... seeing something and putting into reality, it’s another thing.
But one thing is for sure, if you’re like me and love circles and a puzzle here’s how to make your own!

Step 1: From sketch to drawing. I sketched my idea on an envelope and then drew the pattern onto parchment paper. We’ve included the pattern for you here. Print it out and trace onto parchment paper. Do not cure the QuickCure Clay on your printout.

Step 2: Roll the clay in between two layers of parchment and cut the rings using cookie cutters.

Step 3: Remove the excess clay. I decided to leave it in place so I could keep my original design.

Step 4: Cure the clay with the Heat it Craft Tool according to the package directions. Do not hold the Heat It Craft Tool too close to the parchment. Line each cured ring with a piece of heavy-duty packing tape.
Mix ICE Resin according to the package instructions. Pour the resin in the center.

Step 5: Let the resin cure for an hour before adding the ICE Resin Tint. You can play with a toothpick to create some designs since the resin is already beginning to harden.

Step 6: This is how I left it to cure.

Step 7: Use Tim Holtz® Mixative in Silver to color the clay.

Step 8: Using pliers connect the jump rings.


Related Posts

Stickles & Embossing Powder Christmas Card by Miriam Prantner
This adorable snowman card by Miriam Prantner is packed with festive charm! Created with the Tim Holtz Sizzix Winston...
Read More
Dylusions DIY Christmas Gift Wrap & Tags by Jess Peters
Dress up your holiday gifts with this Dylusions DIY Christmas Gift Wrap & Tags by Jess Peters! Using Dylusions...
Read More