


by Audrey Pettit

Commemorate Money Holder by Audrey Pettit
- Materials
- Instructions
- Ranger Watercolor Paper
- Tim Holtz Distress Ink Pads: Tattered Rose, Abandoned Coral, Evergreen Bough, Tumbled Glass, Peeled Paint, Scattered Straw, Antique Linen, Brushed Corduroy
- Tim Holtz Distress Markers: Abandoned Coral, Worn Lipstick, Vintage Photo, Gathered Twigs, Peeled Paint
- Archival Ink: Potting Soil
- Stickles Glitter Glue: Star Dust
- Ranger Wonder Tape™
- Ranger Artist Brush Set
- Ranger Mister
- Ranger Mini Blending Tool
- Ranger Non-Stick Craft Sheet™
- Score-Pal Scoring Board
- Stampin
- Tim Holtz Idea-ology: Wallflower Paper Stash Paper Pad 12x12; Textured Surfaces Burlap Idea-ology Deco Paper, Crinkle Ribbon, Chit Chat Stickers
- Tim Holtz Sizzix Alterations Prize Ribbons Bigz Die, Heartfelt Bigz Die, Love You Framelits w/ Stamps
- Tim Holtz Stamper’s Anonymous Layering Stencil: Latticework
- Tim Holtz Stamper’s Anonymous: Flower Garden
Instructions
 It is graduation time of year, and this is a big year for us at my house. My daughter will be graduating from high school in just a few short weeks, and as often traditional on these occasions, I know she’ll be receiving some gift money from the family.
 Of course a special event like this needs a special gift wrap, and today I’ve got a just such a project to share with you. A quick and easy money holder, perfect for cash, checks, notes, or gift cards, that can be easily personalized to suit any theme or style you wish.
To get started, cut a 9”x7” piece of heavyweight patterned paper or cardstock.
 Using a scoring board or bone folder, score the long side at 2” and 5.5”
 Crease the folds along the score lines. Fold the small 2” flap inwards. Mark the center with a pencil, and then punch a half-circle notch from the edge at the center mark. Stamp the “love you” sentiment from the Love You Framelits w/ Stamps set on the left side of the flap using Potting Soil Archival Ink.
 Place a strip of ¼” Wondertape at the very top and bottom edge of the 2” flap, and secure the side flap shut, creating the perfect money holder pocket.
 Cut a 3.25” x 6.5” piece of manila cardstock. Tear off a portion of the bottom of the paper on the diagonal.
 Dab Antique Linen, Brush Corduroy, Tumbled Glass, and Evergreen Bough Distress Ink onto a non-stick craft sheet. Spray the ink with a mister bottle until large beads of water have formed in the ink.
 Press the front of the torn manila cardstock down into the ink mixture and wiggle the paper slightly to get color over the entire paper. Allow the paper to dry, or heat dry with a heat tool, and repeat the process if you wish to darken and intensify the ink color. Cut approximately 18” of crinkle ribbon, and then use the ribbon to sop up any remaining ink on your craft sheet. Set ribbon aside to dry.
 Lay the Latticework stencil onto the inked manila cardstock. Using an ink blending tool, apply Brushed Corduroy Distress Ink over the stencil in a random fashion, with some areas getting a darker application of ink and others getting a very light application.
 Spray water into your hand with a mister bottle, and then flick the water onto the stenciled paper to create some water droplets and splotches. Dab Tumbled Glass Distress ink onto the craft sheet, and spray it heavily with water. Pick up the ink with a paintbrush, and tap the paintbrush against your finger to flick the ink onto the paper. Dry with a heat tool.
 To make the belly band closure, cut a 1.5” x 10” strip of patterned paper. Hold one end in the middle of the money holder, and then bend and wrap the rest of the strip around the holder, to the back, and back across the front from the opposite side. Add a bit of Wondertape to the center to hold the strip together. Cut a V-notch into the end flap. Add Brushed Corduroy Distress Ink to the edges of the band using an ink blending tool. Cut a 1” strip of Burlap Textured Surfaces paper, and adhere to the front center of the band. Wrap the excess around to the back side. Trim a V-Notch into the end to match the paper. Swipe burlap with Picket Fence Distress Paint, and then set aside to dry.
 Stamp a poppy flower and stem from the Flower Garden stamp set onto Ranger Watercolor Paper using Potting Soil Archival Ink.
 Use Distress Markers to watercolor the flower. Start with drawing around the edge of each petal with Abandoned Coral marker. Dab Tattered Rose Distress Ink onto the craft sheet. Dip a watercolor brush into water and then into the Tattered Rose ink, and use that wet brush to blend out the marker on the flower petals.
 Continue to add water and ink until you have covered all the petals. Dry with a heat tool. Apply Worn Lipstick marker to the shadows, blend with a wet brush, and dry with the heat tool. Use a Gathered Twigs marker to apply color to the flower stamens. Add a bit of Vintage Photo marker to the underside of the petals, and blend out with a wet paintbrush. Fussy cut the flower.
Repeat the process for the stem using Peeled Paint Distress Marker and a wet paintbrush.
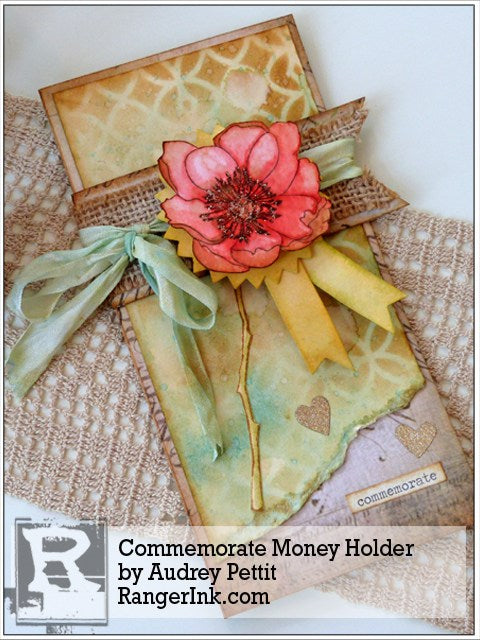
 Adhere the stenciled manila cardstock to the front of the money holder. Slide the belly band wrap onto the holder. Wrap the inked Crinkle Ribbon around the center of the wrap band, and tie the ends into a big bow on the left side.
 Die cut the prize ribbon from Manila Cardstock. Dab Peeled Paint and Scattered Straw Distress Ink onto the craft sheet, and spray the ink with water to blend. Place the front of the ribbon pieces into the ink mixture and then dry the pieces with a heat tool. Repeat the process if you’d like the colors darker or more intense. Cut the banner in half, and adhere the pieces behind the pinked circle. Add foam adhesive behind the circle, and adhere it to the center of the wrap band.
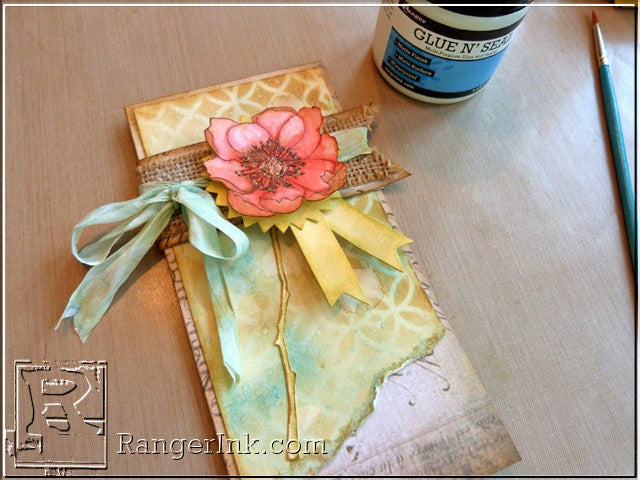 Apply foam adhesive behind the flower and adhere it to the center of the circle die cut. Add Star Dust Stickles to the center of the flower. Place a small amount of Glue n’ Seal Matte adhesive onto the back of the flower stem, and then adhere the stem directly to the stenciled background, tucking the end up under the wrap band.
 Die cut two small hearts from Deco Paper using the Heartfelt Bigz die. Peel off the release paper and adhere the hearts to the bottom right corner.
 Ink the edges of a Chit Chat word sticker with Brushed Corduroy Distress Ink using an ink blending tool. Add sticker to the bottom right corner of the holder.


Related Posts

Dylusions Neon Ink Sprays Journal Page by Miranda van den Bosch
Neon color takes center stage on this eye-catching journal page by Miranda van den Bosch! The newest...
Read More
Tim Holtz Distress Paint Summer Card by Tami Bastiaans
Bring the beach to your craft table! Tami Bastiaans created this bright summer card using Distress Texture Paste, Paints,...
Read More