


Create this fun mixed media book made of Dina Wakley MEdia Heavyweight Watercolor Paper and follow along as Megan Whisner Quinlan shows you an inventive stenciling trick using Dina's chipboard shapes.
Dina Wakley MEdia Chipboard Stencil Book by Megan Whisner Quinlan
- Materials
- Instructions
Instructions
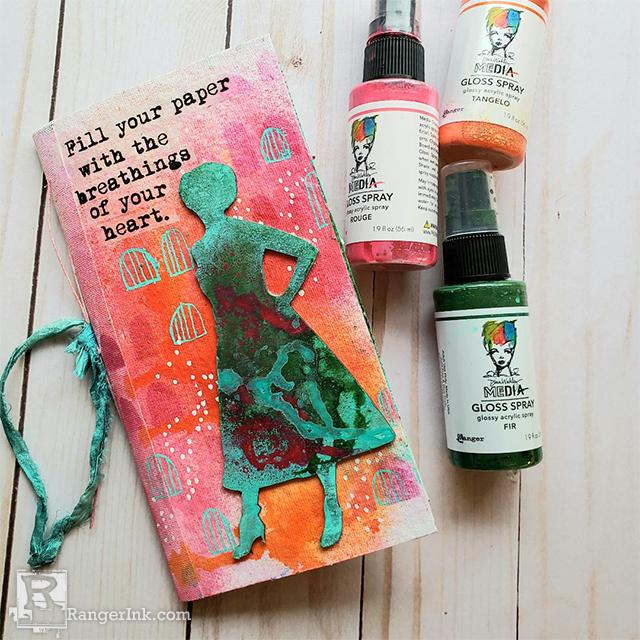
Although chipboard shapes are super fun features to mixed media projects on their own, they can also be used in different ways in your art. Chipboard can be used as a stencil to create spectacular silhouettes in your projects. Follow along to find out how to create this fun book with chipboard shapes and acrylic sprays.

Step 1: Cut some Dina Wakley Media Watercolor sheets in half horizontally. You will now have two pages. Cut 3 or 4 sets.

Step 2: Trim the Sticky Back Canvas Tape down to 2” wide and cut it into strips as long as your page.

Step 3: Add the tape on the front and back seams of the book pages creating your signatures.

Step 4 : Go through all of the pages and, using a Ranger Mini Blending Tool and acrylic paint, stencil some shapes on to all of the pages to begin adding some texture and pattern. Just stencil randomly and try to leave white space as well.

Step 5: Using the acrylic sprays, spray a foundation layer on your pages, taking care to also leave some white space. Allow to dry.

Step 6: Using the chipboard shapes, place one onto your page and spray some contrasting color around the chipboard shape. Carefully lift up your shape, so as to retain the image below. Allow to dry. The shapes can be used in this way for quite sometime until you decide to use it in your projects, which is why the shapes are so amazing.

Step 7: Once your pages are dry, add some marks and doodles with paint pens. To help the image “stand out” a little more, you may want to trace around the shape in a White Opaque Pen.

Step 8: Using some Ultra Thick Gel Medium, add some Collage Tissue phrases onto to your pages to make them inspiring.

Step 9: Place all of ythe pages one on top of the other. Decide what page you want as your cover, and glue down a chipboard shape with Ultra Thick Gel Medium.

Step 10: Using a bookbinding needle (or even a large embroidery needle) and some waxed linen do a simple pamphlet stitch to attatch all of your pages through the Sticky Back Canvas spine. Embellish the outer spine with some fun colored ribbons and you will have a lovely book showcasing your chipboard silhouettes!
 Hello! My name is Megan Whisner Quinlan. I have been art journaling and book binding for about 20 years. However I took a 10-year break from paper arts when I had my first 2 children. About 5 years ago, I came back into journaling after some big life changes, including 2 more children. Journaling had always been a part of my life, especially to work things out in life on paper. When I first started out, I really only focused on making books by hand and some basic collage and stamping. I was intimidated by the amazing art journalers out there who had elaborate mixed media spreads in their journals. But when I came back to journaling after such a long break, I decided that I was going to really push myself to learn all the techniques I had been too afraid to try. Painting and drawing have really allowed me to find so much joy in my creative process, and I now almost exclusively create mixed media every day. I feel excited to have joined the art journaling community and you can find me on Instagram @Megan_Whisner_Quinlan.
Related Posts

Using Tags as Masks for Art Journaling by Laura Dame
Join Laura Dame in this exciting art journal tutorial where she demonstrates how to use a Dina Wakley Media...
Read More
Dylusions Flip Cap Paint Journal Page by Jess Peters
In this tutorial, Jess Peters creates a lively, bold journal page using Dylusions Flip Cap Paint, Stencils, and Archival Inks!...
Read More