


by Kassa Hayselden

Dinner Time by Kassa Hayselden
- Materials
- Instructions
- Dina Wakley Media Brushes
- Ranger Texture Paste: Opaque
- Ranger Non-Stick Craft Sheet™
- Ranger Watercolor Paper
- Archival Ink™ #0 Pad: Jet Black
- Fude Ball Pen: Black
- Tim Holtz® Distress Ink Pads: Salty Ocean, Mustard Seed, Blueprint Sketch, Twisted Citron, Squeezed Lemonade, Fossilized Amber, Peacock Feathers, Mermaid Lagoon, Spun Sugar, Shaded Lilac, Frayed Burlap, Picked Raspberry, Worn Lipstick, Ripe Persimmon, Abandoned Coral
- Tim Holtz Distress® Crayon Kits
- Tim Holtz® Distress Markers: Salty Ocean & Mustard Seed
- Tim Holtz® Idea-ology - Adornments, Crinkle Ribbon, Mini Pocket Watch, Number Token, Mini Clipboard, Design Tape-Dapper, Quote Bands
- Tim Holtz® by Stampers Anonymous - Crazy Cat Stamps - cms251, Mini Bird Crazy - cms250, Psychedelic Grunge - cms056, Mini Layering Stencils & Layering Stencil 'Speckles'
Instructions

Hi there everyone, Kassa here, so happy to be back again with another tutorial, sharing how I colorized the ace Crazy Cats with a watercolor like effect using Distress Inks, then splattering them for a kool trendy look and the assemblage of the Mini Clipboard. This tutorial is all about the layers, layers, layers! Oh ‘n’ splats!
Heeheehee, so I just couldn’t resist putting the cats and mini birds together, tis like they were made for each other!
 Step 1: After stamping out your images on the smooth side of the watercolor paper, stamp the Distress Ink on a non-porous surface.
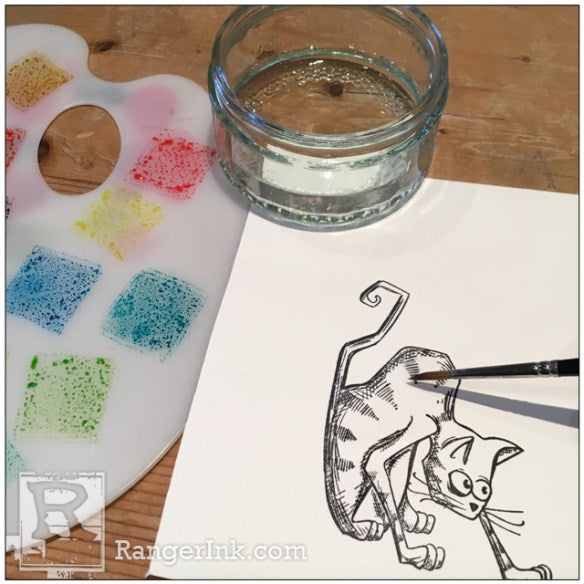 Step 2: With a fine head paintbrush and clean water wet the area of the cat you are about to work on.
 Step 3: Pick up some Mustard Seed on your brush and dab into the ‘wetted’ area. The ink will spread out into the ‘wetted’ area. After the ink has spread, keep dabbing with the ink as necessary to cover the area you are workingon. If there is too much water, soak up with the edge of a kitchen towel.
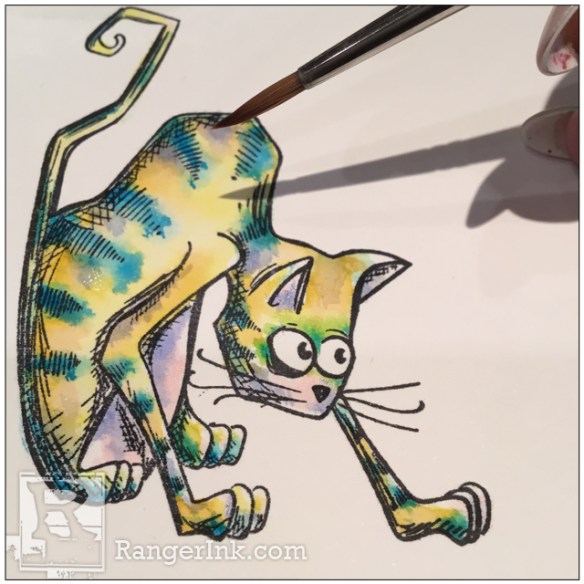
 Step 4: Continue to fill in the main body of the cat in the same way, adding Squeezed Lemonade, Fossilized Amber inks, too. Leave the belly, eyes, lower face, inner ears, some toes and the stripes white.
 Step 5: Wet around the eyes (careful not to wet the insides of eyes), and add Twisted Citron. Whilst wet add a tiny spot or two of Peacock Feathers.
 Step 6: Wet the stripes and add a light layer of Peacock Feathers.
 Step 7: Whilst wet or add a little drop more water where/whenever necessary add small amounts of Mermaid Lagoon ink – little and often is best as this color is vibrant and will take over your cat if you are not careful/cautious.
 Step 8: Wet the belly, inner ears, lower face, and toes. Next, add a few layers of Spun Sugar ink.
 Step 9: A touch of Shaded Lilac over some of the pinky areas adds shadow and depth. Add a few drops to the cat’s body, paws and legs (not forgetting to wet these areas with water first).
 Step 10: I now add more blue to liven up the stripes. To do this use a little touch of Blueprint Sketch – careful, tis a very strong color. I then leave puddle drops of water in various places on the cat, this will make the inks seep out and into each other creating puddles and random inky lines as it dries.
 Step 11: You will see interesting/curious puddles/lines appearing – creating more character!
At this point I touch deepen the colours, going back in with some or all of the above used colours (approx 3 or 4 layers) creating yet more overlaps and interest. As each layer dries you see the previous layers appear through.
Add a touch of Worn Lipstick, and Picked Raspberry to the nose. Abandoned Coral and Worn Lipstick are great for the rosy cheeks and belly area. Ripe Persimmon in tiny amounts gives a brightening boost.
 Step 12: The eyes need a touch of Shaded Lilac mixed with Frayed Burlap. Leave some white space so the eyes twinkle! When the eyes are finished, add a tiny puddle droplet of water and leave the droplet to disperse the ink and dry naturally. The Frayed Burlap is great to add shadow to any areas over the cat, but be careful, you only need a drop or you will muddy all your hard work!
 Step 13: Whilst the inks are still wet, add a few puddle drops of water then add a little rock salt here and there and leave to dry fully – I’m not patient so I leave overnight!
 Step 14: The salt soaks up the water and inks leaving yet another interesting look and a slightly glassy, glistening look too!
 Step 15: Take the clipboard and coat the edges with Black Gesso and when dry apply White Gesso to the inner board and clip (approx 3 coats). Dry brush the white into the black for soft dusty edges. A heat gun at this stage for drying is ace. Go in close to create those wonderful Gesso bubbles – eeeeek!!!
 Step 16: So now I gather my main elements and position them on my clipboard to give me direction going forward – I have an idea where I’m going but by doing this I can swap things around or even glean more ideas!
 Step 17: I apply torn design tape onto the clip, down the upper and lower left hand side (multi layers of tape adds texture). I also mask off the bottom and right hand black edges ready to apply the Texture Paste through the layering stencils (I want to keep the edges black, framing the artwork and pushing if forwards – a great and easy way to make your colors ‘POP.’)
 Step 18: With Gesso, paint over the tape a couple of times to blend into the background and seal in. Dry brush Black Gesso through the stencil at the bottom of the clipboard.
 Step 19: Once everything has dried ‘naturally’ start to dry brush layers of the Mustard Seed and Salty Ocean paint around the edges, on the Texture Paste rings and clip. Careful not to cross contaminate as greens will occur! But wet wipe greens away and any smudges on the black edges. Adding the same colored ink with a Distress Marker deepens and brightens the colors, blend out quickly with a dry paintbrush.
 Step 20: Add Picket Fence Paint with the dabber over the colours to create a mottled effect. You will have to dab the ‘inky’ areas more as the ink seeps through but I love how this ‘seepage’ looks!
 Step 21: I thread 7 rounds of white wire under the clip and around the board. The wire makes for a cool hanging loop too! Dab a little paint on the wire to blend in and add a touch of Black Soot too. Add the black to the inner Texture Paste rings and a little on the clip.
 Step 22: On the Craft Sheet I add 1 dab of Black Soot then add 3-4 drops of water to make a rinse which I brush all over the top and mid of the board (ink the clip & loop) but exclude the colour painted edges which are simply blended in with kitchen roll. The lush drip is a rinse again, but with more paint and I repeated the process to deepen the black!
 Step 23: Add the black dots with Archival Ink randomly round the edges and clip, once the ink is dry with White Gesso dry brush to blend them back into the background. Also I add a few layers of Gesso over the areas where the cats will sit and brighten up any areas like for instance the clip!
 Step 24: Gesso the adornments, pocket watch, number token 2 times. Dampen down crinkle ribbon and add the various ‘yellow’ inks, then blues via dabbing them on your craft mat and dragging the ribbon through, dry with the Heat it Tool whilst scrunching in your hand. Stamp and cut out the fish and the ‘Dinner Time’ is cut out from various magazines!
 Step 25: Pop the feathers then fish into the pocket watch, add a touches of the blue, yellow, black, white paints on the pocket watch, number token and ribbon.
 Step 26: I adhere the ‘Dinner Time’ letters with matte gel media, all the idea-ology pieces are adhered to and around the clip with both hot glue (for an immediate effect) and a dollop of the thick heavy gel medium (extremely strong so the pieces won’t eventually drop off).
 Step 27: Shape your cats and birdie with your hands and adhere with a couple or sploges of heavy gel media and YeY!!! Now for the splatters on and around the cats. Cover the precious faces with kitchen roll, then simply dab the yellow and blue inks on a Craft Sheet, add droplets of water. In turn, pick up the inks with a small headed paint brush and tap the end of your paint brush over the cats. Lush droplets can be strategically placed this way and for the more finer random splats whip your brush quickly over the areas you want to splatter (if you want – cover any areas you don’t wish to splat).
 Step 28: Distress Crayons add more layers of color. Blue added beneath the cats and birdie grounds them. File off paint on the clip. Randomly dry brush Tarnished Brass Distress Paint here and there (not the cats or birdie). Add a dab of the vibrant Blueprint Sketch into the blue splats. Do the same to the yellow splats with the Distress Crayons. Also add these to the blues and yellows on and around the idea-ology. On the various Texture Paste splatters/speckles, especially the rings and the black ring ‘drip’ add black shading with a dry Stabilo pencil, wetting the pencil nib for the very deep black tones. The Fude Ball pen nicely edges the clipboard and enhances some of the stamped dots. Rub the design tape with a wet wipe to let the print show through a little and finally scribble white marker ink randomly on the background before splattering ink from it across the middle/top of the board. The very top right corner has a couple of black splats with the black marker pen.
Thanks so much for stopping by today. It would be totally amazing to link your inspired ‘Crazy Cats/Crazy Birds splattered ink art over on the Ranger Facebook page. After all, sharing art with friends is the best- Mwah xoxo Kassa

