Distress Lost Shadow Tag by Paula Cheney

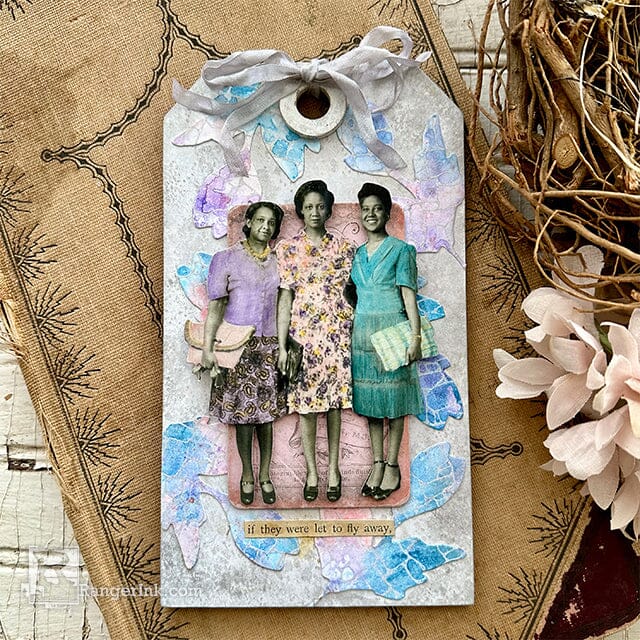
Follow along as Paula Cheney uses Tim Holtz Distress Lost Shadow and Distress Crayons to create this stunning, intricate tag.

Tim Holtz Idea-ology Ephemera Large Palette
Other:
Sizzix Blossom Thinlits Die Set - Blossom by Tim Holtz 
Stampers Anonymous Tim Holtz Cling Mount Stamp: Slate & Stone CMS299
Stampers Anonymous Tim Holtz Etcetera Mini Tag Thickboards
Stampers Anonymous Tim Holtz Grid Blocks
Tim Holtz Idea-ology: Paper Dolls, Groups
Tim Holtz Idea-ology Ephemera Large Palette
Tim Holtz Idea-ology Clippings Sticker Book  
1/4” rayon ribbon
Foam squares 
Cutting knife and self-healing mat board 
Cotton swabs 


Instructions

Distress Lost Shadow Tag by Paula Cheney Step 1
Step 1: Gather items for the project: Mini Etcetera Tag, Distress Watercolor cardstock, Distress Crayons set #14 and Lost Shadow Distress Ink and Embossing Glaze. 


Distress Lost Shadow Tag by Paula Cheney Step 2
Step 2: Cut a piece of Distress Watercolor Cardstock the size of substrate. 


Distress Lost Shadow Tag by Paula Cheney Step 3
Step 3: Press Lost Shadow Distress Ink pad directly onto craft sheet, adding enough ink to cover an area the size of the cut cardstock. Spritz ink with water and press cardstock into the ink.  Repeat the process, lightly drying the cardstock before going back into the ink. 


Distress Lost Shadow Tag by Paula Cheney Step 4
Step 4: Use Collage Medium Matte and a Collage Brush to adhere cardstock to substrate. Cut away excess paper with cutting knife and self healing mat board.


Distress Lost Shadow Tag by Paula Cheney Step 5
Step 5: Add a Distress Sanding Disk to a Mini Ink Blending Tool. Use the Blending Tool to sand the edges of the cardstock. Set substrate aside. 


Distress Lost Shadow Tag by Paula Cheney Step 6
Step 6: Use the large leaf shaped die from the Sizzix Blossom Thinlit to cut at least 6 large leaves from Distress Watercolor Cardstock. 


Distress Lost Shadow Tag by Paula Cheney Step 7
Step 7: Add the Stampers Anonymous ‘Stone’ stamp to a large Grid Block.  Ink stamp with Embossing Ink and stamp over the die-cut leaf. 


Distress Lost Shadow Tag by Paula Cheney Step 8
Step 8: Move stamped leaf to a piece of disposable paper.  Pour Lost Shadow Distress Embossing Glaze over the top of the stamped leaf. 


Distress Lost Shadow Tag by Paula Cheney Step 9
Step 9: Shake off the excess Embossing Glaze and return to the jar.  Emboss Lost Shadow Glaze with Ranger Heat-It Tool. Repeat steps for each leaf. NOTE: Distress Embossing Glaze melts very quickly, so be sure not to over melt. 


Distress Lost Shadow Tag by Paula Cheney Step 10
Step 10: Scribble Distress Crayons from set #14 (Saltwater Taffy, Uncharted Mariner, Villainous Potion) onto glass mat or craft sheet. Spritz Distress Crayon with water. 


Distress Lost Shadow Tag by Paula Cheney Step 11
Step 11: Smoosh leaf into the watery crayon to pick up color.  You do not have to color the entire leaf (white space is okay).  Dry with a Heat-it Tool then repeat steps until all the leaves have been colored. NOTE: I found it best to wipe up the watery crayon after each leaf.  You will need to dry your surface before adding more crayon to the mat. 


Distress Lost Shadow Tag by Paula Cheney Step 12
Step 12: Adhere leaves to the substrate with Collage Medium Matte. Press each leaf down until secure. 


Distress Lost Shadow Tag by Paula Cheney Step 13
Step 13: Flip the substrate over onto a self-healing mat board and cut away the leaves that hang over the edge. Set to the side. 


Distress Lost Shadow Tag by Paula Cheney Step 14
Step 14: Use your finger to wipe Picket Fence Distress Paint over donut shaped reinforcer. Let paint dry, then lightly sand with Sanding Disk. Press Lost Shadow Distress Ink onto craft mat. Lightly rub Collage Medium over the top of reinforcer and press into ink. Dry with Heat-It Tool.  


Distress Lost Shadow Tag by Paula Cheney Step 15
Step 15: Spray 1/4” rayon ribbon with Lost Shadow Distress Spray Stain. Dry with Heat-It Tool. 


Distress Lost Shadow Tag by Paula Cheney Step 16
Step 16: Fold Lost Shadow ribbon in half and thread both ends through hole. Tie a bow, then trim excess. 


Distress Lost Shadow Tag by Paula Cheney Step 17
Step 17: Color Paper Dolls using Distress Crayons from set #14.  Color directly over the surface, then use a cotton swab to smooth out and add visual texture. If you want to remove color, just add a touch of water to the cotton swab to remove.  TIP: To add multiple colors (pink dress): color the dress in Saltwater Taffy, smooth out color with cotton swab. Add dots of Villainous Potion where there are flowers on the dress, pounce over color with cotton swab. Add a touch of Fossilized Amber (or another color) and repeat the pouncing with another cotton swab. 


Distress Lost Shadow Tag by Paula Cheney Step 18
Step 18: Using foam squares, add pink Ephemera from the idea-ology Palette pack to the Etcetera Tag. 


Distress Lost Shadow Tag by Paula Cheney Step 19
Step 19: Add foam squares to the back of the Paper Dolls.  Adhere to the pink ephemera, creating a layered effect. 


Distress Lost Shadow Tag by Paula Cheney Step 20
Step 20: Add a strip of words from the idea-ology Clipping Sticker Book. 


paula cheneyI have been a “maker” all my life. Sewing, stamping, paper arts, I love it all. Creating and teaching is a passion for me, whether it is in the classroom or on my blog, One Lucky Day.. I have worked in the scrapbooking/mixed media field since 2005 and  for the last 7 years have been the Creative Coordinator for Tim Holtz Brands, a dream job if there ever was one. On a personal note, I live on the Central Coast of California with my husband, Jay. I love to travel to new places to look for old junk and am willing to pack a bag at a moment’s notice. On an ordinary day you can find me working away in my craft room with the windows wide open and music playing in the background. Follow Paula on instagram @luckyday

Related Posts

Dylusions Brayered Background Tag by Denise Lush
February 19, 2024
Dylusions Brayered Background Tag by Denise Lush

Check out Denise Lush's tutorial on crafting this cool, grunge-inspired Dylusions Brayered Background Tag! Follow along as she uses the...

Read More
Dina Wakley MEdia Colorful Collage Tags by Laura Dame
December 11, 2023
Dina Wakley MEdia Colorful Collage Tags by Laura Dame

Follow along with Laura Dame as she transforms these tags into vibrant works of art using Dina Wakley's latest...

Read More