


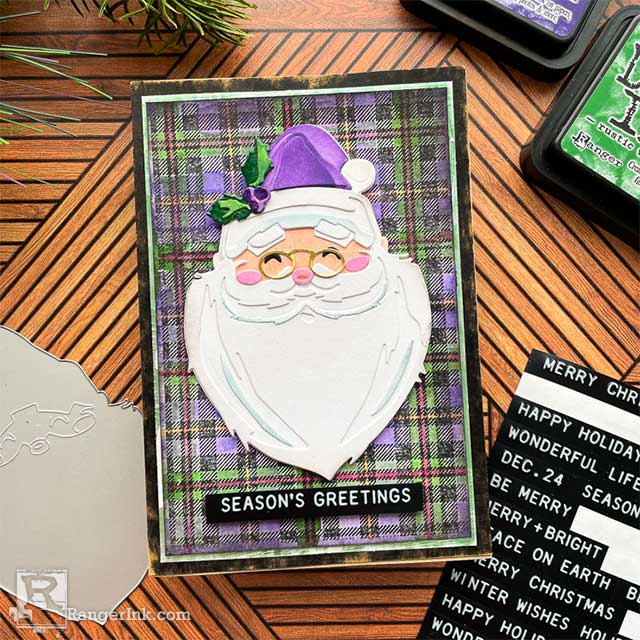
Add a fresh non-traditional look to your holiday makes with this adorable Santa card by Cheiron Brandon that features Tim Holtz Distress Villainous Potion.
Distress Villainous Potion Santa Card by Cheiron Brandon
- Materials
- Instructions
Tim Holtz Distress® Oxide Ink Pads: Villainous Potion, Tattered Rose, Pumice Stone, Hickory Smoke, Weathered Wood, Rustic Wilderness, Kitsch Flamingo
Tim Holtz Distress® Ink Pad: Villainous Potion, Rustic Wilderness, Picked Raspberry, Dried Marigold, Black Soot
Tim Holtz Distress® Archival Ink Pad 4 pk: Black Soot
Tim Holtz Distress® Embossing Glaze: Villainous Potion, Rustic Wilderness
Tim Holtz Distress® Watercolor Cardstock
Tim Holtz Distress® Sprayer
Tim Holtz Distress® Collage Medium (Matte)
Ranger Mini ink Blending Tool
Ranger Mini Ink Blending Tool Domed Replacement Foams
Tim Holtz® idea-ology Kraft Stock: Black
Tim Holtz® Idea-olgy Christmas Label Stickers
Other:
Tim Holtz® idea-ology: Metallic Confections Kraft Stock
Tim Holtz® Metallic Kraft Stock
Tim Holtz® Alterations by Sizzix Santas Wish
Tim Holtz® Stampers Anonymous Nordic & Plaid
Tim Holtz® by Tonic Studios Glass Mat
Instructions
Hi there, crafty friends! It’s Cheiron Brandon and I am thrilled to be back on the Ranger website, today sharing a project with you using the newest color of Distress, Villainous Potion.
I love this new shade of purple, and I thought it would be fun to incorporate it into a holiday make, since that is what I have been working on these past few weeks. Today I will walk you through a fun holiday card that I created using this color using the Sizzix Santa’s Wish dies.

Step 1: To begin, cut all pieces of the Santa’s Wish die out of Distress Watercolor Cardstock except for the eyebrows (black) and the glasses (gold metallic paper). We are going to color the white pieces with Distress Oxide.
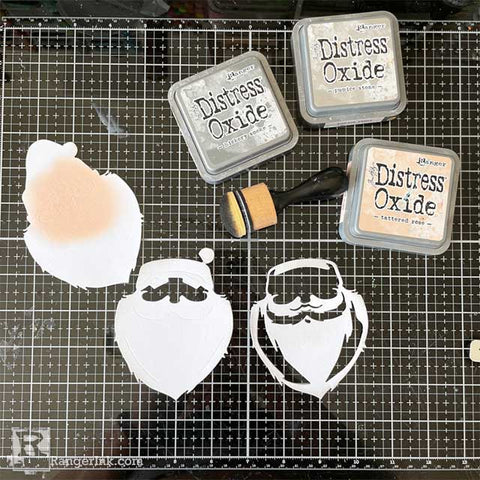
Step 2: Color your cut pieces using Distress Oxide Inks and a Foam Blending Tool. Here are the colors Tattered Rose (face), Pumice Stone, Hickory Smoke, Weathered Wood (beard parts), Kitsch Flamingo (cheeks and nose), Villainous Potion (hat, holly berries) and Rustic Wilderness (holly leaves).

Step 3: Arrange all your colored pieces together except for the berries and holly leaves.

Step 4: For the berries and holly leaves, emboss them in Villainous Potion and Rustic Wilderness Distress Embossing Glazes.

Step 5: Adhere all the colored pieces down, the face, beard, eyebrows, glasses, nose and cheeks, hat and holly using Distress Matte Medium. Tweezers come in handy for doing this!

Step 6: Stamp the plaid stamp from the Plaid and Nordic set onto a panel of Distress Watercolor Cardstock. My final panel was 4 x 6.
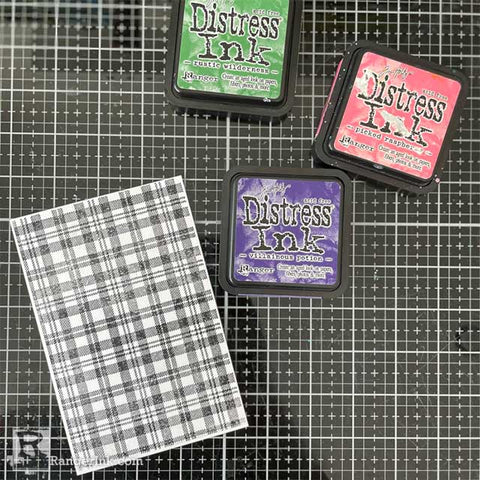
Step 7: Create a watercolor plaid background using Distress Inks in Villainous Potion, Picked Raspberry, and Rustic Wilderness. Take the inks and press ink onto your glass mat (or palette), spray with a Distress Sprayer and pick up with a paintbrush.

Step 8: Paint each color and let dry before painting the next. I started with the Villainous Potion, then added Rustic Wilderness, then Picked Raspberry.

Step 9: Fill in the thin lines of the plaid by adding in some Dried Marigold Distress Ink.

Step 10: Dry the panel fully and ink the edges with Black Soot Distress Ink.

Step 11: To finish the card, add the Santa to the plaid panel using foam adhesive, add the plaid panel to a piece of green metallic cardstock and add that panel and adhere to a piece of Black Kraft Stock, then to a notecard. Finished card is 4 ½ x 6 ½, metallic mat is 4 1/8 x 6 1/8 and plaid is 4 x 6).

I hope you enjoyed this non-traditional Santa! Once you get all your pieces prepared, he is super easy to assemble, and the plaid is really fun to paint.
 My name is Cheiron Brandon. I live in Bayonne, New Jersey with my husband and our two adorable rescue pups, Big Boy and Oreo. I work in the financial district by day and love to play with stamps, ink and paint at night in my studio. I teach monthly card making and mixed media classes in NYC. You can find me on my blog at www.cheironbrandon.typepad.com and posting more often @cheiron on Instagram!
Related Posts

Simon Hurley create. Woodland Hello Card by Lieschen Harshbarger
Step into the woods with this enchanting card tutorial by Lieschen Harshbarger! Crafted using the Simon Hurley create...
Read More
Distress Embossing Glaze Christmas Card by Cheiron Brandon
Get into the holiday spirit with this stunning “Peace on Earth” card by Cheiron Brandon! Learn how to layer...
Read More