


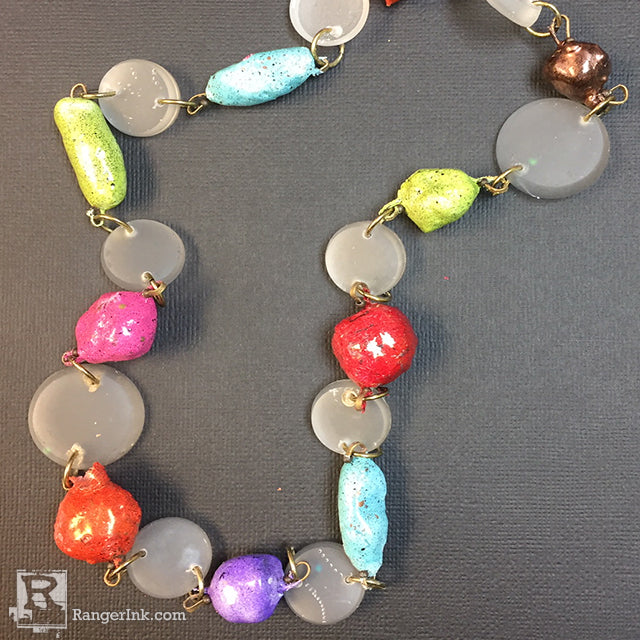
It's easy to create colorful enamel beads with QuickCure Clay & ICE Resin ICED Enamels! In this tutorial, Milagros shares how she combines these colorful clay beads with clear resin beads to create a stunning DIY Jewelry piece.
Enameled Quickcure Clay Bead Necklace
- Materials
- Instructions
- ICE Resin®
- ICE Resin® Jewelry Mold
- ICE Resin® ICED Enamels (pick your favorite!)
- ICE Resin® Findings: Jump Rings
- ICE Resin® Jewelry Wires
- QuickCure Clay
- Tim Holtz® Hand Drill
- Jewelry Pliers
Instructions
Summer is here and the vibrant tones have taken over! Here’s a fun way to incorporate the ICE Resin® Iced Enamels with QuickCure Clay. Let’s play.

Step 1: Making the ICE Resin® beads takes time, I chose to use the circles but I think it can work integrating the rectangles as well. Mix ICE Resin according to package instructions, pour into the ICE Resin® Jewelry Mold and allow to cure 8-12 hours.

Step 2: Once they’re done it’s time to put them together. You can use a dremmel or a hand drill to make the holes. Add an ICE Resin® Jump Ring to each ICE Resin® bead.

Step 3: For the clay beads have fun making cylinders, balls & squares. I work around an ICE Resin® Jewelry Wire.

Step 4: You can roll the clay into the Iced Enamels and then heat to cure the clay or you can heath the clay to cure first and then immediately cover them with the enamels. The heat from the clay is enough to melt the enamels without further heating!

Step 5: Rest the hot clay beads on ICE Resin Mixing Cups to cool.

Step 6: Putting it together is a breeze, just wrap the wires around the jump ring, it’ll be done in a cinch!


Related Posts

Stickles & Embossing Powder Christmas Card by Miriam Prantner
This adorable snowman card by Miriam Prantner is packed with festive charm! Created with the Tim Holtz Sizzix Winston...
Read More
Dylusions DIY Christmas Gift Wrap & Tags by Jess Peters
Dress up your holiday gifts with this Dylusions DIY Christmas Gift Wrap & Tags by Jess Peters! Using Dylusions...
Read More