


By Jenn Shurkus
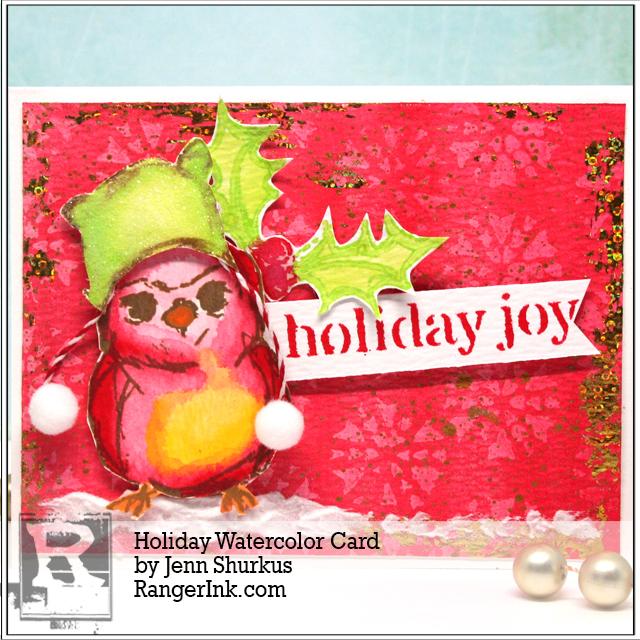
Holiday Watercolor Card By Jenn Shurkus
- Materials
- Instructions
- Ranger Wonder Tape™
- Ranger Shiny Foil Sheets: Holiday
- Ranger Glossy Accents™
- Tim Holtz Distress® Sprayer
- Tim Holtz Distress® Splatter Brush
- Ranger Non-Stick Craft Sheet™
- Ranger Heat it™ Craft Tool
- Tim Holtz Distress® Stickles™ Dry Glitter
- Ranger Texture Paste
- Dina Wakley Media Palette Knife
- Dina Wakley Media Brushes
- Dina Wakley Media Heavy Body Acrylic Paints: Ruby, Lemon, Lime, Gilt
- Archival Ink™ Wendy Vecchi Designer Series: Potting Soil
- Tim Holtz Distress® Watercolor Cardstock
- Pom Poms, Bakers Twine
Instructions

Hello Everyone! It’s Jenn Shurkus again from Shurkus.com. I am wicked excited to be sharing on the Ranger Blog again!
Today I am sharing with you a holiday card where we will play with watercoloring using Dina Wakley Media Heavy Body Acrylic Paints. Yep! You can watercolor with them too! I also love the new Hollday Set with her stamps and a stencil- this will make creating this card super easy since everything we will need (focal image, background and sentiment) are included in this set!
I hope this will inspire you to create some extra special holiday cards this season!
Let’s get started with today’s card!
 Step 1: Start by squeezing out some Ruby and Lemon paint onto the Ranger Non-Stick Craft Sheet. I then spritzed it with water. I stamped the bird image on Distress Watercolor Cardstock with Archival Ink.
 Step 2: Using a very watery brush and picking up the Ruby paint from the heavy watered down parts, start to paint in your bird. I am leaving his belly open for Lemon paint later.
 Step 3: Then pick up some of the Ruby paint from the less “watery” areas so you get more of the acrylic paint on your brush.
 Step 4: Paint in the shadowed areas of the bird.
 Step 5: Using a wet brush with no paint on it, blend between the shadows and the lighter areas. I then heat set the bird before moving onto another color.
 Step 6: To color in the belly of the bird, follow the same steps with Lemon paint. With a very “watery” brush, pick up color from the most “watery” area on your palette. Fill in the whole belly.
 Step 7: Then pick up some of the Lemon paint from the less “watery” areas. So you get more of the acrylic paint on your brush.
 Step 8: Using a wet brush with no paint on it, blend between the shadows and the lighter areas. Heat set the bird.
 Step 9: Mix together some orange paint. More Lemon than Ruby will do the trick. Color in the birds beak and feet. Set your bird aside.
 Step 10: To create the background of the card I cut a piece of Distress Watercolor Cardstock to be 4”x 5.25”. I started by stenciling the snowflakes from the stencil in the Holiday Set using Gel Medium. You don’t need a lot of medium on your brush as you don’t want it to seep under the stencil. Also, stiff bristles are best for this to pounce the medium over the stencil. I love Dina’s brushes for this technique! Once you have the whole background covered, set that aside to dry.
 Step 11: To create the sentiment for the card, stencil the words with Ruby paint on Distress Watercolor Cardstock. Again, less paint is best for this and a stiff brush.
 Step 12: Cut down the sentiment with a paper trimmer. Approx .75” x 4”. I left space to the right of the sentiment as this will tuck under the bird. I also left space to the right of the sentiment so I can cut it into a flag.
 Step 13: Once your background is dry, do a wet wash of Ruby paint over the whole background.
 Step 14: You can see the Gel Medium resists the paint revealing the pretty snowflake background.
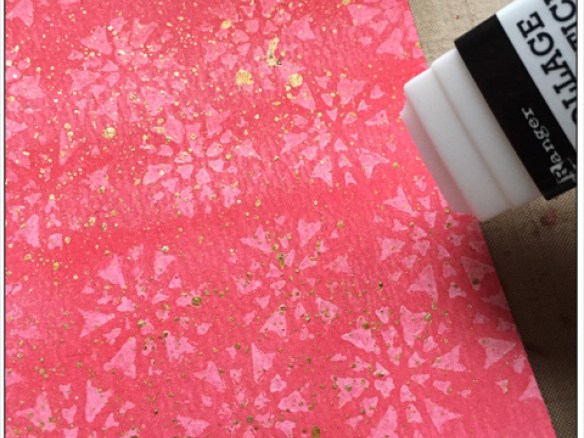
 Step 15: Next, using watered down Gilt paint (which is the best gold paint ever and the Tim Holtz Distress Splatter Brush, I splattered gold paint over the whole background. I quickly heat set the background.
Note: be sure you are wearing your “painty” clothes for this. Trust me.
 Step 16: Using the Collage Glue Stick rub it on the sides of your background. I would work in small sections for this part.
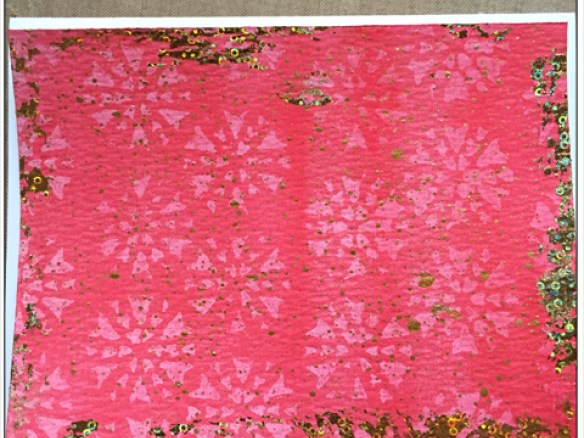 Step 17: Rub the foils over where you just glued. I found rubbing hard with your finger is best, and you can always pick up the foil, place it back down and rub again. Repeat Step 16 and Step 17 until you have as much gold on the edges as you would like.
 Step 18: Using the Holly Stamp from the set I dabbed paint directly onto the stamp. I did the Lime first, then Ruby.
 Step 19: Stamp the Holly on Distress Watercolor Cardstock.
 Step 20: Using a wet brush, paint in the Holly with a little of the Lime paint. Fussy cut it out.
Step 21: I picked one of the winter hats, stamped it in Archival Ink and painted that in as well. I fussy cut it out. I also adhered the background with flat adhesive onto a white card base. Using foam tape, I popped up the bird and sentiment. I also adhered the Holly tucking it into the bird and sentiment with flat adhesive.
 Step 22: As you can see in this image, I used some Wonder Tape to hold down the bakers twine. I used foam adhesive just on the top of the hat, so that it will layer onto the bird correctly.
 Step 23: Adhere the hat on the bird and figure out where you want the pom-poms to lie. Tack the bakers twine down with little pieces of Wonder Tape.
 Step 24: Using a generous amount of Glossy Accents, adhere the pom-poms at the end of the bakers twine.
 Step 25: Spread a little bit of Texture Paste along the ground, under the bird.
 Step 26: Sprinkle a little bit of Distress Rock Candy Dry Glitter to give it some sparkle.
 Step 27: I also put Glossy Accents all over the hat and sprinkled some Distress Rock Candy Dry Glitter.


Related Posts

Archival Ink Mother's Day Card by Lauren Bergold
With Mother's Day just around the corner, it's time to go above and beyond for the special women in our...
Read More
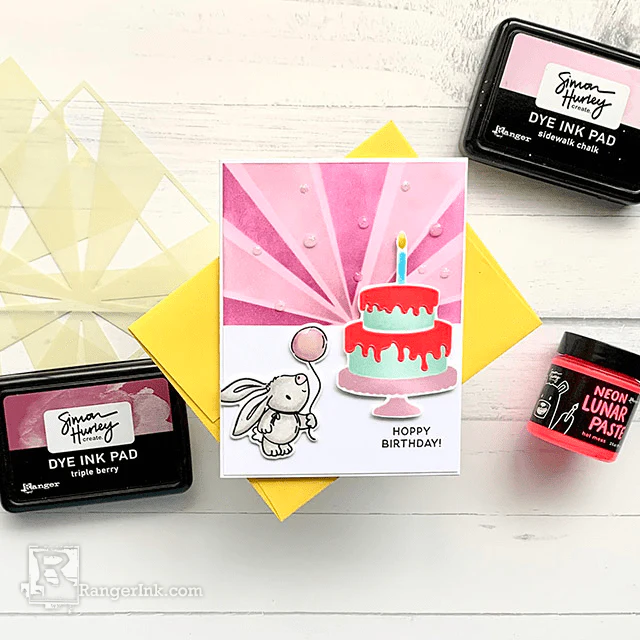
Simon Hurley create. A Very Hoppy Birthday Card by Lieschen Harshbarger
Hop into birthday fun with this adorable card tutorial by Lieschen Harshbarger! Using the new vibrant Simon Hurley create....
Read More