


Hello! I’m Samantha, known as Scarlyton in the art community, and I’m back to share a new project with you. I’ll be using a 9”x12” Media Board from Dina Wakley’s collection. If you’ve been wanting to experiment with the boards, here’s your chance!

Leafy Cascade by Samantha “Scarlyton” Carlton
- Materials
- Instructions
- Dina Wakely Media Board : 9
- Dina Wakley Media Stencils & Masks : Shape Mashup, Big Leafy
- Dina Wakley Media Scribble Sticks : Magenta
- Dina Wakley Media Heavy Body Acrylic Paints : Ocean, Lemon, Magenta, Turquoise, Black
- Dina Wakley Media Brushes
- Dylusions Paint Pens : White Linen, Black Marble
- Ranger Mini Blending Tool with Foam
- Tim Holtz® Distress Sprayer
- Fude Ball Pen : Black
- Ranger Collage Glue Stick
- Pattern Tissue Paper
- Stabilo All Purpose Pencil
Instructions

Step 1: Apply a thin layer of Lemon onto an unprimed board (you could use gesso if you’d prefer). I spritzed a small amount of water to thin the paint for a more translucent look. After the Lemon dried for a couple of minutes, I applied Magenta on top. The colors mixed and created a lovely coral color. If you want your paint colors to be more vibrant, skip the water and allow the first layer to dry completely.

Step 2: Lay the Big Leafy stencil over the dry paint and apply using Turquois and the Blending Tool. I seldom apply the entire stencil because I like the disjointed and inconsistent look. You do you.
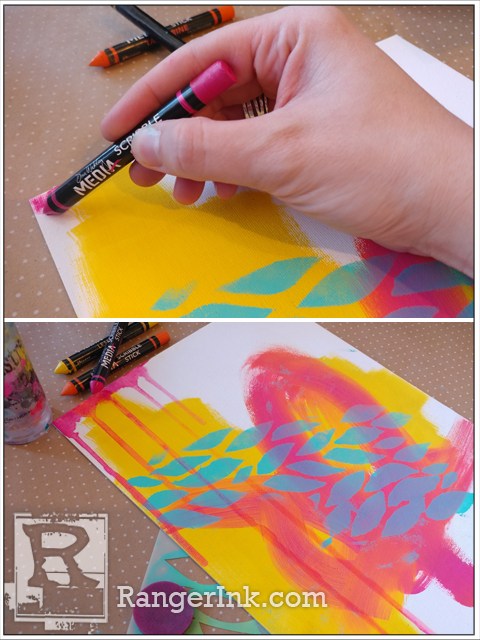
Step 3: Using the Magenta Scribble Stick, dip it in water and apply to the top of the board. Lay down your preferred amount of color; I wanted my pigment to be bright so I applied a heavy layer (this will also help when it’s time for the drip effect). After scribbling I used the Distress Sprayer to create drippage. I usually hold the board at a slight angle to apply water and establish a route for the liquid, then hold the board parallel to my body to get those luscious drips. Keep the board flat while it dries. After the drips dry, use Turquois with a fine tipped applicator or use the 1-ounce bottle (the fine tip is conveniently built in!) to outline the leaves from the stencil.

Step 4: Drips aren’t the only messy effect I appreciate in a mixed media piece; splatters are near and dear to my heart as well. Start by making a wash with water and Black paint. I usually use a ratio of 2:1 with water being the greater of the two. Mix and dip a dry brush in the solution. Carefully hold the wet brush over the area you want to cover and use another brush to gently tap the wet brush. This is not an exact process and your mileage may vary. Embrace the mess, folks! I also used a Stabilo to scribble along the edge of the board. I used a fine-tipped brush dipped in water to trace my scribbles and give them a pop.

Step 5: Grab a sheet of acid free white paper and apply a thin layer of Ocean. Next, trace the leaves from the Organic Shapes mask set and cut them out. Apply the Shape Mashup stencil over the leaves and apply the squares using Turquois and Blending Tool. To create more color cohesion, I drew a scribbly circle with Lemon on tissue paper. Paste the leaves and tissue paper on the board. I didn’t apply glue on all the leaves because I wanted some of them to be three-dimensional.

Step 6: Use your finger, dipped into Magenta, to add dots to the board. I only did a few but you can make as many as you’d like. Because I can’t leave things alone and always need MORE, I scribbled circles around the Magenta dots using a Fudeball pen. If you don’t own this pen yet, make it a priority to change that. Finally, I added white dots inside the Turquois leaves for texture and interest.

And there you have it! I appreciate this opportunity to work with you in creating something beautiful. Remember, you should always create your version of these things because you, friend, are creative and capable.

Related Posts

"My Cup of Care" Journal Page with Dylusions Pastel Paints by Miranda van den Bosch
Read More

Tim Holtz Distress® Micro Glaze Embossing Resist by Tami Bastiaans
Create gorgeous embossed backgrounds with the Micro Glaze Embossing Resist technique! ✨ Tami Bastiaans pairs Tim Holtz Distress® Micro...
Read MoreDrawer Title
- Choosing a selection results in a full page refresh.