


By Anita Houston
Melt Art Christmas Panels
- Materials
- Instructions
- Ranger Non-Stick Craft Sheet™
- Tim Holtz Distress® Stickles™ Dry Glitter
- Archival Ink™ #0 Pads: Jet Black
- Tim Holtz® Distress™ Markers: Black Soot
- Ranger Glossy Accents™
- Tim Holtz® Distress Ink Pads: Tea Dye, Black Soot
- Ranger Ink Blending Tool & Foam
- Tonic Studios Tim Holtz Kushgrip Non-Stick Micro Serrated Scissors
- Stamper
- Tim Holtz Alterations by Sizzix: 3D Star Bright Bigz Die
- Tim Holtz Idea-ology: Shabby Accoutrements, Merriment Christmas Paper Stash
- Tim Holtz District Market: 6x8 Burlap Panels
- Dreamweaver Wendy Vecchi Studio 490 Embossing Paste: White
- Jute String
- Christmas Ribbon
- Faux Holly Leaves and Berries
Instructions
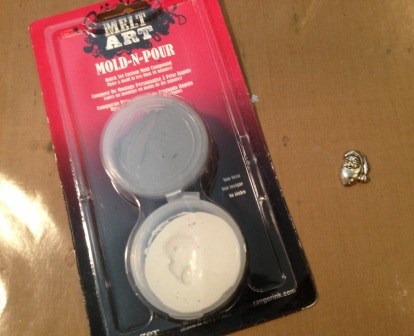
(Picture 001) 1. Mix and knead the gray and white parts of the Mold-n-Pour thoroughly until it is completely melded together. Working quickly, form it into a ball and flatten it somewhat on a Craft Sheet, and push the object you wish to mold into the center of it until it’s flush with the sides of the compound, but make sure not to push it all the way to the bottom. I used a Santa charm that had broken off from an old Christmas bracelet.

2. Wait about 10 to 15 minutes for the mold to set and then carefully remove your object. The mold is now ready to go, and can be used an unlimited amount of times.

3. Turn the Melting Pot up to the highest setting, lay the pot shaped craft sheet into it, and then evenly pour Clear Ultra Thick Embossing Enamel (UTEE) into the pot up to the fill line. Cover the pot until the UTEE is completely melted. Gather all of your materials and have them ready as you will need to work as fast as you can, and diecut two of the larger sized Star Bright stars with the Manila Cardstock.
Note: The Melting Pot is extremely hot, as is the liquid inside it. Take great care and caution when working with it, have ample room, and make sure the cord is out of the way.

4. Pinch a bit of the Seafoam Embossing Powder and sprinkle it over the melted UTEE. It will bubble up some, and you can gently use the spatula to mix it a bit, but you still want to see swirls. Carefully and slowly pour the hot mixture into your mold, stopping right when it is flush with the mold.

5. Wait about a minute or two, and gently pop the mold out. Repeat the pouring to make more if desired. If there are any that don’t turn out like you want, simply drop them back into the Melting Pot and it will melt again. These can be used in so many ways as embellishments or even jewelry pieces.
Note: The hot mixture might have started to turn an amber color by now and that is okay. If you need to add more UTEE to have enough for the next part, add more to the line and melt it down. The same goes for each step after this.

6. Ink the Santa stamp with Jet Black Archival and have it ready, as you need to work quickly. Pour the UTEE directly onto the Craft Sheet, either about the same size as the stamp, or in various sizes. Quickly lay the stamp face down onto the poured liquid, and press down slightly making sure the stamp is level on all sides.

7. After about a minute or so gently remove the stamp. If you want to trim it with scissors do so now while it is still warm, or the piece will shatter once it is cooled and completely set. Do not add any scrap pieces back into the Melting Pot if Archival Ink is on them, just discard them. If the piece breaks for some reason, use a little Glossy Accents to adhere it back. You can use this as an embellishment now, or make a canvas just as I did.

8. Sprinkle a good pinch of the Platinum UTEE evenly into the pot, but do not stir it with the spatula as you’ll want a lot of marbling. Using one of the Star Bright die cuts, cut off one of the points of the star, and then cut that in half long ways. This will only be a pattern for you and nothing else.
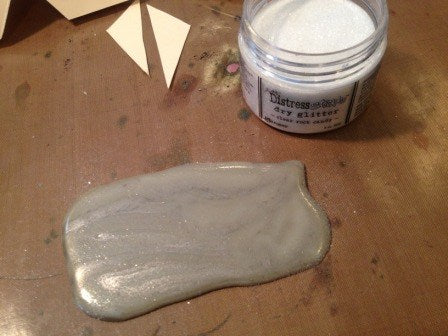
9. Pour the liquid directly onto the Craft Sheet at about the size of a playing card, and about 1/4 inch thick. Quickly sprinkle a little Rock Candy Distress Stickles Dry Glitter onto the mound. The cooling process will keep the glitter in place.

10. Wait about a minute and then lightly touch the mound to see if it stiff enough and cool enough to handle. If so, use the two cut pieces of the Star Bright point as patterns and cut two each of both parts from it. Be careful not to bend the pieces, or they will set up that way. Lay them back down and lightly flatten. Let these completely cool, and add the scrap pieces back into the Melting Pot.

11. Use the spatula to make sure the liquid is totally molten and ready to go. Squeeze one or two drops of Heat It Ink in the Melting Pot near the edge of the pour spout. Do not mix this with the spatula. It will bubble and make swirls.

12. Pour some of the liquid onto the Craft Sheet, making it about the size of a playing card again. Sprinkle with the Dry Glitter or use mica or another chunky glitter. Repeat the process of checking for heat, stiffness, and cutting two pieces of each of the patterns after about a minute, as well as an additional two diamond shaped pieces the same size as each other. Do not add the scrap pieces back into the Melting Pot. Pour out any liquid that has any of the Heat It Ink onto the Craft Sheet, and use more Archival inked stamps to stamp into the liquid to make more embellishments. I was able to make three: Believe, Happy Holidays, and 25. Remove the stamps after two minutes.

13. There shouldn’t be much left in the pot now, and that is okay as you will use the rest of it up in this last part, but you might need to add more UTEE. If there is any Heat It Ink left in the pot, just give it a stir to mix it in well, as it’s probably not enough to really alter the color much. Add a pinch of the Gold UTEE to the pot, and do not mix it up.

14. Pour the remainder of the liquid onto the craft sheet, and sprinkle on a pinch of Green Embossing Tinsel. Repeat what you did on step 12 after a minute, checking for heat, stiffness, and cutting two pieces of each of the patterns, as well as two diamond shaped pieces the same size as each other. If you don’t have enough to cut a second diamond, then one is enough. Turn off your Melting Pot, and clean it up while it is warm to make the job easier.

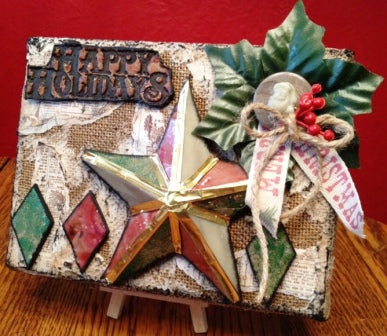
15. Get the second die cut of the Star Bright, and fold it up the way it is supposed to go. Using Glossy Accents adhere the Star Bright points onto it, alternating colors. You have 12 pieces and only need ten, so you can play with the pattern and sizes. To add more sturdiness to the Star, you can add a back piece to it by just adhered it to Manila and then cutting it out. Cut strips of Memory Foil Tape, and attach them from one end of a fold line to the opposite end, pressing gently as you go to stay on the line between the point pieces. Wrap the extra length around the back of the Manila. They should now look like a stained glass star, which you can use as an ornament or embellishment as I did on a canvas.
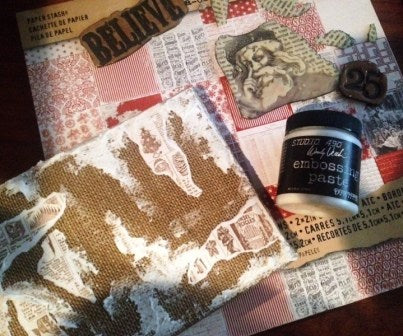
16. To make the project as I have, adhere torn Christmas paper from the Merriment Stack in random places to two 6×8 inch Burlap Canvases. Add White Embossing Paste around all the edges of the paper, and anywhere else you’d like. Let this dry, and then ink over the surface with Tea Dye Distress Ink and a Blending Tool. Add Black Soot Distress Ink to only the raised portions of the canvases by just laying the ink pad directly on and swiping it over everything. Give this a quick dry. Use an Adirondack Pitch Black Paint Dabber to coat the edges of all the stamped pieces, as well as the Star Bright piece, and let them dry. Adhere the molded pieces onto larger Accoutrement buttons. Adhere all the Melt Art pieces onto the canvases, and adorn with holly, ribbon, and the buttons using the Glossy Accents.


Related Posts

Tim Holtz Distress Mini Oxides Christmas Wreath Card by Dominique Bennani
Step into a Winter Wonderland with this charming Christmas wreath card created by Dominique Bennani using the latest...
Read More
49 and Market Mistletoe and Memories Journal Page by Jessica Mikels
Read More
Drawer Title
- Choosing a selection results in a full page refresh.