


It’s time to pull out that box of random tidbits, ribbons, and papers (you know the one!) because we’re making mixed media flags. I’m going to show you how I created these chunky flags using up some of my old supplies, along with many of Ranger’s goodies.
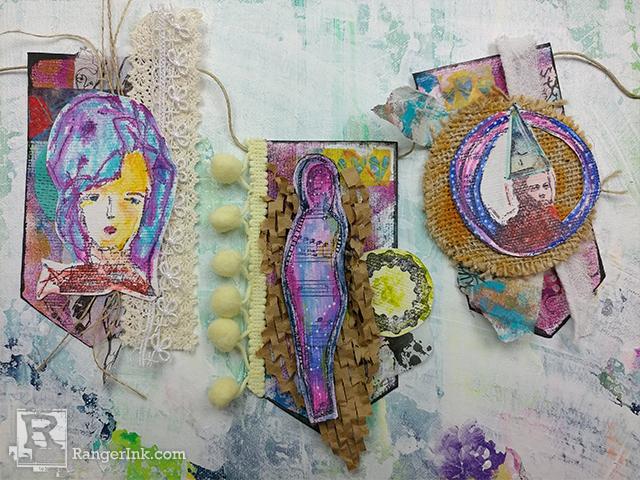
Mixed Media Flags by Samantha “Scarlyton” Carlton
- Materials
- Instructions
- Dina Wakley Media Surface Packs: Watercolor Paper
- Dina Wakley Media Washi Tape
- Dina Wakley Media Stamps: Scribbly Circles Background, Abstract Figures, Interesting Faces, Weird is Good, Woodcuts, Funky Journal Shapes
- Dina Wakley Media Journals: Burlap
- Dina Wakley Media Stencils & Masks: Scales, Linking Pattern, Cellular, Funky Masks
- Dina Wakley Media Collage Papers
- Dina Wakley Media Scribble Sticks
- Dina Wakley Media Acrylic Paints: Eggplant, Peacock, Lime, Cheddar
- Dina Wakley Media Mediums and Gessoes: Gel Medium, Ultra Thick Gel Medium
- Gel Plates
- Gel Plate Printing Brayers: Small
- Archival Ink™ #0 Pads: Jet Black, Vibrant Fuchsia
- Ranger Ink Blending Tool & Foam
- Ranger Collage Glue Stick
- Ranger Non-Stick Craft Sheet™
- Fude Ball Pen
- Tim Holtz Distress® Sprayer
- Tim Holtz® Waterbrush
- Tim Holtz Distress® Crayons: Picket Fence
- Tim Holtz by Tonic Studios Kushgrip Snips
- Muslin Ribbon
- Lace Ribbon
- Packing Paper
- Hand Dyed Gauze
- Underpaper
- Twine
- Fringe
- Hot Glue Gun
- White Pitt Pen
- Paint Chip (selected for the shape)
Instructions

Step 1: Start by grabbing two sheets of Dina Wakley’s watercolor paper, scissors, a pen, paint chip, ink pad, and stamps (check the supplies listed to see what I used). On one sheet, select your favorite large stamps from Dina’s collection and press them on the page. Trace your paint chip on the second paper and cut them out. These shapes will be your flags. You can use any shape you desire. Next you’ll use your Gel Plate to add a painted background to the flags. Use the colors, texture combs, and stencils you prefer. Note: I apologize for skipping how I used the Gel Plate but that’s a tutorial all in itself. Dina Wakley has some great videos on how to use the plate to create amazing prints.

Step 2: After the paint dried, I added more layers with paint (Peacock and Lime), masks (Funky Journal Masks), and stencils (Scales). I also used the Scribbly Circles clear stamp to add texture and black ink. Revisiting the stamps I previously applied to watercolor paper, I used Scribble Sticks to color all my stamped images. You can use the Scribble Sticks as they are or you can take advantage of their water solubility and paint with them, which is what I did. The wet colors blend so nicely and can be muted by dabbing a dry paper towel on the wet pigment.

Step 3: Once you’re happy with your paint/stencil/stamp layering, add your tidbits. I made small collages on each flag using paper, dyed gauze, patterned tissue paper, underpaper, burlap, and fringe ribbon. I didn’t have a plan for these, I just started intuitively layering my goodies. The burlap circle was cut from one of the burlap pages in the Dina Wakley Media Journal. I glued it using the Ultra Thick Gel and added the Cellular stencil with Cheddar paint directly on top of the burlap. There really isn’t a way to mess this up so let your creative intuition be your guide!

Step 4: The key to making these chunky flags is layering. After adding all the paint, stencils, scribbles, collage, and ribbon, I added my stamped images as a final layer. I also added washi tape so it would peek through the layers in a subtle manner. Finally, I took a black Scribble Stick dipped in water and rubbed it along the edges of each flag. This adds dimension and a grungy look.

Step 5: Once I determined the flags were complete, I used hot glue to adhere twine to the back of the flags. If I’m being honest, I didn’t want to dig out my sewing machine and all its parts. Would stitching the string to the flags add a cool new element? Absolutely. Did I feel like doing it? Nope. You do you!

I made these flags for fun but you can theme them if you’d like. Think “Happy Birthday”, “Bon Voyage”, or even your family name. Take time to nourish your creativity and feel free to share your work with me by tagging me on Instagram @scarlyton!

Related Posts

Tim Holtz Distress Mini Oxides Christmas Wreath Card by Dominique Bennani
Step into a Winter Wonderland with this charming Christmas wreath card created by Dominique Bennani using the latest...
Read More
49 and Market Mistletoe and Memories Journal Page by Jessica Mikels
Read More
Drawer Title
- Choosing a selection results in a full page refresh.