


Hi, Everyone, Bobbi here! I’m so happy to be with you on the Ranger Blog today! I’ll be creating this special Mini Framed Panel just for Mom!
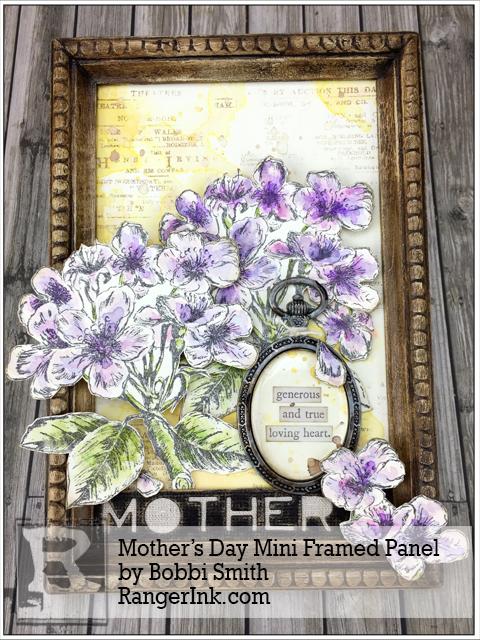
Mother’s Day Mini Framed Panel by Bobbi Smith
- Materials
- Instructions
- Tim Holtz Distress Oxide Ink Pads : Fossilized Amber, Walnut Stain,
- Tim Holtz® Distress Ink Pads : Walnut Stain
- Tim Holtz® Distress Mixed Media Archival Ink Palette : Black Soot
- Tim Holtz® DIY – Distress It Yourself Ink Pad
- Tim Holtz® Distress Markers : Milled Lavender, Shaded Lilac, Seedless Preserves, Wilted Violet, Dusty Concord, Bundled Sage, Mowed Lawn, Peeled Paint
- Tim Holtz® Distress Paint : Antique Linen, Iced Spruce, Ground Espresso,
- Tim Holtz® Alcohol Inks : Mushroom
- Ranger Ink Blending Tool & Foam
- Ranger Heat it™ Craft Tool
- Tim Holtz® Distress Splatter Brush
- Tim Holtz® Waterbrush : Detailer Brush
- Tim Holtz® Distress Collage Mediums : Crazing
- Tim Holtz® Distress Collage Brushes : Small Brush
- Tim Holtz® Distress Sprayer
- Ranger Paper Creasers
- Ranger Glossy Accents™
- Ranger Adhesive Foam Rolls : Black
- Dina Wakley Media Brushes
- Tim Holtz Tonic Kushgrip Snips
- Tim Holtz Kraft-Core #24 Black Cardstock
- Tim Holtz Craft Thread
- Tim Holtz Idea-ology: Sanding Grip, Watch Cameo, Clippings Stickers, Textile Surfaces
- Tim Holtz by Stampers Anonymous Illustrated Garden CMS295, Newsprint & Type Stamp CMS266
- Tim Holtz Alterations by Sizzix Sentiment Words 661807
Instructions

Step 1: Working on a Non-Stick Craft Sheet, apply Antique Linen Distress Paint to the mini frame with a paint brush. Use the Heat It Tool on frame, to speed up the drying process. Apply Distress Crazing sporadically to dried frame with Distress Collage Brush, set aside and let air dry.

Step 2: To really bring out those great little cracks, apply Ground Espresso Distress Ink with a paint brush to mini frame. While paint it still wet, spray a clean towel with water to dampen, then wipe off excess Ground Espresso Distress Paint. This will give more of a glazed looked and sink down into the cracks. Then dry with a Heat It Tool.

Step 3: Paint the back and sides of mini panel with Ground Espresso Distress Paint using a paint brush to give it a finished look. Then dry with the Heat It Tool.

Step 4: Add Distress Oxide Fossilized Amber to the Non-Stick Craft Sheet. Spray droplets of water onto the ink using a Distress Spray bottle. Press the sheet of Distress Mixed Media Heavystock on the ink, picking up the color. While the Distress Mixed Media Heavystock is still wet, slowly pull the trigger of the Distress Sprayer to add larger water droplets. Then dry with Heat It Tool. To add more distress, pick up droplets of color off the Non-Stick Craft Sheet with the Distress Watercolor Cardstock, blotting to pick up the color (not swiping), then drying with Heat It Tool.

Step 5: Using the Stampers Anonymous Newsprint Stamp and Walnut Stain Distressed Oxide Ink, stamp the image onto a scratch piece of paper. There is still a lot of ink on the Newsprint Stamp so we are going to stamp that 2nd image without reinking. It’s called 2nd generation stamping. Gently lay the colored Distress Mixed Media Heavystock paper on top of the inked stamp and apply very little pressure sporadically over the surface of the stamp. Very carefully lift the Distress Mixed Media Heavystock paper off of the stamp and dry with the Heat It Tool. Not all of the stamped image will transfer to the paper and it gives it a lovely vintage distressed appearance.

Step 6: Add splatters for additional interest using Distress Oxide Walnut Stain with water droplets and the splatter brush to Distress Mixed Media Heavystock. Then dry with Heat It Tool.

Step 7: To further activate the oxide affect in the Distress Oxide Inks, slowly pull the trigger of the Distress Sprayer to add larger water droplets. Then dry with Heat It Tool.

Step 8: Using Stampers Anonymous Illustrated Garden CMS295. Stamp 3 of the same floral images onto Distress Mixed Media Heavystock with Black Soot Distress Archival Ink. Then dry with the Heat It Tool. I chose Milled Lavender, Shaded Lilac, Dusty Concord, Seedless Preserves and Wilted Violet Distress Markers to paint the blooms. Then I chose Bundled Sage, Mowed Lawn and Peeled Paint Distress Markers to paint the stems and leaves.

Step 9: Scribble a little of the Distress Marker onto the Non-Stick Craft Sheet. Then pick up the color with a Detailed Waterbrush and paint the stamped image. Always start with the lightest color first, then medium shade and dark last. I used very little of the Wilted Violet because it is such a strong, bright, powerful color. Stop between each shade and dry with Heat It Tool. I like the separation of color it gives.

Step 10: I did the same with coloring the stem and leaves. Start with lightest color to darkest. Scribble a little of the Distress Marker onto the Non-Stick Craft Sheet. Then pick up the color with a Detailed Waterbrush and paint the stamped image. I used very little of the Mowed Lawn because it is such a strong, bright, powerful color. Stop between each shade and dry with Heat It Tool.
Step 10: I did the same with coloring the stem and leaves. Start with lightest color to darkest. Scribble a little of the Distress Marker onto the Non-Stick Craft Sheet. Then pick up the color with a Detailed Waterbrush and paint the stamped image. I used very little of the Mowed Lawn because it is such a strong, bright, powerful color. Stop between each shade and dry with Heat It Tool.

Step 11: After the flowers have all been colored, cut out with scissors or craft knife.

Step 12: Cut a small strip of black Kraft Core cardstock. Die cut the word “Mother” using the Tim Holtz Sizzix Sentiment Words 661807. The die spells out the word “Mother’s” but the ‘s can stay intact with tape on the back of the cardstock. It will be covered up with a bloom with the finished project.
After die cutting “Mother” and cardstock on a scrap piece of paper to expose underlying kraft core. Cut a small strip of linen from the Textile Surfaces to use as the backing, adhere to cardstock with Glossy Accents.
Step 13: Apply a little Iced Spruce Distress Paint to the watch cameo using your finger. Then dry paint with Heat It Tool. Apply some Mushroom Alcohol Ink using Ranger Alcohol Ink Blending Tool with felt to watch cameo, in a pouncing motion to metal.

Step 14: Cut an oval to fit inside watch cameo from Distress Mixed Media Heavystock. Chose a quote from Clipping Stickers. Cut Clipping Sticker to fit in oval. Shade with Walnut Stain Distress Ink and Blending Tool with Foam. Adhere oval to Watch Cameo with a little Glossy Accents. Then attach clear oval sticker over the insert.

Step 15: Tie a little Craft Thread to neck of watch cameo.

Step 16: Trim down stamped newsprint to 4 3/8 x 6 3/8. Adhere to panel with Glossy Accents. Adhere “Mother” cut out to bottom left (making sure the wording is as far left as possible) with Glossy Accents. Attach 2 of the flowers with black Adhesive Foam Tape. Only placing the adhesive foam on upper bloom portions (not stem and leaves).

Step 17: Apply a little Glossy Accents to back of stems and leaves to hold in place. Attach the watch cameo with black adhesive foam. Cut a few small blooms and petals from 3 flower with scissors or craft knife. Adhere additional blooms with a little Glossy Accents.

Close ups of where the additional blooms were placed.

I do hope you give this sweet little floral Mother’s Day Mini Framed Panel a try.

Related Posts

Simon Hurley create. Easter Card by Lieschen Harshbarger
Hop into spring with this adorable Easter card tutorial by Lieschen Harshbarger! Follow along as she uses the latest...
Read More
Distress Thanksgiving Leaves Place Cards by Cheiron Brandon
Set a stylish and rustic tone for your Thanksgiving feast with these beautiful Distress Thanksgiving Leaves Place Cards...
Read More