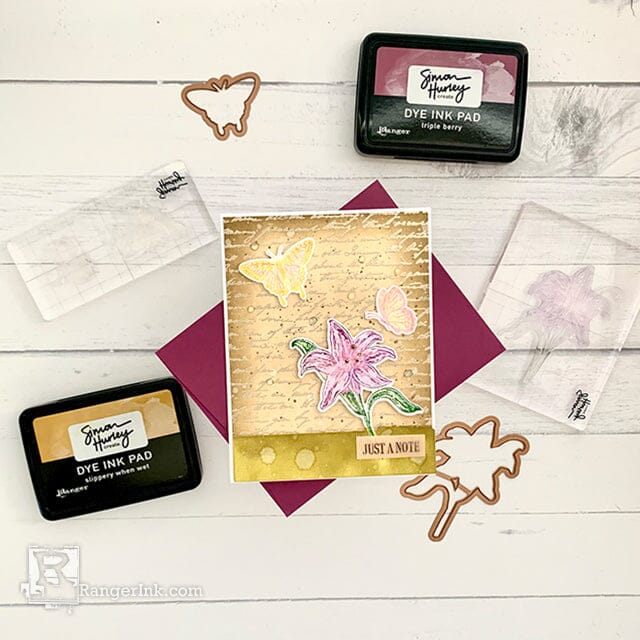
Gift a touch of vintage elegance with Lieschen Harshbarger's latest creation. Using Simon Hurley create. stamps and dye ink pads, she crafts intricate details and timeless beauty into every corner of this enchanting card!

Simon Hurley create. Vintage Themed Card by Lieschen Harshbarger
- Materials
- Instructions
Simon Hurley create. Background Stamp Handwritten
Simon Hurley create. Dye Ink Pad Cookie Dough
Simon Hurley create. Dye Ink Pad Grrr!
Simon Hurley create. Dye Ink Pad Weeping Willow
Simon Hurley create. Dye Ink Pad Fake Plant
Simon Hurley create. Dye Ink Pad Triple Berry
Simon Hurley create. Dye Ink Pad Crown Me
Simon Hurley create. Dye Ink Pad Viper
Simon Hurley create. Dye Ink Pad Slippery When Wet
Simon Hurley create. Dye Ink Pad Rosy Cheeks
Simon Hurley create. Stark White Cardstock
Simon Hurley create. Acrylic Stamping Blocks
Wendy Vecchi MAKE ART Perfect Card Adhesive
Stickles™ Glitter Glue Sunflower
Ranger Heat It™ Craft Tool
Ranger Glossy Accents
Ranger Artist Brushes
Ranger Anti-Static Pouch
Ranger Silicone Mat
Ranger Mini Ink Blending Tool
Ranger Mini Ink Blending Tool Domed Replacement Foams
Ranger Detail Blending Tool
Emboss It™ Ink Pad Clear
Embossing Powder Liquid Platinum
Embossing Powder Clear
Tim Holtz Distress Sprayer
Tim Holtz Distress Medium Brayer
Tim Holtz Distress® Pencils Set 2
Tim Holtz® Tools by Tonic Studios – Trimmer
Other:
Scissors
Foam Adhesive
Die Cutting Machine
Scor board
Envelope
Low Back Tape
Hello crafty friends! Today I’m sharing a card tutorial featuring the new Handwritten background stamp and the Beautiful Blooms bundle from Simon Hurley’s latest release. I usually don’t do many vintage theme projects, but I couldn’t help doing it for this card - especially using the Handwritten background stamp. I enjoyed making this card, and I hope it gives you inspiration to do something fun and creative today!

Step 1: Begin by creating an A2 card base out of Stark White Cardstock. Cut the 8½ x 11 card stock down to 4¼ x 11. Then score it at 5½. Cut another piece measuring 4 x 5¼ to be your front panel.

Step 2: On the front panel piece stamp the Handwritten image using the Emboss It Clear pad. Then, place the card stock onto the stamp and apply pressure using the brayer. Next, heat emboss using Liquid Platinum embossing powder.

Step 3: After the background has been heat embossed, ink blend it with Cookie Dough first, then use Grrr! around the edges.

Step 4: Once the background is complete, spray some water using the distress sprayer. Then, splatter some Weeping Willow ink using a brush. Next, glue the front panel piece onto the A2 card base.

Step 5: On a separate piece of card stock, stamp one of the floral images from the Beautiful Blooms stamp set. Use Fake Plant to ink the stem and leaves. Then, use Triple Berry and Crown Me ink to ink the flower. You can use the detail blending tool to apply ink onto the stamp.

Step 6: After stamping, color the image using Seedless Preserves and Twisted Citron Distress Watercolor Pencils.

Step 7: Using the coordinating die for the floral image, do partial die cutting to only die cut part of the flower. Then, use scissors to trim off the rest of the card stock to fit the front panel piece.

Step 8: Once the partial die cut is done, it leaves a hill-like shape with the flower on it. Ink blend the “hill” using Viper ink.

Step 9: On a separate piece of card stock, stamp two of the butterflies from the Beautiful Blooms stamp set using Slippery When Wet and Rosy Cheeks inks. Then, color the images using Fossilized Amber, Seedless Preserves, and Vintage Photo Distress Watercolor Pencils.

Step 10: Next, die cut the butterflies using the coordinating dies from the Beautiful Bloom set.

Step 11: Apply foam adhesive to the partial die cut from step 7. Then, tape it to the front panel piece.

Step 12: Glue the butterflies onto the front panel piece.

Step 13: Stamp a sentiment from the Beautiful Blooms set on a piece of card stock using Weeping Willow. Then, heat emboss with clear embossing powder. Next, trim the piece and ink blend the background with Cookie Dough. Now, glue the sentiment to the partial die cut.

Step14: Add glossy accents to the background and a few Sunflower Stickles on the middle of the flower.

Step 15: Pair the card with a matching envelope and it is ready to be sent to a loved one!


 Hi! My name is Lieschen Harshbarger. I’m married to my best friend and even though we don’t have children yet, our dog Sophie fills our hearts with lots of love and joy. By day, I work for the State of Texas, but during my evenings and weekends you’ll find me in my craft room – making cards and trying out new techniques with my crafty supplies. I enjoy being creative, but mostly I have enjoyed getting to know others and learning fun new things in this wonderful crafty industry! You can see more of my crafty projects on my blog
