


Embrace winter's enchantment with this stunning, sparkly thank you card crafted by Lieschen Harshbarger! Using Simon Hurley create. Dye Inks, Stamps, and Dies, she adds the perfect touch of magic. Gratitude sparkles brighter in the season of snowflakes!
Simon Hurley create. Winter Thank You Card by Lieschen Harshbarger
- Materials
- Instructions
Simon Hurley create. Background Stamp Stitched Snowflakes
Simon Hurley create. Photopolymer Stamp Watercolor Flowers
Simon Hurley create. Spellbinders Watercolor Flowers Die
Simon Hurley create. Spellbinders Stained Glass Window Die
Simon Hurley create. Dye Ink Pad No Diving
Simon Hurley create. Dye Ink Pad Remember Me
Simon Hurley create. Dye Ink Pad Clear Skies
Simon Hurley create. Stark White Cardstock
Simon Hurley create. Acrylic Stamping Blocks
Wendy Vecchi MAKE ART Perfect Card Adhesive
Ranger Heat It™ Craft Tool
Ranger Anti-Static Pouch
Ranger Silicone Mat
Ranger Mini Ink Blending Tool
Ranger Mini Ink Blending Tool Domed Replacement Foams
Emboss It™ Ink Pad Clear
Embossing Powder Super Fine White
Stickles™ Glitter Glue Stardust
Tim Holtz Idea-ology Kraft-Stock Sparkle Classic
Tim Holtz® Tools by Tonic Studios – Trimmer
Other:
Foam Adhesive
Die Cutting Machine
Scor board
Envelope
Low Back Tape
Instructions
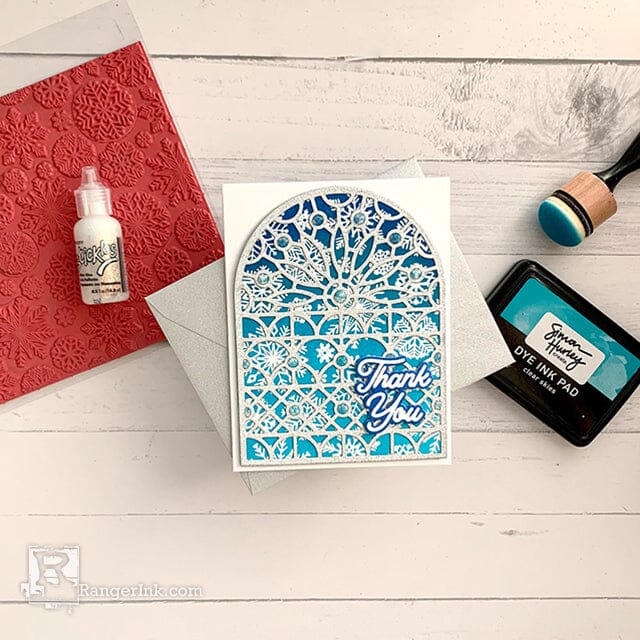
Hi crafty friends! I hope you had a wonderful Holiday Season and an amazing New Year’s Eve. Today I’m sharing a simple card tutorial featuring the Stitched Snowflakes background stamp and Spellbinders Stained Glass Window dies from Simon Hurley. This winter themed thank you card is very easy to make so that it can be sent to a loved one. I really enjoyed making this card, and I hope it gives you inspiration to do something fun and creative today!

Step 1: Begin by gathering the supplies to make the background for the card: No Diving, Remember Me, and Clear Skies Inks, Stitched Snowflakes Background Stamp, Spellbinders Stained Glass Window Dies, and Tim Holtz Idea-ology Kraft-Stock Sparkle Classic card stock.

Step 2: On a piece of Stark White card stock, stamp the Stitched Snowflakes image using the Emboss It Clear pad. Then, heat emboss using white embossing powder.

Step 3: After the background has been heat embossed, ink blend it with No Diving, Remember Me, and Clear Skies Inks using the Mini Ink Blending tool.

Step 4: Once the background is complete, use the arch die from the Stained Glass Window set and run it through a die cut machine to produce a die cut. Then, add more ink around the edges as needed.

Step 5: Next, use both dies from the Stained Glass Window to get the intricate die cut out of Tim Holtz Idea-ology Kraft-Stock Sparkle Classic card stock.

Step 6: Glue the intricate die cut over the snowflake background using Wendy Vecchi MAKE ART Perfect Card Adhesive.

Step 7: Add foam adhesive to the back of the arch die cut.

Step 8: On a separate piece of Stark White card stock, stamp the thank you sentiment from the Watercolor Flowers stamp set. Then, heat emboss using white embossing powder. Next, ink-blend the sentiment with No Diving Ink.

Step 9: Use a die cutting machine to die cut the sentiment using the coordinating dies from the Watercolor Flowers set. Die cut two more times and glue them together to add dimension.

Step 10: Next, glue the sentiment onto the arch background, tape the arch background to an A2 card base, and add some Star Dust Stickles to the background.

Step 11: Once the Stickles dots have dried, pair the card to a complimentary envelope. Now it’s ready to be sent to a loved one!
 Hi! My name is Lieschen Harshbarger. I’m married to my best friend and even though we don’t have children yet, our dog Sophie fills our hearts with lots of love and joy. By day, I work for the State of Texas, but during my evenings and weekends you’ll find me in my craft room – making cards and trying out new techniques with my crafty supplies. I enjoy being creative, but mostly I have enjoyed getting to know others and learning fun new things in this wonderful crafty industry! You can see more of my crafty projects on my blog Harshgurl and Instagram at @harshgurl.
 Related Posts

Make-It™ You're The Zest Card by Miriam Prantner
Bright, bold, and full of summer vibes! Miriam Prantner created this cheerful citrus-inspired card using the Make-It Fun with Fruit...
Read More
Dylusions Neon Ink Sprays Journal Page by Miranda van den Bosch
Neon color takes center stage on this eye-catching journal page by Miranda van den Bosch! The newest...
Read More