


by Audrey Pettit

So Lucky Altered Frame by Audrey Pettit
- Materials
- Instructions
- Tim Holtz® Waterbrush
- Ranger Heat it™ Craft Tool
- Ranger Non-Stick Craft Sheet™
- Ranger Mini Blending Tool
- Ranger Multi-Medium Matte
- Tim Holtz Distress® Sprayer
- Tim Holtz® Distress Spray Stain: Tarnished Brass
- Tim Holtz® Distress Ink Pads: Lucky Clover, Cracked Pistachio, Twisted Citron
- Archival Ink™ Designer Series: Wendy Vecchi: Watering Can
- Archival Ink™ #0 Pad: Jet Black
- Ranger Watercolor Paper
- Tim Holtz idea-ology: Sanding Grip
- Tim Holtz Alterations by Sizzix: Heartfelt Bigz Die, Alphanumeric Thinlits Die Set, Handwritten Celebrate Thinlits Die Set; Framelits w/stamps: Love You
- Tim Holtz by Stampers Anonymous Stamps: Haberdashery, Reflections
- Tim Holtz by Stampers Anonymous Layering Stencils: Measured, Latticework
- Paper Piercer, Pencil, Twine, Floss, Buttons
Instructions

Add some festive flair to your home for St. Patrick’s Day with a seasonal altered frame project. These fun shamrocks are easily made using a good basic supply most of us already have in our stash…. a heart die set. In this case, the super versatile Heartfelt Bigz Die by Tim Holtz. And what better color for a little St. Patty’s project than some Lucky Clover Distress!

To begin, gather your supplies:
 Step 1: Remove the glass from an old desk frame, and paint the frame with Picket Fence Distress Paint. Allow the paint to dry, and then sand the frame using a sanding grip to remove portions of the paint for a shabby, distressed finish.
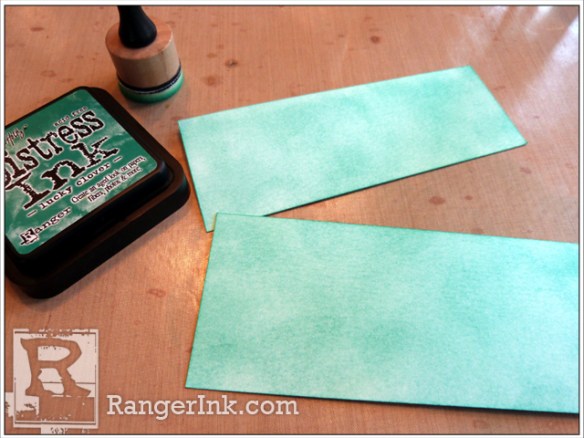
 Step 2: Cut a piece of Ranger Watercolor Paper to fit the inside of the frame opening. I had a fun long and skinny frame measuring approximately 10” x 3.5”. But you could use almost any shape and size for this project. Dab Lucky Clover, Cracked Pistachio, and Twisted Citron Distress Inks onto a Non-Stick Craft Sheet. Mist the ink with water from the Distress Sprayer, and then press and swipe the watercolor paper through the ink mixture. Dry the paper with a Heat Tool. Repeat the process, if desired.
 Step 3: Place the Latticework stencil over the inked watercolor paper, and apply Twisted Citron Distress Ink to a few areas of the paper using a Mini Ink Blending Tool. If the stencil isn’t big enough to cover the entire paper at once, simply move the stencil as you work. Set the stencil aside, without cleaning off the residual ink.
 Step 4: Now place the Measured stencil over the inked paper, and apply Lucky Clover Distress Ink to a few random areas using the Ink Blending Tool, avoiding the areas inked with the Latticework stencil. Set the stencil aside, without cleaning off the residual ink.
 Step 5: Spritz the paper with water using the Distress Sprayer, and allow the water to sit on the paper for about 30 seconds, before blotting it off with a clean paper towel. The water acts like a bleaching effect with Distress to create some cool water droplets.
 Step 6: Spray a small amount of Tarnished Brass Distress Spray Stain onto the Craft Sheet, and mix it with a small amount of water. Pick up the ink mixture with a wet paintbrush, and flick the ink onto the paper. You can also spray directly for a heavier application. Dry the paper with the Heat Tool.
 Step 7: Cut two pieces of watercolor paper that are large enough to die cut four medium-sized hearts from. Ink both pieces with Lucky Clover Distress Ink using the Ink Blending Tool.
 Step 8: Spray the inked side of the Latticework stencil liberally with water. Press the wet side of the stencil down onto one of the pieces of inked Lucky Clover paper.
 Step 9: Allow the stencil to sit for several seconds before removing. Check out the cool pattern that you get! Repeat the process with the Measured stencil on the second piece of inked paper. Allow the papers to dry, or speed up the process with the heat tool.
 Step 10: Now add random stamped images to both pieces of paper using a variety of text-print stamps in Watering Can Archival Ink, in both first and second generation stamping.
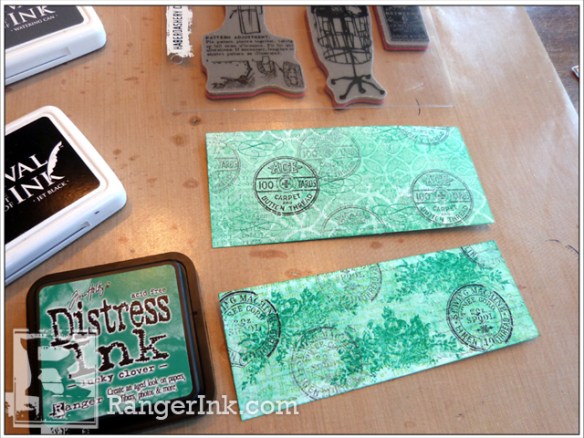 Step 11: Continue adding stamped images to the papers, using Jet Black Archival Ink in both first and second generation stamping, and Lucky Clover Distress Ink. I used different stamps on the different papers to create a unique collage-style finished product.
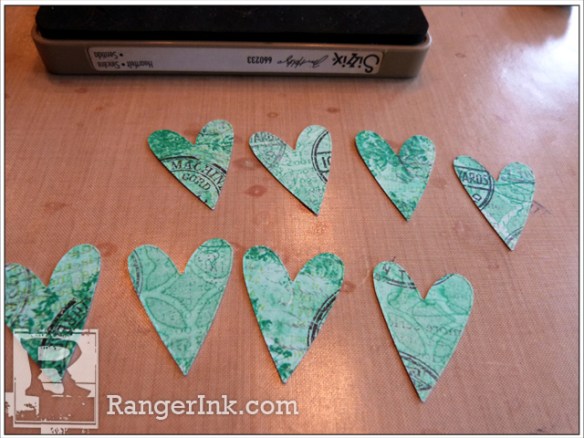 Step 12: Die cut four medium-sized hearts from each collaged paper using the Heartfelt Bigz die by Sizzix and Tim Holtz.
 Step 13: Draw two intersecting curved lines in pencil on the left side of the frame background piece. Poke holes evenly along both lines using a paper piercer. Erase the pencil lines, and then stitch the stems in using black embroidery floss.
 Step 14: Place the tips of each die cut heart between your thumb and finger, and gently curve the top of each heart upwards with your other hand. Watercolor paper tends to soften and curl easily as you work it. Just try not to crease the paper. Apply a dot of Multi Medium Matte at the tip of each heart, and adhere four hearts in a clover shape to the top of each stitched stem.
 Step 15: With the curving of the paper, it’s not even necessary to apply foam adhesive behind the petals. But you could, if you wish.
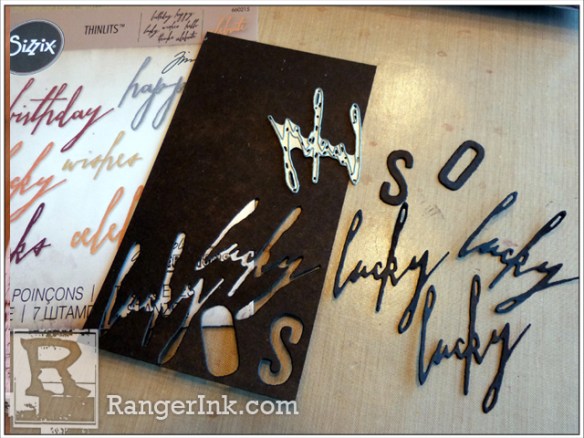 Step 16: Die cut the letters “S” and “O” from black cardstock using the Alphanumerics Thinlits die set. Die cut the word “lucky” from the Handwritten Celebrate Thinlits die set three times from the black cardstock. Adhere the three word die cuts together using Multi Medium Matte. This gives the word die cut the appearance of dimensional chipboard.
 Step 17: Adhere the die cuts to the right side of the frame using Multi Medium Matte.
 Dress up the centers of the shamrocks with twine bows and pearl buttons, adhered with Multi Medium Matte.
Love the dimension the curved petals give to the finished project. And love the fun collage look you get from mixing and matching different stamps, inks, and stencils. It’s a great way to stretch the use of your crafting supplies.
Enjoy!

